Ultimate Grilled Steak Cheese Sandwich Recipe
There is something deeply satisfying about biting into a hot, melty sandwich packed with juicy chicken, gooey cheese, and perfectly sautéed peppers and onions. The bread is crisp on the outside, soft inside, and every bite is loaded with savory flavor. This Ultimate Grilled Steak Cheese Sandwich Recipe (Juicy &Chicken) brings all of that comfort straight to your kitchen.
It feels like something you would order at your favorite sandwich shop, but trust me, you can absolutely make it at home. And once you do, you might not go back.
Why This Sandwich Deserves a Spot on Your Dinner Table
When you want something hearty, cheesy, and packed with flavor, this sandwich delivers in every single way. It has that classic grilled sandwich appeal, but with tender seasoned chicken instead of traditional beef.
The melted provolone stretches beautifully with each bite, the peppers add sweetness, and the onions bring depth. It is warm, filling, and incredibly satisfying. This one’s a total game-changer for easy lunches or quick dinners.
A Little History Behind Steak and Cheese Sandwiches
The classic steak and cheese sandwich traces back to American sandwich culture, especially in cities known for hearty street food and deli counters. Traditionally made with thinly sliced beef and melted cheese, it became a comfort food favorite thanks to its rich flavor and satisfying texture.
Over time, creative home cooks began swapping in chicken for a lighter twist. The result is just as juicy and flavorful, with a slightly leaner profile that still feels indulgent. And honestly, it holds up beautifully to all that melted cheese and sautéed goodness.
Now that you know the backstory, let’s talk about why this version works so well.
Why You Will Love Making This Again and Again
There are plenty of reasons this sandwich becomes a repeat favorite.
Versatile: You can adjust the vegetables, switch the cheese, or even add mushrooms for extra flavor.
Budget-Friendly: Chicken and basic vegetables keep it affordable while still tasting impressive.
Quick and Easy: From start to finish, it comes together in about 35 minutes.
Customizable: Add heat with chili flakes or keep it mild for the whole family.
Crowd-Pleasing: That melted cheese and toasted roll win everyone over.
Make-Ahead Friendly: You can prep the vegetables and slice the chicken ahead of time.
Great for Leftovers: The filling works beautifully in wraps or over rice the next day.
Pro Tips for That Perfect Juicy Bite
Before you start cooking, here are a few tips that make all the difference.
- Slice the chicken thinly against the grain for maximum tenderness.
- Cook the vegetables until soft but not mushy, you want a slight bite.
- Melt the cheese directly over the hot chicken so it gets perfectly gooey.
- Toast the rolls lightly so they stay sturdy but soft inside.
Let me tell you, these small steps are worth every bit of attention.
Essential Tools for Success
You do not need anything fancy, just a few basics.
Large Skillet: For cooking the chicken and vegetables evenly.
Sharp Knife: Makes slicing the chicken and vegetables easier and more precise.
Cutting Board: Keeps everything organized while prepping.
Spatula or Tongs: Helps flip and mix without breaking the chicken pieces.
Now let’s gather everything you need.
Ingredients You Will Need For This Grilled Chicken Cheese Sandwich
Each ingredient works together to build bold, balanced flavor.
- Boneless Skinless Chicken Breasts: 2 large pieces, about 1 pound total, thinly sliced. This forms the juicy base of the sandwich.
- Salt: 1 teaspoon. Enhances flavor.
- Black Pepper: 1/2 teaspoon. Adds gentle heat.
- Garlic Powder: 1 teaspoon. Brings savory depth.
- Olive Oil: 2 tablespoons, divided. Used for cooking both chicken and vegetables.
- Green Bell Pepper: 1 medium, thinly sliced. Adds sweetness and texture.
- Red Bell Pepper: 1 medium, thinly sliced. Adds color and mild sweetness.
- Yellow Onion: 1 medium, thinly sliced. Provides rich, caramelized flavor.
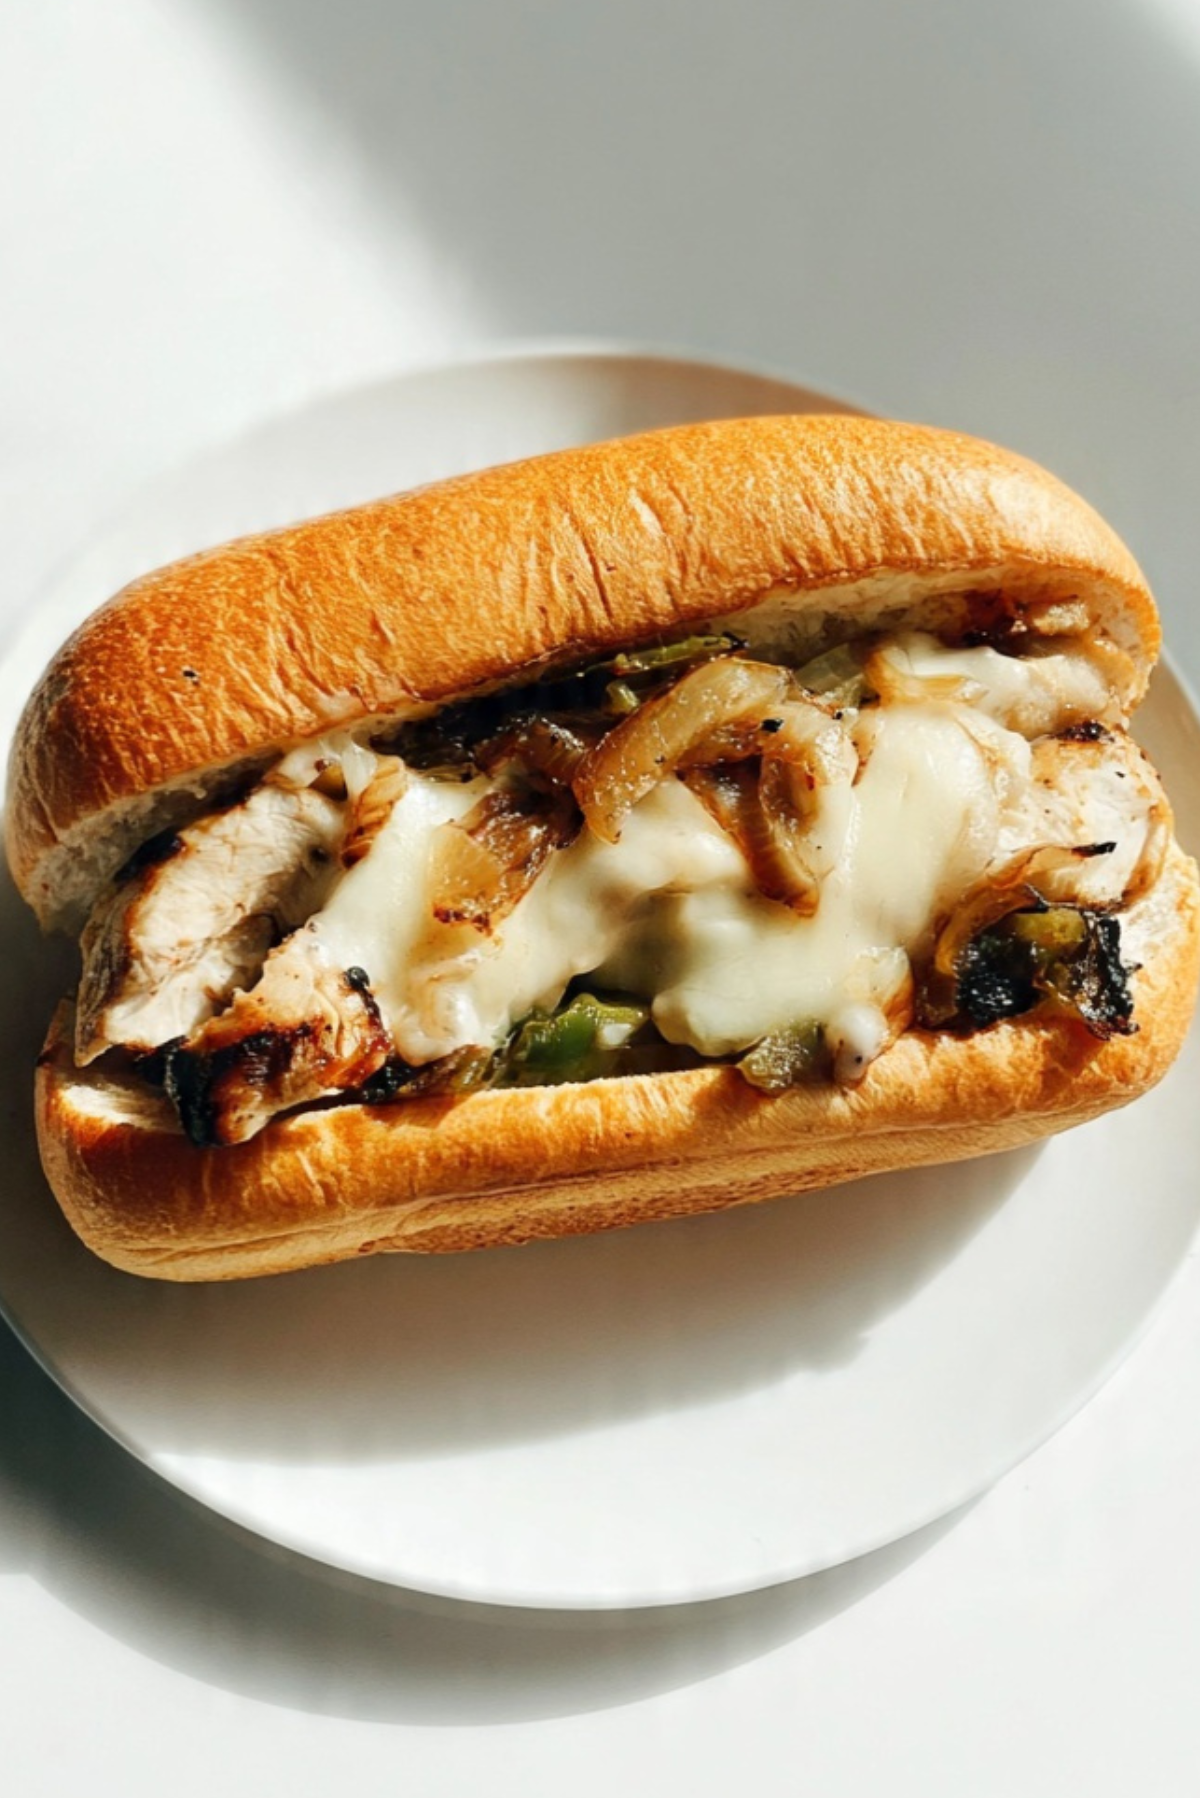
- Provolone Cheese Slices: 6 slices. Melts beautifully over the hot filling.
- Hoagie Rolls: 4 rolls. Soft inside, sturdy outside, perfect for holding the filling.
Easy Ingredient Swaps
You can easily adjust based on what you have.
Provolone Cheese: Swap with mozzarella or white cheddar.
Green and Red Bell Peppers: Use all one color if needed.
Hoagie Rolls: Substitute with sub rolls or even sturdy sandwich bread.
Olive Oil: Avocado oil works just as well.

The Ingredients That Make It Shine
Provolone Cheese: It melts smoothly and has a mild, creamy flavor that complements the chicken without overpowering it.
Bell Peppers: Their natural sweetness balances the savory chicken and cheese, adding both color and texture.
And now, let’s dive into the cooking process.
Let’s Bring This Sandwich to Life
Get ready, because this part is where the magic happens.
- Preheat Your Equipment: Heat a large skillet over medium heat for 3 to 4 minutes.
- Combine Ingredients: In a bowl, toss the sliced chicken with salt, black pepper, and garlic powder until evenly coated.
- Prepare Your Cooking Vessel: Add 1 tablespoon of olive oil to the skillet. Add the sliced peppers and onion. Cook for 5 to 7 minutes until softened and lightly golden. Remove and set aside.
- Assemble the Dish: Add the remaining 1 tablespoon olive oil to the skillet. Add the seasoned chicken and cook for 6 to 8 minutes, stirring occasionally, until fully cooked and lightly browned.
- Cook to Perfection: Return the vegetables to the skillet with the chicken and mix gently. Lay provolone slices over the hot mixture and cover the pan for 1 to 2 minutes until melted.
- Finishing Touches: Slice the hoagie rolls open and lightly toast them in a dry pan or oven for 2 to 3 minutes.
- Serve and Enjoy: Spoon the cheesy chicken and vegetable mixture into each roll. Serve hot and enjoy every gooey, savory bite.
Texture and Flavor That Truly Satisfy
The toasted roll gives a gentle crunch before giving way to soft, cheesy filling. The chicken is tender and juicy, coated in savory seasoning. The peppers add a slight sweetness, and the onion brings rich depth. Everything melts together in the most comforting way.
It is warm, cheesy, slightly sweet, and deeply savory all at once.
Helpful Cooking Tips and Tricks
To make sure it turns out perfect every time, keep these in mind.
- Slice everything evenly so it cooks at the same rate.
- Do not overcrowd the pan, cook in batches if needed.
- Cover the pan while melting the cheese to trap heat.
- Taste and adjust seasoning before assembling the sandwiches.
Common Mistakes and How to Avoid Them
Even simple sandwiches can go wrong without a little care.
- Overcooking the chicken, which makes it dry. Cook just until done.
- Skipping the toasting step, which helps prevent soggy bread.
- Using too much oil, which can make the filling greasy.
- Not seasoning enough, chicken needs proper seasoning for bold flavor.
Nutrition Facts at a Glance
Servings: 4
Calories per serving: 610
Note: These are approximate values.
Preparation Time Overview
Prep Time: 15 minutes
Cook Time: 20 minutes
Total Time: 35 minutes
Make-Ahead and Storage Tips
You can slice the vegetables and chicken a day ahead and store them separately in the fridge. Cooked filling can be stored in an airtight container for up to 3 days.
Reheat gently in a skillet until warmed through, then assemble with freshly toasted rolls. The filling can also be frozen for up to 2 months without the bread.
How to Serve This Hearty Sandwich
Serve it with crispy fries, a simple side salad, or even a bowl of soup for a comforting meal. It also works great for game nights or casual gatherings.
Creative Leftover Transformations
Leftover filling is amazing in wraps, quesadillas, or even spooned over baked potatoes. You can also toss it with pasta for a cheesy chicken skillet dinner.
Additional Tips for Extra Flavor
Add a pinch of chili flakes if you like heat. A squeeze of lemon over the filling brightens everything up. Fresh chopped parsley on top adds color and freshness.
Make It a Showstopper
Brush the rolls lightly with olive oil before toasting for extra golden color. Pile the filling high and let the melted cheese spill slightly over the edges for that irresistible look.
Variations to Try
- Add sautéed mushrooms for an earthy twist.
- Use pepper jack cheese for a spicy kick.
- Add a thin layer of mustard inside the roll for tang.
- Mix in a handful of spinach for extra greens.
- Turn it into sliders for party servings.
FAQ’s
Q1: Can I use chicken thighs instead?
Yes, boneless thighs work well and stay very juicy.
Q2: Can I grill the chicken instead of using a skillet?
Yes, grill and slice thinly before combining with vegetables.
Q3: How do I keep the sandwich from getting soggy?
Toast the rolls and avoid adding excess oil.
Q4: Can I prepare this ahead for guests?
Yes, keep the filling warm and assemble just before serving.
Q5: What cheese melts best?
Provolone and mozzarella both melt beautifully.
Q6: Can I make this dairy free?
Yes, skip the cheese or use a dairy free alternative.
Q7: How thin should I slice the chicken?
Thin strips cook quickly and stay tender.
Q8: Can I freeze the cooked filling?
Yes, freeze in an airtight container for up to 2 months.
Q9: Is this good for meal prep?
Absolutely, the filling reheats very well.
Q10: Can I add hot sauce?
Yes, drizzle it over the filling before serving.
Conclusion
This Ultimate Grilled Steak Cheese Sandwich Recipe (Juicy &Chicken) is everything you want in a hot, cheesy sandwich. It is comforting, flavorful, and surprisingly simple to make at home. Once you taste that tender chicken with melted provolone and sweet peppers tucked into a toasted roll, you will understand why it is such a favorite.
Trust me, you are going to come back to this one again and again.
PrintUltimate Grilled Steak Cheese Sandwich Recipe

Ultimate grilled chicken and cheese sandwich made with tender seasoned chicken, sautéed bell peppers and onions, and melted provolone tucked into a golden toasted hoagie roll. A hearty and satisfying meal perfect for lunch or dinner.
Ingredients
- 2 large boneless skinless chicken breasts, about 1 pound total, thinly sliced
- 1 teaspoon salt
- 1/2 teaspoon black pepper
- 1 teaspoon garlic powder
- 2 tablespoons olive oil, divided
- 1 medium green bell pepper, thinly sliced
- 1 medium red bell pepper, thinly sliced
- 1 medium yellow onion, thinly sliced
- 6 slices provolone cheese
- 4 hoagie rolls
Instructions
- Preheat a large skillet over medium heat for 3 to 4 minutes.
- In a bowl, toss the sliced chicken with salt, black pepper, and garlic powder until evenly coated.
- Add 1 tablespoon olive oil to the skillet. Add the sliced peppers and onion. Cook for 5 to 7 minutes until softened and lightly golden. Remove from skillet and set aside.
- Add the remaining 1 tablespoon olive oil to the skillet. Add the seasoned chicken and cook for 6 to 8 minutes, stirring occasionally, until fully cooked and lightly browned.
- Return the cooked vegetables to the skillet with the chicken and mix gently. Lay provolone slices over the hot mixture and cover the pan for 1 to 2 minutes until the cheese is melted.
- Slice the hoagie rolls open and lightly toast them in a dry pan or oven for 2 to 3 minutes until lightly crisp.
- Spoon the cheesy chicken and vegetable mixture evenly into each roll. Serve hot and enjoy.
Notes
- Slice the chicken thinly against the grain for extra tenderness.
- Do not overcrowd the pan to ensure proper browning.
- Cover the skillet while melting the cheese to help it melt evenly.
- Toast the rolls lightly to prevent sogginess.