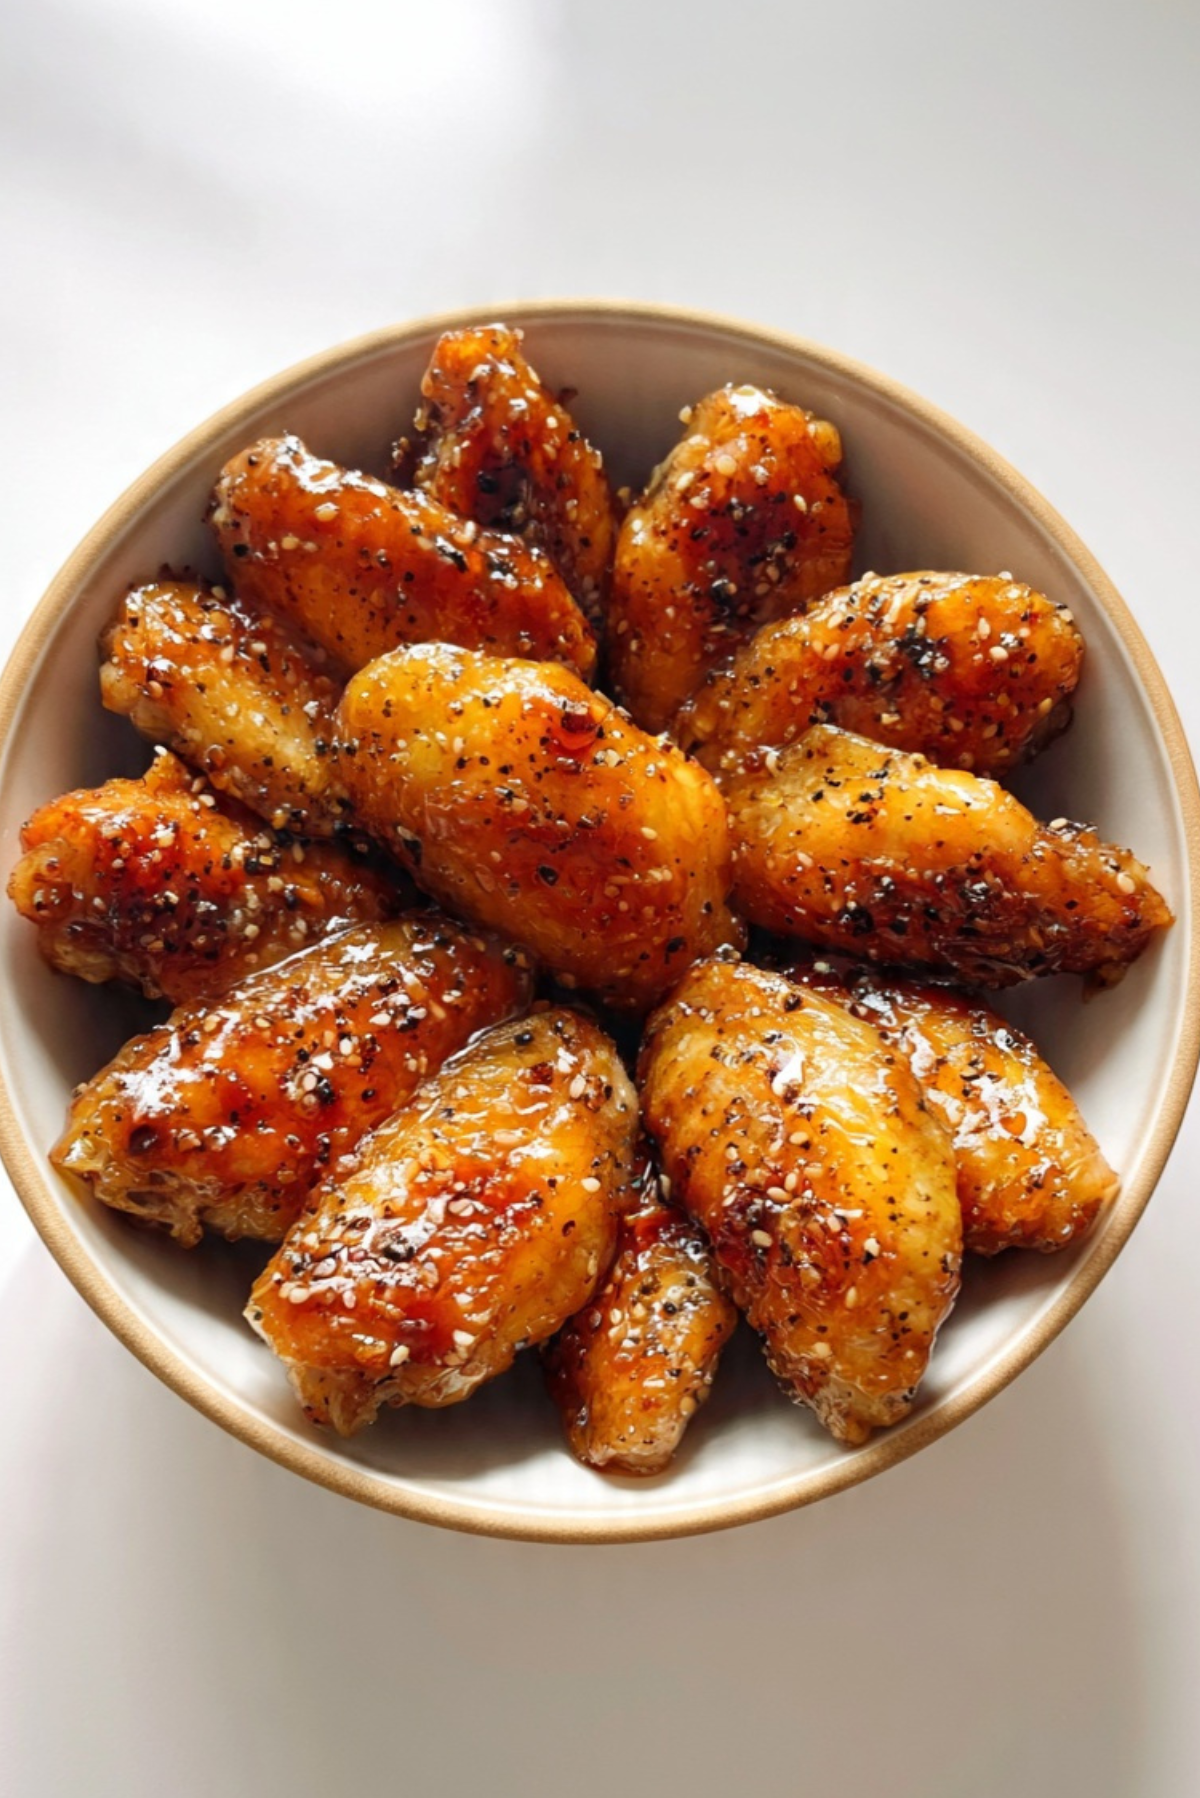
Honey Glazed Wings Recipe
There is something wildly satisfying about pulling a batch of golden, sticky wings out of the air fryer and hearing that faint crackle as the glaze settles. This Honey Glazed Wings Recipe, TikTok Style Air Fryer Dinner, is sweet, savory, and just a little addictive. The outside turns beautifully caramelized while the inside stays juicy and tender. Trust me, you’re going to love this.
It is the kind of dinner that feels fun and trendy, yet incredibly easy to pull off on a busy weeknight. And yes, it is absolutely worth every bite.
Why These Wings Are Blowing Up Everywhere
Scroll through TikTok for five minutes and you will see it, glossy wings, dramatic glaze drips, that crispy bite sound. But here is the thing, this is not just hype. The air fryer gives you that crispy texture without deep frying, and the honey glaze thickens into a shiny coating that clings to every curve of the wing.
The balance of sweet honey, savory soy sauce, and a touch of garlic creates layers of flavor that hit all at once. This one’s a total game changer for easy dinners at home.
The Sweet and Savory Story Behind Honey Glazed Wings
Glazed wings have long been a favorite in American comfort food culture, especially in game day spreads and casual family dinners. The idea of pairing sweet and savory flavors is rooted in many cuisines, from Asian inspired soy honey combinations to classic Southern style sticky wings.
The air fryer twist is the modern upgrade. It keeps things lighter, faster, and perfect for small kitchens without sacrificing that crisp exterior everyone loves.
Why This Recipe Works Every Single Time
Before we jump into the kitchen, let me tell you why this Honey Glazed Wings Recipe, TikTok Style Air Fryer Dinner, is such a reliable favorite.
Versatile: Serve them as a main dish, party appetizer, or late night snack.
Budget-Friendly: Chicken wings are affordable and use pantry staples for the glaze.
Quick and Easy: Minimal prep and about 25 minutes in the air fryer.
Customizable: Add chili flakes for heat or a splash of extra honey for more sweetness.
Crowd-Pleasing: Sticky, crispy wings are always a hit.
Make-Ahead Friendly: You can season the wings in advance and refrigerate.
Great for Leftovers: Reheat in the air fryer to bring back that crispiness.
Pro Tips for Ultra Crispy, Sticky Wings
Let dive into the details that make these wings next level.
- Pat the wings completely dry before seasoning to help them crisp up.
- Do not overcrowd the air fryer basket, cook in batches if needed.
- Brush the glaze on during the last few minutes to prevent burning.
- Let the wings rest for a few minutes after cooking so the glaze thickens slightly.
Kitchen Tools You Will Need
Keeping it simple makes this even more fun.
Air Fryer: The key to crispy skin without deep frying.
Mixing Bowl: For tossing wings with seasoning.
Small Saucepan: To gently simmer and thicken the honey glaze.
Tongs: For flipping and coating the wings evenly.
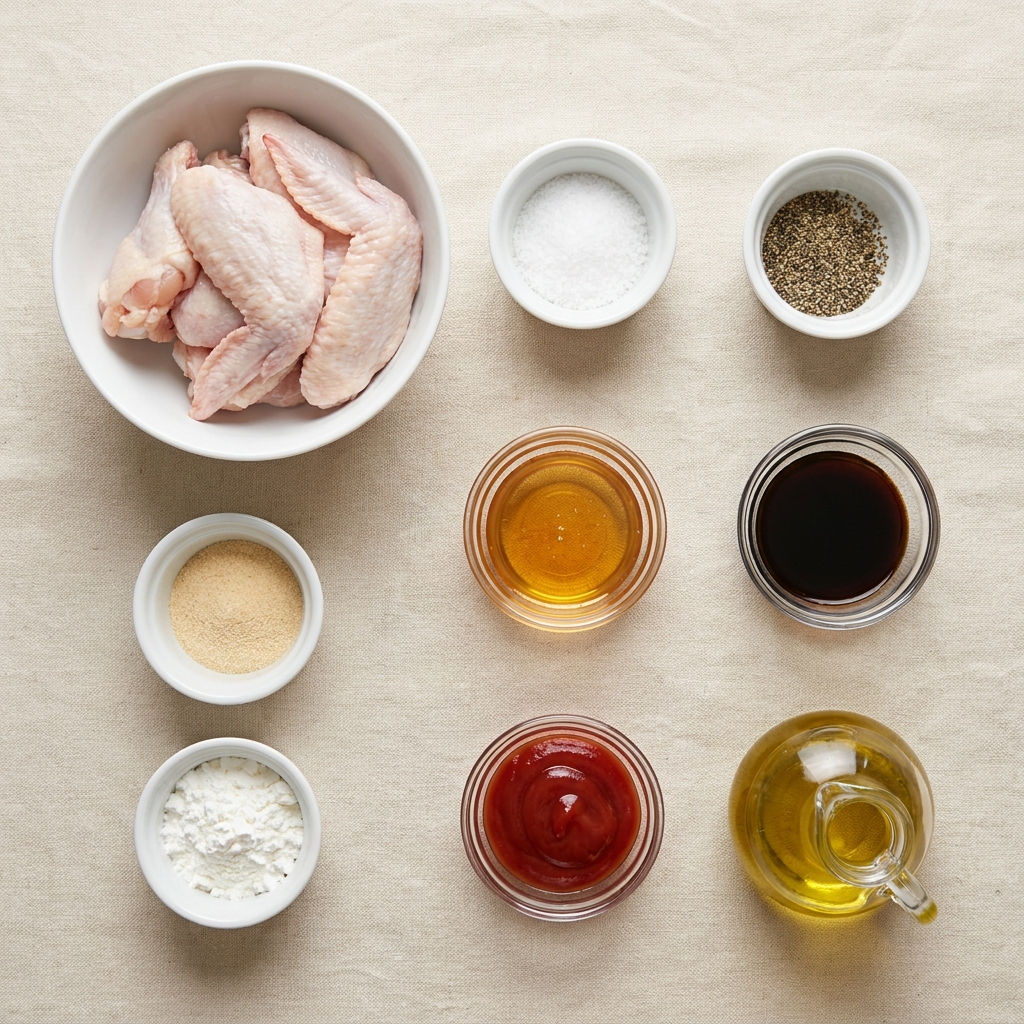
Ingredients You Will Need For These Sticky Wings
Each ingredient brings balance and depth to the final bite.
- Chicken Wings: 2 pounds, split into drumettes and flats, the juicy base of the dish.
- Salt: 1 teaspoon, enhances overall flavor.
- Black Pepper: ½ teaspoon, adds subtle heat.
- Garlic Powder: 1 teaspoon, gives savory depth.
- Honey: ½ cup, creates the sticky sweet glaze.
- Soy Sauce: 3 tablespoons, adds salty umami balance.
- Ketchup: 2 tablespoons, adds tang and body to the glaze.
- Olive Oil: 1 tablespoon, helps crisp the wings.
- Cornstarch: 1 tablespoon, lightly coats wings for extra crispiness.
Simple Swaps If Needed
Flexibility makes cooking less stressful.
Honey: Maple syrup can work for a slightly different sweetness.
Soy Sauce: Use low sodium soy sauce to reduce salt.
Garlic Powder: Substitute with 2 cloves minced fresh garlic.
Spotlight on the Key Ingredient
Honey: This is what transforms ordinary wings into glossy, sticky perfection. As it heats, it thickens and caramelizes, creating that irresistible coating.
Let’s Make These Wings
Now comes the best part, turning simple ingredients into something crave worthy.
- Preheat Your Equipment: Preheat your air fryer to 380°F for 5 minutes.
- Combine Ingredients: In a large bowl, toss the wings with salt, black pepper, garlic powder, olive oil, and cornstarch until evenly coated.
- Prepare Your Cooking Vessel: Lightly spray the air fryer basket with oil if needed.
- Assemble the Dish: Arrange the wings in a single layer in the air fryer basket without overlapping.
- Cook to Perfection: Air fry for 20 to 25 minutes, flipping halfway through, until the skin is crispy and golden brown.
- Finishing Touches: While the wings cook, simmer honey, soy sauce, and ketchup in a small saucepan over medium heat for 3 to 5 minutes until slightly thickened. Brush or toss the cooked wings in the warm glaze.
- Serve and Enjoy: Serve immediately while hot and sticky. Let me tell you, it is worth every bite.
Texture and Flavor That Hits All the Right Notes
The outside is crisp and lightly crackly, while the inside stays juicy and tender. The glaze clings in a shiny layer, sweet at first taste, then savory, with just a gentle peppery warmth at the end. It is sticky in the best way possible.
Extra Tips for Success
A few small adjustments can elevate your wings.
- Flip the wings halfway for even browning.
- Warm the glaze before tossing so it coats more smoothly.
- Serve immediately for maximum crispiness.
What to Avoid When Making These Wings
Mistakes happen, but they are easy to fix.
- Do not skip drying the wings, moisture prevents crisping.
- Avoid adding glaze too early, it can burn in the air fryer.
- Do not stack wings in the basket, airflow is key.
Nutrition Facts Overview
Servings: 4
Calories per serving: 420
Note: These are approximate values.
Time Breakdown
Prep Time: 10 minutes
Cook Time: 25 minutes
Total Time: 35 minutes
Make Ahead and Storage Tips
You can season the wings up to 24 hours in advance and store them covered in the refrigerator. Cooked wings keep well in the fridge for up to 3 days. Reheat in the air fryer at 350°F for 5 to 7 minutes to restore crispiness.
Freezing is possible, though the texture is best when fresh. If freezing, store without glaze and add fresh glaze after reheating.
How to Serve These Sticky Wings
Serve with celery sticks and a light yogurt based dip for contrast. They also pair beautifully with simple fries or a crisp green salad. For a fun dinner board, add extra napkins and let everyone dig in.
Creative Leftover Transformations
Shred leftover wings and toss into a wrap with lettuce. Chop and add to a rice bowl. Or pile them onto flatbread with sliced veggies for a quick lunch.
Additional Helpful Notes
Adjust sweetness by adding more or less honey to suit your taste. If you like heat, add a pinch of red pepper flakes to the glaze.
Make Them Look Irresistible
Pile the wings high in a bowl and brush with a final layer of warm glaze. A light sprinkle of sesame seeds or chopped green onions adds color and texture.
Flavor Variations to Try
- Add a teaspoon of chili paste to the glaze for spicy sweet wings.
- Mix in a splash of lemon juice for brightness.
- Add smoked paprika to the seasoning for a subtle smoky twist.
- Try a touch of ginger in the glaze for warmth.
FAQ’s
Q1: Can I use frozen wings?
Yes, thaw them completely and pat dry before seasoning.
Q2: How do I know when they are done?
The skin should be crispy and the internal temperature should reach 165°F.
Q3: Can I bake these instead?
Yes, bake at 400°F for 40 to 45 minutes, flipping halfway.
Q4: Can I double the glaze?
Absolutely, just simmer slightly longer if needed.
Q5: Are they very sweet?
They are balanced, but you can reduce honey slightly if preferred.
Q6: Can I make them spicy?
Yes, add chili flakes or hot sauce to the glaze.
Q7: Do I need to marinate them?
No, seasoning before cooking is enough.
Q8: What oil works best?
Olive oil or any neutral oil works well.
Q9: Can I prepare them ahead for a party?
Yes, cook and reheat in the air fryer just before serving.
Q10: How do I keep them crispy?
Do not sauce until right before serving.
Conclusion
This Honey Glazed Wings Recipe, TikTok Style Air Fryer Dinner, proves that you do not need complicated steps to create bold flavor. Crispy, sticky, sweet, and savory all at once, these wings bring serious excitement to your table. Once you try them, they might just become your new favorite weeknight dinner.
PrintHoney Glazed Wings Recipe
Crispy air fryer chicken wings coated in a glossy honey glaze that is sweet, savory, and slightly sticky. A quick TikTok style dinner that delivers bold flavor with minimal effort.
Ingredients
- 2 pounds chicken wings, split into drumettes and flats
- 1 teaspoon salt
- ½ teaspoon black pepper
- 1 teaspoon garlic powder
- ½ cup honey
- 3 tablespoons soy sauce
- 2 tablespoons ketchup
- 1 tablespoon olive oil
- 1 tablespoon cornstarch
Instructions
- Preheat the air fryer to 380°F for 5 minutes.
- In a large bowl, toss the chicken wings with salt, black pepper, garlic powder, olive oil, and cornstarch until evenly coated.
- Lightly spray the air fryer basket with oil if needed.
- Arrange the wings in a single layer in the basket without overlapping.
- Air fry for 20 to 25 minutes, flipping halfway through, until crispy and golden brown and the internal temperature reaches 165°F.
- While the wings cook, combine honey, soy sauce, and ketchup in a small saucepan and simmer over medium heat for 3 to 5 minutes until slightly thickened.
- Brush or toss the hot wings in the warm glaze until fully coated, then serve immediately.
Notes
- Pat the wings completely dry before seasoning to help them crisp up.
- Do not add the glaze before air frying, as it may burn.
- Reheat leftovers in the air fryer at 350°F for 5 to 7 minutes to restore crispiness.
- For extra heat, add a pinch of red pepper flakes to the glaze.