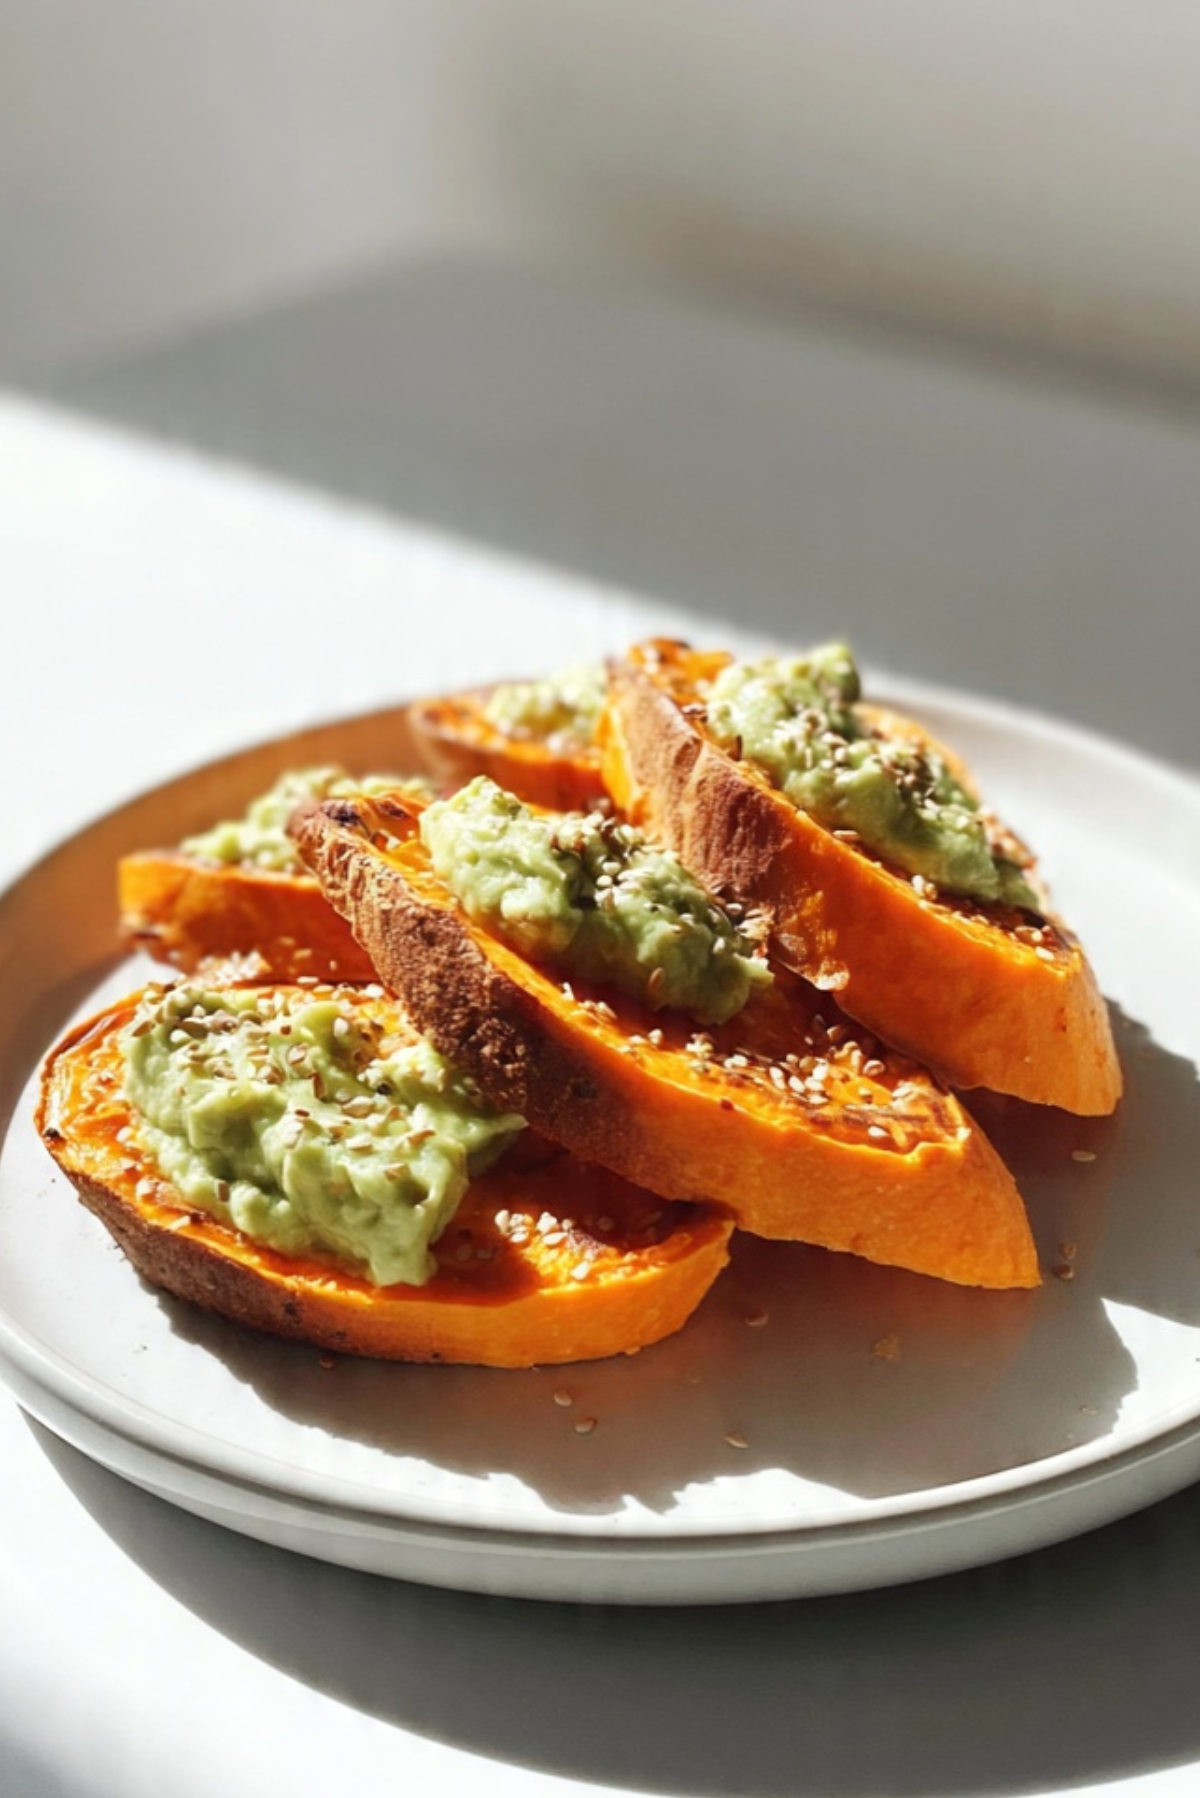
Sweet Potato Toast
Sweet Potato Toast is one of those recipes that feels almost too simple to be this good. The first time you pull those warm orange slices out of the oven, lightly crisped at the edges and tender in the center, you will understand the hype. They are naturally sweet, beautifully vibrant, and sturdy enough to hold all your favorite toppings. Trust me, you’re going to love this. It is wholesome, colorful, and surprisingly satisfying.
A Simple Idea That Changes Your Breakfast Game
At first glance, it is just sliced sweet potato baked until tender. But once you add creamy avocado, a sprinkle of seeds, or even nut butter and fruit, it transforms into something that feels creative and nourishing. The edges get lightly caramelized, the inside stays soft, and every bite has that perfect contrast of texture.
It is naturally gluten free, full of flavor, and adaptable for breakfast, lunch, or even a quick snack. This one’s a total game-changer when you want something fresh and filling without bread.
From Humble Root to Trendy Toast
Sweet potatoes have been enjoyed across many cultures for centuries. They are nutrient dense, naturally sweet, and incredibly versatile. In recent years, slicing and roasting them as a bread alternative became popular among those looking for creative and wholesome options.
What makes this concept so appealing is its simplicity. You take a basic ingredient that most of us already have at home and turn it into a beautiful base for endless toppings.
Why You Will Make This Again and Again
Before we start slicing, let me tell you why this recipe works so well.
Versatile: Top it with avocado, eggs, nut butter, yogurt, or fresh fruit.
Budget-Friendly: Sweet potatoes are affordable and easy to find year round.
Quick and Easy: Minimal prep and hands-off baking time.
Customizable: Sweet or savory toppings both work beautifully.
Crowd-Pleasing: It fits many dietary preferences and tastes.
Make-Ahead Friendly: Bake the slices ahead and reheat when needed.
Great for Leftovers: Store roasted slices and enjoy throughout the week.
Pro Tips for Perfect Slices
A few small details make all the difference.
- Slice evenly, about 1/4 inch thick, for consistent cooking.
- Use a sharp knife for clean, uniform cuts.
- Flip halfway through baking for even browning.
- Do not overcrowd the baking sheet.
Tools You Will Need
You do not need anything complicated.
Sharp Chef’s Knife: For slicing evenly.
Cutting Board: Stable surface for safe cutting.
Baking Sheet: For roasting the slices evenly.
Parchment Paper: Prevents sticking and makes cleanup easier.
Ingredients You Will Need For This Wholesome Base
The base is simple, and toppings bring personality.
- Large Sweet Potatoes: 2, sliced lengthwise into 1/4 inch thick pieces, the main structure.
- Olive Oil: 1 tablespoon, helps crisp the edges.
- Salt: 1/4 teaspoon, enhances natural sweetness.
- Avocado: 1 ripe, sliced, for creamy topping.
- Mixed Seeds: 1 tablespoon, such as sesame or pumpkin seeds, for crunch.
Flexible Ingredient Substitutions
You can easily switch things up.
Olive Oil: Avocado oil for a neutral flavor.
Avocado: Greek yogurt or hummus for a savory twist.
Mixed Seeds: Chopped nuts for added crunch.

The Stars of This Recipe
Some ingredients truly shine.
Sweet Potatoes: Their natural sugars caramelize slightly in the oven, creating subtle sweetness and crisp edges.
Avocado: Adds creamy richness that balances the warm base perfectly.
Let’s Get Cooking
Now let’s dive into turning simple slices into something special.
- Preheat Your Equipment: Preheat oven to 400°F and line a baking sheet with parchment paper.
- Combine Ingredients: Brush both sides of sweet potato slices lightly with olive oil and sprinkle with salt.
- Prepare Your Cooking Vessel: Arrange slices in a single layer on the baking sheet.
- Assemble the Dish: Ensure slices are spaced slightly apart for even roasting.
- Cook to Perfection: Bake for 20 to 25 minutes, flipping halfway, until tender and lightly browned.
- Finishing Touches: Remove from oven and allow to cool slightly.
- Serve and Enjoy: Top with avocado slices and sprinkle with mixed seeds before serving.
Texture and Flavor Development
As the slices roast, their edges become lightly crisp while the center stays tender and slightly creamy. The natural sweetness deepens, creating a perfect base for savory or sweet toppings. The creamy avocado and crunchy seeds create a satisfying contrast in every bite.
Helpful Cooking Tips
- Cut slices evenly to ensure consistent baking.
- Test doneness with a fork, it should slide in easily.
- Add toppings just before serving for best texture.
What to Avoid
- Cutting slices too thin, which may burn.
- Skipping oil, which helps with browning.
- Overcrowding the pan, which prevents crisp edges.
Nutrition Overview
Servings: 4
Calories per serving: 180
Note: These values are approximate.
Preparation Time
Prep Time: 10 minutes
Cook Time: 25 minutes
Total Time: 35 minutes
Make-Ahead and Storage Tips
Roast the slices ahead of time and store in an airtight container in the refrigerator for up to 4 days. Reheat in the oven or toaster oven to restore slight crispness. Freezing is not recommended as the texture may become watery.
How to Serve
Serve topped with mashed avocado and seeds for a savory option. For a sweet version, try almond butter and sliced banana. Pair with a smoothie or a simple side salad for a complete meal.
Creative Leftover Transformations
Chop leftover slices into cubes and toss into salads. Use as a base for mini breakfast stacks. Top with scrambled eggs for a hearty brunch plate.
Additional Tips
Add a pinch of chili flakes for heat. Sprinkle with fresh herbs for brightness. Experiment with both sweet and savory combinations.
Make It a Showstopper
Arrange slices neatly on a platter and layer toppings with care. A light drizzle of olive oil and a sprinkle of seeds right before serving adds visual appeal.
Variations to Try
- Top with cottage cheese and sliced tomatoes.
- Spread with nut butter and fresh berries.
- Add hummus and roasted vegetables.
- Sprinkle with cinnamon and a drizzle of honey.
FAQ’s
Q1: Can I toast them in a toaster?
Thin slices may work in a toaster, but oven baking is more reliable.
Q2: How do I know they are done?
They should be fork tender and lightly browned.
Q3: Can I peel the sweet potatoes?
Peeling is optional, just wash thoroughly if leaving skin on.
Q4: Are they gluten free?
Yes, naturally gluten free.
Q5: Can I use white sweet potatoes?
Yes, they work just as well.
Q6: Why are mine soggy?
They may be overcrowded or sliced too thick.
Q7: Can I air fry them?
Yes, cook at 375°F for about 10 to 15 minutes.
Q8: Can I make them sweet?
Absolutely, add fruit, nut butter, or a drizzle of honey.
Q9: How long do leftovers last?
Up to 4 days in the refrigerator.
Q10: Can I meal prep this?
Yes, roast ahead and add toppings fresh before serving.
Conclusion
Sweet Potato Toast proves that simple ingredients can create something fresh, colorful, and satisfying. With crisp edges, tender centers, and endless topping options, it fits into almost any meal of the day. Let me tell you, it’s worth every bite. Once you try it, you might just rethink what toast can be.
PrintSweet Potato Toast

Crispy roasted sweet potato slices topped with creamy avocado and crunchy seeds. This simple, wholesome alternative to traditional toast is naturally gluten free and perfect for breakfast, brunch, or a nourishing snack.
Ingredients
- 2 large sweet potatoes, sliced lengthwise into 1/4 inch thick pieces
- 1 tablespoon olive oil
- 1/4 teaspoon salt
- 1 ripe avocado, sliced
- 1 tablespoon mixed seeds
Instructions
- Preheat oven to 400°F and line a baking sheet with parchment paper.
- Brush both sides of the sweet potato slices lightly with olive oil.
- Sprinkle evenly with salt.
- Arrange the slices in a single layer on the prepared baking sheet.
- Bake for 20 to 25 minutes, flipping halfway through, until tender and lightly browned at the edges.
- Remove from the oven and allow to cool slightly.
- Top each slice with avocado and sprinkle with mixed seeds.
- Serve immediately and enjoy.
Notes
- Slice evenly to ensure consistent cooking.
- Do not overcrowd the baking sheet to help the edges crisp.
- Reheat leftovers in the oven or toaster oven for best texture.
- Add toppings just before serving for maximum freshness.