Easy Oreo Waffles Recipe Kids (And Everyone) Will Love
There is something about Oreos that instantly brings a little joy, and when you turn them into warm, crispy waffles, it becomes a full on comfort moment. Imagine that first bite, slightly crunchy edges, soft waffle center, and little bursts of chocolate cookie with creamy sweetness melting through. It feels playful, nostalgic, and honestly a bit irresistible.
And now let’s dive into what makes this treat so fun and so easy to bring together in your own kitchen.
Why These Oreo Waffles Feel Like Pure Fun
These waffles are not just dessert, they are an experience. The crushed Oreos melt slightly into the batter, creating pockets of chocolate flavor, while the waffle iron gives everything a golden crisp edge. It is the kind of recipe that makes kids excited and adults secretly go back for seconds.
It is simple, quick, and always a crowd favorite.
A Sweet Little Story Behind Oreo Desserts
Oreos have been a beloved cookie for over a century, often used in milkshakes, cheesecakes, and ice cream treats. Adding them to waffles is a modern twist that brings together breakfast comfort and dessert indulgence in one plate.
It is playful food, meant to be shared and enjoyed without overthinking it.
Why This Recipe Works Every Time
Before we start mixing, here is why this recipe never fails to impress.
Versatile: Works as breakfast, dessert, or a fun snack.
Budget-Friendly: Uses simple pantry ingredients and a few cookies.
Quick and Easy: Ready in under 20 minutes.
Customizable: Add chocolate chips, bananas, or extra cream.
Crowd-Pleasing: Kids love it and adults cannot resist it.
Make-Ahead Friendly: Batter can be prepped in advance.
Great for Leftovers: Reheats nicely in a toaster or waffle maker.
Now let’s bring it to life.
Tips for Perfect Oreo Waffles
A few small details make them extra delicious.
- Do not over crush the Oreos, small chunks give better texture.
- Preheat your waffle iron fully for a crisp finish.
- Lightly grease the waffle iron to avoid sticking.
- Do not overfill, the batter will expand.
Tools You Will Need
Nothing fancy, just the basics.
Waffle Iron: Essential for crisp edges and soft inside.
Mixing Bowl: For combining the batter.
Whisk or Spoon: To mix everything evenly.
Measuring Cups: For accurate portions.
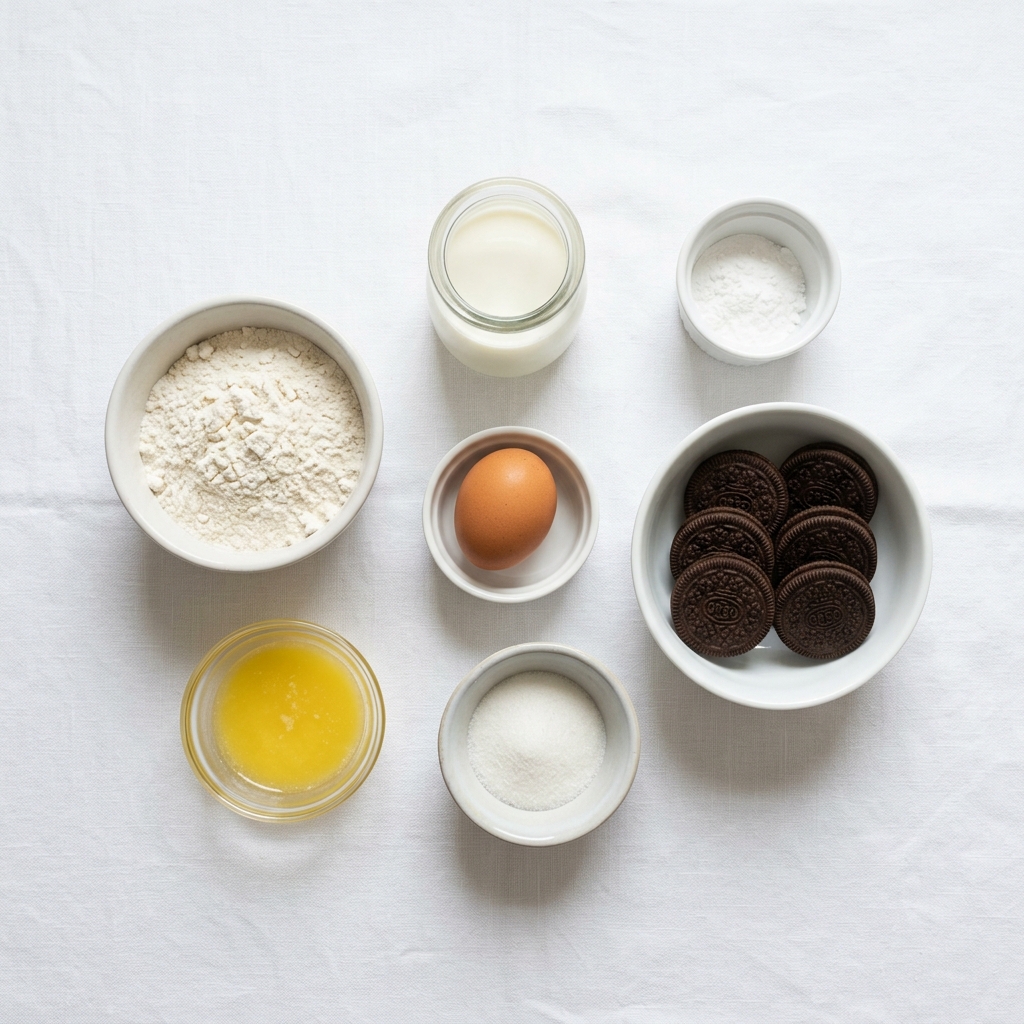
Ingredients You Will Need For These Oreo Waffles
Simple ingredients come together for a rich and fun treat.
- All Purpose Flour: 1 cup, about 120 grams. Builds structure.
- Milk: 3/4 cup, about 180 milliliters. Keeps the batter smooth.
- Egg: 1 large egg. Binds everything together.
- Baking Powder: 2 teaspoons, about 8 grams. Adds fluffiness.
- Sugar: 2 tablespoons, about 25 grams. Adds sweetness.
- Butter: 2 tablespoons, about 30 grams melted. Adds richness.
- Oreo Cookies: 8 cookies, crushed. Adds chocolate crunch and cream flavor.
Easy Ingredient Swaps
Milk: Almond or oat milk works well.
Butter: Coconut oil for a dairy free option.
Sugar: Honey or brown sugar for deeper flavor.
Oreos: Any chocolate sandwich cookie works.
Spotlight on the Star Ingredients
Oreo Cookies: They bring chocolate crunch and creamy filling that melts slightly into the waffle.
Waffle Batter Base: Light and fluffy, it balances the richness of the cookies perfectly.
Let’s Make These Step by Step
Here is where the fun begins.
- Preheat Your Equipment: Heat the waffle iron until fully hot.
- Combine Ingredients: In a bowl, whisk flour, baking powder, and sugar. Add milk, egg, and melted butter, then mix until smooth. Fold in crushed Oreos.
- Prepare Your Cooking Vessel: Lightly grease the waffle iron.
- Assemble the Dish: Pour batter into the waffle iron, making sure not to overfill.
- Cook to Perfection: Cook for 3 to 5 minutes until golden and crisp.
- Finishing Touches: Remove gently and let cool slightly.
- Serve and Enjoy: Top with extra crushed Oreos or whipped cream if desired.
This is one of those recipes that disappears fast.
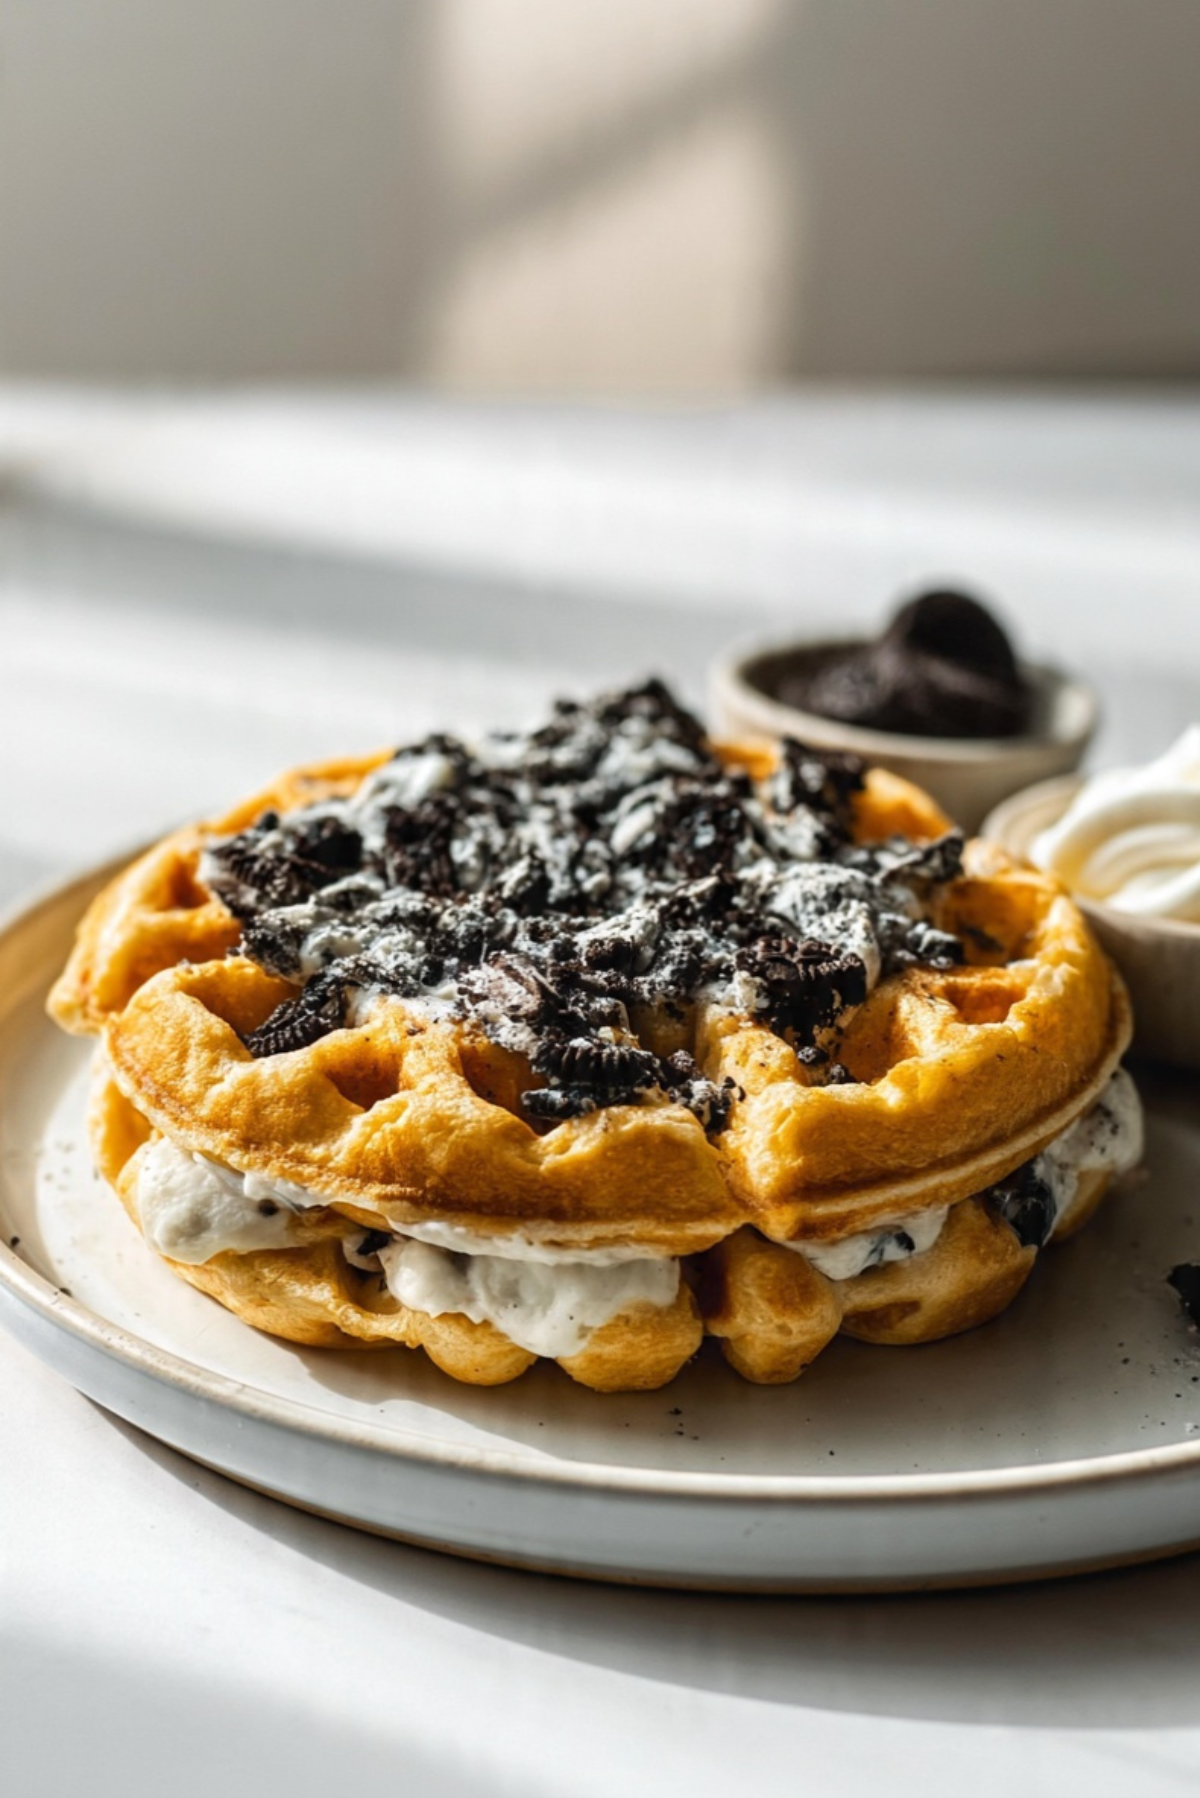
Texture and Flavor Experience
You get crisp edges, soft fluffy center, and little bursts of chocolate cookie throughout. The cream filling from the Oreos melts slightly into the waffle, creating a sweet and rich flavor in every bite.
It is playful, warm, and very satisfying.
Helpful Tips for Best Results
- Keep Oreo chunks uneven for better texture.
- Do not overmix after adding cookies.
- Serve immediately for best crispness.
What to Avoid
- Do not use too many Oreos or the batter becomes heavy.
- Avoid opening the waffle iron too early.
- Do not skip greasing the plates.
Nutrition Facts
Servings: 2 waffles
Calories per serving: Approximately 410
Preparation Time
Prep Time: 10 minutes
Cook Time: 8 minutes
Total Time: 18 minutes
Make Ahead and Storage Tips
You can prepare the batter ahead and store it in the fridge for a few hours. Cooked waffles can be stored in an airtight container for up to 2 days and reheated in a toaster for crispness.
How to Serve
Serve warm with whipped cream, extra crushed Oreos, or a scoop of vanilla ice cream for dessert style presentation.
Creative Leftover Ideas
Turn leftovers into waffle sandwiches with ice cream. Break them into chunks for dessert toppings. Or drizzle with chocolate sauce for a quick treat.
Extra Tips for Flavor
Add vanilla extract for extra depth or a sprinkle of sea salt to balance sweetness.
Make It a Showstopper
Pile them high, sprinkle Oreo crumbs on top, and let a little cream drizzle flow over the edges for a bakery style look.
Variations to Try
- Add chocolate chips for extra richness.
- Use golden Oreos for a vanilla twist.
- Add peanut butter drizzle.
- Top with strawberries for freshness.
FAQ’s
1. Can I use any waffle maker?
Yes, any standard waffle iron works.
2. Can I make them without eggs?
Yes, use an egg substitute like flax egg.
3. Can I make them crispier?
Cook a little longer until edges are golden.
4. Can I freeze them?
Yes, freeze and reheat in toaster.
5. Can I use double stuffed Oreos?
Yes, but reduce sugar slightly.
6. Are they very sweet?
Yes, they are dessert level sweet.
7. Can I make mini waffles?
Yes, perfect for snacks or kids.
8. Can I add toppings inside?
Yes, chocolate chips work well.
9. Can I make batter ahead?
Yes, up to a few hours in fridge.
10. Do they taste like cake?
They are closer to soft cake waffles with crunch.
Conclusion
These Oreo waffles are fun, indulgent, and incredibly easy to make. They bring together comfort and playfulness in every bite, making them perfect for kids, parties, or anytime you want something a little extra special. Once you try them, they will quickly become a favorite treat in your kitchen.
PrintEasy Oreo Waffles Recipe Kids (And Everyone) Will Love

Fun and indulgent Oreo waffles made with crushed cookies folded into fluffy batter for a crispy, chocolatey, creamy treat.
Ingredients
- 1 cup all purpose flour (120g)
- 3/4 cup milk (180ml)
- 1 large egg
- 2 tsp baking powder (8g)
- 2 tbsp sugar (25g)
- 2 tbsp melted butter (30g)
- 8 Oreo cookies, crushed
Instructions
- Preheat waffle iron.
- Mix dry ingredients in a bowl.
- Add milk, egg, and melted butter, then whisk until smooth.
- Fold in crushed Oreo cookies.
- Pour batter into waffle iron and cook until golden and crisp.
- Remove carefully and serve warm with toppings if desired.
Notes
- Do not overmix after adding Oreos to keep texture light.
- Cook on medium heat for even browning.
- Serve immediately for best crisp texture.