Turkish Yogurt Bazlama Bread
There is something almost magical about pulling warm, pillowy bread off a hot pan and watching the steam rise gently into the air. The first time I made Turkish Yogurt Bazlama Bread in my own kitchen, I remember pressing one lightly with my fingertips and feeling that soft bounce back. Trust me, you’re going to love this. It is simple, honest bread, the kind that makes you slow down and enjoy every bite.
And now, let’s ease into what makes this flatbread so special, because once you understand its charm, you will want to make it again and again.
Why This Soft Flatbread Wins Hearts Every Time
This bread is thick yet tender, golden on the outside and cloud like on the inside. It cooks on a pan, which means no complicated baking steps, and no need to heat up the entire kitchen. The yogurt gives it a gentle tang and an incredible softness that stays even the next day.
It is the kind of bread you tear apart with your hands, dip into olive oil, scoop up creamy spreads, or wrap around grilled vegetables. Every bite feels comforting and familiar, even if it is your first time making it. Let me tell you, it is worth every bite.
A Little Taste of Turkey in Your Kitchen
Bazlama is a traditional Turkish flatbread, often baked fresh in villages and served warm at breakfast tables. In many homes across Turkey, it is cooked on a large griddle and enjoyed with cheese, olives, fresh tomatoes, and tea.
What makes it different from other flatbreads is the yogurt in the dough. That simple ingredient brings moisture, flavor, and a tender crumb that feels almost luxurious. Over generations, families have passed down their own versions, but the heart of it stays the same, simple ingredients, patient hands, and warm hospitality.
And now that you know where it comes from, let’s talk about why this version works so beautifully in a home kitchen.
Why You Can Trust This Bread to Turn Out Perfect
There is something reassuring about a dough that behaves well, and this one truly does.
Versatile: You can serve it for breakfast, lunch, or dinner. It pairs beautifully with savory dishes or even a drizzle of honey.
Budget-Friendly: The ingredients are simple pantry staples, flour, yogurt, yeast, and a few basics.
Quick and Easy: The steps are straightforward, and most of the time is just letting the dough rest.
Customizable: You can add herbs, spices, or even a sprinkle of seeds on top.
Crowd-Pleasing: Soft bread fresh from the pan always brings people to the table.
Make-Ahead Friendly: The dough can rest in the fridge overnight for deeper flavor.
Great for Leftovers: It reheats beautifully and can be transformed into wraps or sandwiches the next day.
And now, before we dive into mixing and shaping, let me share a few insider tips that make a real difference.
Chef Secrets for Ultra Soft and Fluffy Results
Making this bread is simple, but a few small details can elevate it.
- Use room temperature yogurt so the yeast activates evenly.
- Do not rush the resting time, this helps create that airy interior.
- Keep the pan at medium heat so the outside turns golden without burning.
- Cover cooked breads with a clean towel to keep them soft.
With those little secrets in mind, let’s gather the tools you will need.
Essential Kitchen Tools for Success
Before we start mixing, here is what you will want nearby.
Mixing Bowl: Large enough to comfortably combine and knead the dough.
Measuring Cups and Spoons: Accuracy helps with consistent results.
Wooden Spoon or Spatula: For mixing before kneading.
Non Stick Skillet or Griddle: A heavy pan ensures even cooking.
Clean Kitchen Towel: To cover the dough and keep cooked breads soft.
Now that everything is ready, let’s look at the ingredients that bring this bread to life.
Ingredients You Will Need For This Soft Flatbread
Each ingredient plays its own role in creating that fluffy, golden round.
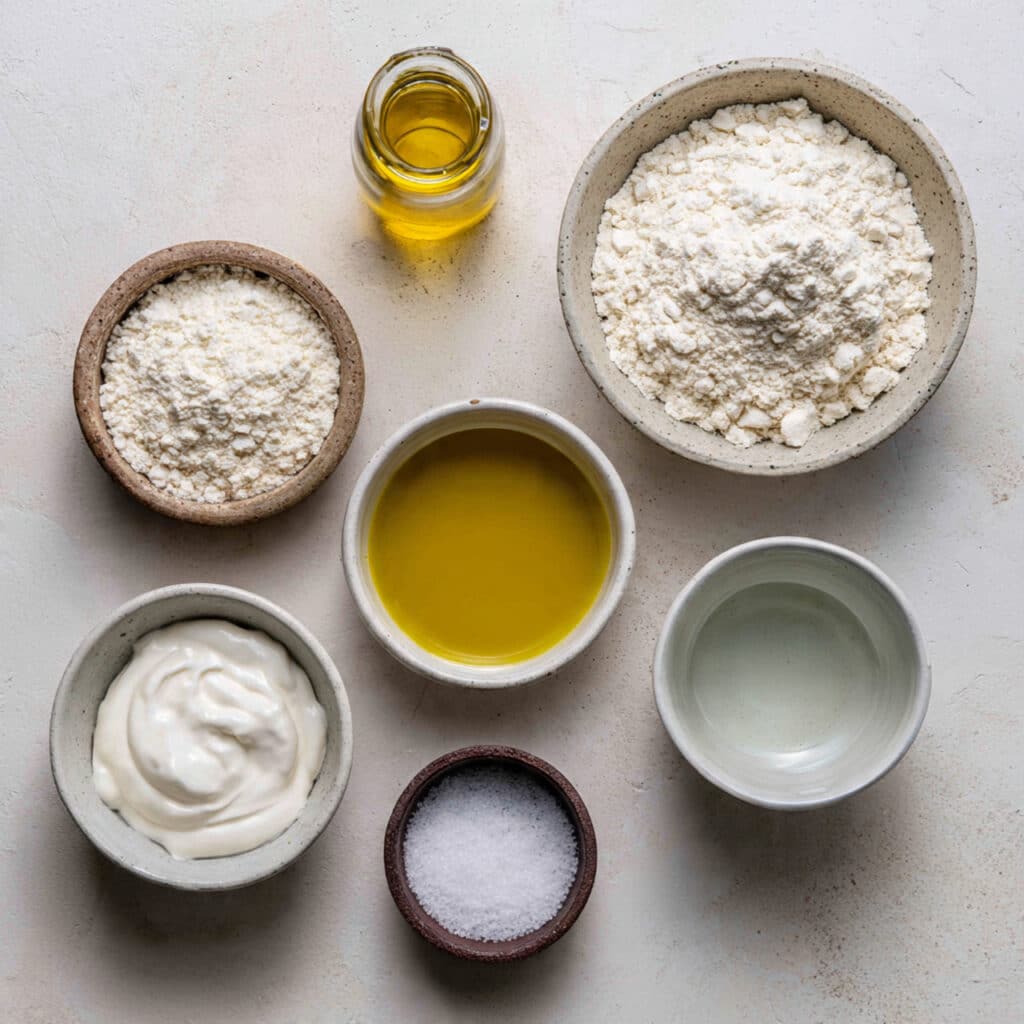
- All Purpose Flour: 3 1/2 cups, about 440 grams. This forms the structure of the bread.
- Plain Yogurt: 1 cup, about 240 grams. Adds moisture, softness, and a gentle tang.
- Warm Water: 1/2 cup, about 120 milliliters. Helps activate the yeast.
- Active Dry Yeast: 2 1/4 teaspoons, about 7 grams. Gives the bread its rise and airy texture.
- Olive Oil: 2 tablespoons, about 30 milliliters. Adds richness and tenderness.
- Sugar: 1 teaspoon, about 4 grams. Feeds the yeast and balances flavor.
- Salt: 1 1/2 teaspoons, about 9 grams. Enhances flavor and strengthens the dough.
And now that we know what goes into it, let’s talk about how flexible this dough can be.
Smart Substitutions If You Need Them
Sometimes you work with what you have, and that is perfectly fine.
All Purpose Flour: You can substitute part of it with whole wheat flour for a nuttier flavor.
Plain Yogurt: Greek yogurt works well, just thin it slightly with a splash of water.
Olive Oil: You can use any neutral vegetable oil.
Active Dry Yeast: Instant yeast can be used in the same quantity without proofing separately.
Now let’s shine a little spotlight on two ingredients that truly define this bread.
The Ingredients That Make It Special
Plain Yogurt: This is the heart of the dough. It creates a tender crumb and subtle tang that sets it apart from other flatbreads.
Active Dry Yeast: This gives the bread its soft, airy interior and that beautiful puff in the pan.
And now, let’s dive into the part you have been waiting for, making the dough.
Let’s Make This Beautiful Bread Together
This is where the magic begins. Take your time, enjoy the feel of the dough, and trust the process.
- Preheat Your Equipment: Place a non stick skillet or griddle over medium heat so it warms gradually while the dough rests.
- Combine Ingredients: In a large bowl, dissolve the sugar and yeast in warm water. Let it sit for 5 minutes until slightly foamy. Add yogurt, olive oil, and salt, then gradually mix in the flour until a soft dough forms.
- Prepare Your Cooking Vessel: Lightly flour a clean surface and knead the dough for about 8 to 10 minutes until smooth and elastic. Place it back in the bowl, cover with a towel, and let it rise for 1 hour until doubled in size.
- Assemble the Dish: Divide the dough into 6 equal pieces. Shape each into a ball, then gently flatten into rounds about 1/2 inch thick.
- Cook to Perfection: Place one round into the warm skillet. Cook for about 2 to 3 minutes per side until golden brown with light toasted spots and cooked through.
- Finishing Touches: Transfer cooked bread to a plate and cover with a towel to keep soft. Repeat with remaining dough.
- Serve and Enjoy: Serve warm, tear apart, and savor that soft, fluffy interior.
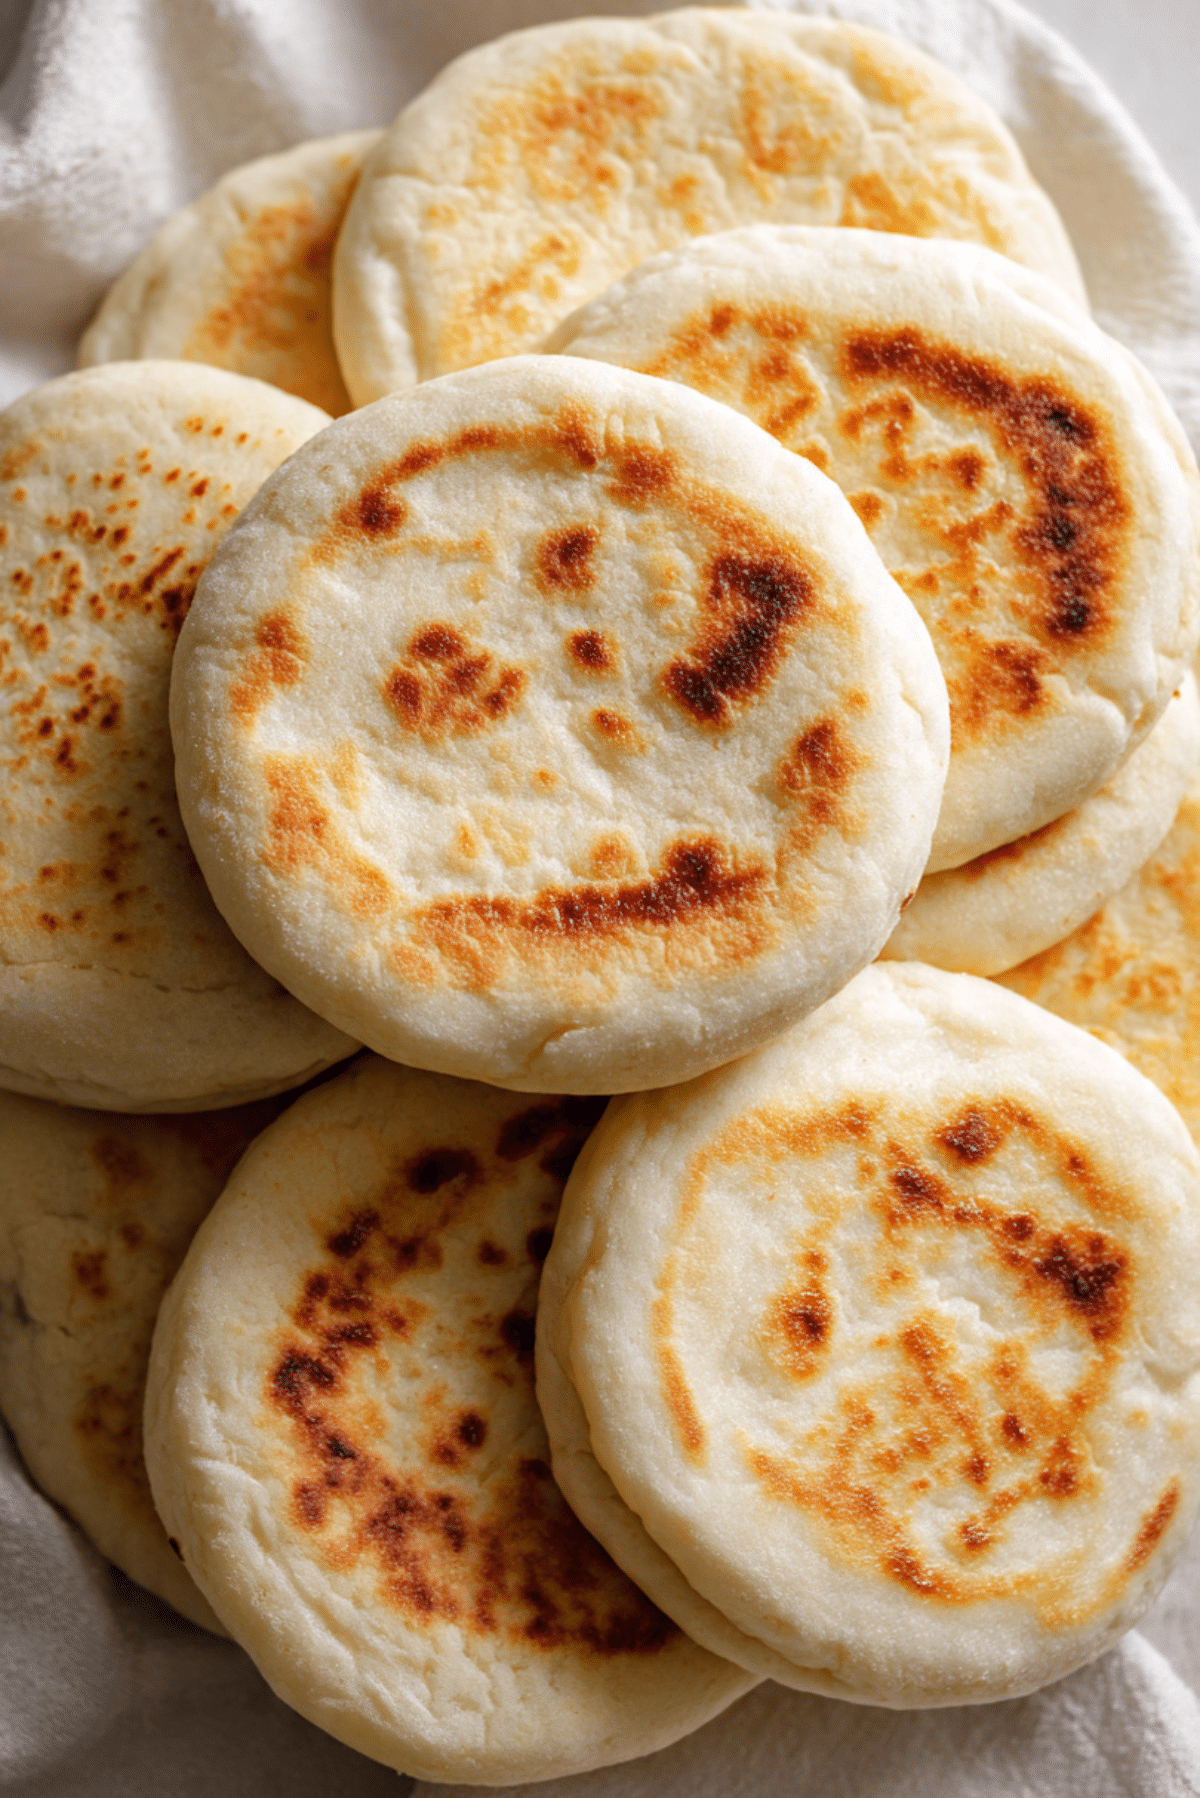
The Texture and Flavor You Will Fall For
As the bread cooks, it puffs slightly, creating tiny air pockets inside. The outside turns golden with delicate brown spots, while the inside stays tender and almost creamy from the yogurt. The flavor is mild with a gentle tang, making it perfect for both savory and sweet pairings.
Helpful Tips for Even Better Results
A few small adjustments can make a big difference.
- Keep the dough slightly soft, adding too much flour will make the bread dense.
- If the bread browns too quickly, lower the heat slightly.
- Brush with a little olive oil right after cooking for extra softness.
Common Mistakes and How to Avoid Them
Even simple breads can have small hiccups, but they are easy to fix.
- Adding too much flour can make the bread heavy, keep the dough soft and slightly tacky.
- Cooking on high heat may burn the outside before the inside cooks, maintain medium heat.
- Skipping the resting time reduces fluffiness, let the dough rise fully.
Nutrition Snapshot
Servings: 6 flatbreads
Calories per serving: 220
Note: These are approximate values.
Time Breakdown
Prep Time: 15 minutes
Cook Time: 15 minutes
Total Time: 30 minutes plus 1 hour resting
Make Ahead and Storage Guide
You can prepare the dough the night before and let it rest in the refrigerator. Once cooked, store the bread in an airtight container at room temperature for up to 2 days. For longer storage, freeze with parchment between each piece. Reheat in a warm skillet for a few minutes to bring back that fresh softness.
Serving Ideas You Will Love
Serve warm with cheese and olives for breakfast. Use it as a wrap for grilled vegetables. Dip it into hummus or creamy yogurt sauces. It even works beautifully as a base for a quick flatbread pizza.
Creative Ways to Use Leftovers
Turn leftover bread into sandwich wraps. Toast pieces and use them for dipping into soups. Cut into wedges and bake briefly for crispy dippers.
Extra Tips for Flavor and Ease
A sprinkle of dried herbs in the dough adds a subtle aroma. Letting the dough rest a little longer deepens flavor. Always cover cooked bread to keep it soft and tender.
Make It Look Bakery Worthy
Stack the warm rounds slightly offset so the golden spots show. Brush lightly with olive oil for a soft sheen. Serve on a simple wooden board for that rustic touch.
Fun Variations to Try
Add chopped fresh herbs like parsley or dill into the dough. Mix in a pinch of chili flakes for gentle heat. Brush with garlic infused olive oil after cooking. Sprinkle sesame seeds on top before cooking for extra texture.
FAQ’s
1. Can I make the dough without yeast?
Yes, but the texture will be denser. Yeast gives it the signature fluffiness.
2. Can I bake it instead of cooking on a pan?
You can bake at high heat, but the texture may differ slightly.
3. Why is my bread not puffing?
The dough may need more resting time or the heat might be too low.
4. Can I use whole wheat flour only?
Yes, but expect a slightly denser texture.
5. How do I keep it soft?
Cover with a towel immediately after cooking.
6. Can I freeze the dough?
Yes, after the first rise. Thaw and shape before cooking.
7. Is Greek yogurt suitable?
Yes, thin it slightly with water if it is very thick.
8. How thick should I roll it?
About 1/2 inch for the best balance of softness and structure.
9. Can I double the recipe?
Absolutely, just ensure enough space in the pan.
10. What pairs best with it?
Cheese, olives, grilled vegetables, or even a drizzle of honey.
Conclusion
There is something deeply satisfying about making your own bread, especially when it turns out this soft and flavorful. This one is a total game changer for busy days or relaxed weekend meals. Once you try it, you will see how easily it becomes part of your regular rotation. Go ahead, warm up that pan and enjoy every fluffy bite.
PrintTurkish Yogurt Bazlama Bread
Soft, fluffy Turkish Yogurt Bazlama Bread cooked on a skillet until golden brown, tender inside with a gentle tang from yogurt. Perfect for dipping, wrapping, or serving warm at the table.
Ingredients
- 3 1/2 cups all purpose flour (about 440 grams)
- 1 cup plain yogurt (about 240 grams)
- 1/2 cup warm water (about 120 milliliters)
- 2 1/4 teaspoons active dry yeast (about 7 grams)
- 2 tablespoons olive oil (about 30 milliliters)
- 1 teaspoon sugar (about 4 grams)
- 1 1/2 teaspoons salt (about 9 grams)
Instructions
- In a large bowl, dissolve the sugar and yeast in warm water and let it sit for 5 minutes until slightly foamy.
- Add the plain yogurt, olive oil, and salt, then gradually mix in the flour until a soft dough forms.
- Knead the dough on a lightly floured surface for 8 to 10 minutes until smooth and elastic.
- Place the dough back into the bowl, cover with a clean towel, and let it rise for 1 hour until doubled in size.
- Preheat a non stick skillet or griddle over medium heat.
- Divide the dough into 6 equal pieces, shape into balls, and flatten each into rounds about 1/2 inch thick.
- Cook each round in the warm skillet for 2 to 3 minutes per side until golden brown with light toasted spots and cooked through.
- Transfer cooked bread to a plate and cover with a towel to keep soft. Serve warm and enjoy.
Notes
- Keep the dough slightly soft, adding too much flour can make the bread dense.
- If the bread browns too quickly, lower the heat slightly.
- Cover the cooked breads immediately with a towel to maintain softness.
- You can refrigerate the dough overnight for deeper flavor.