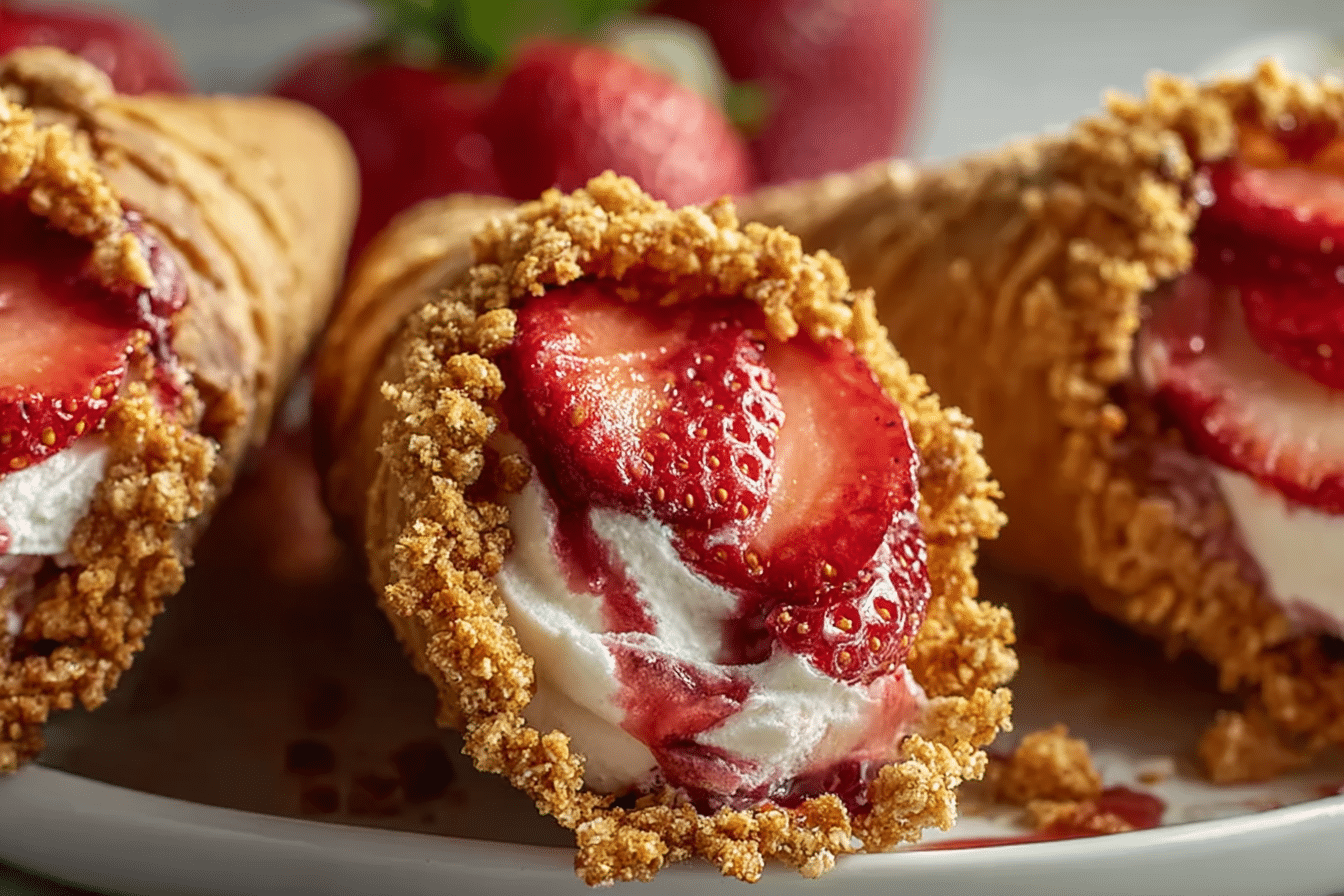
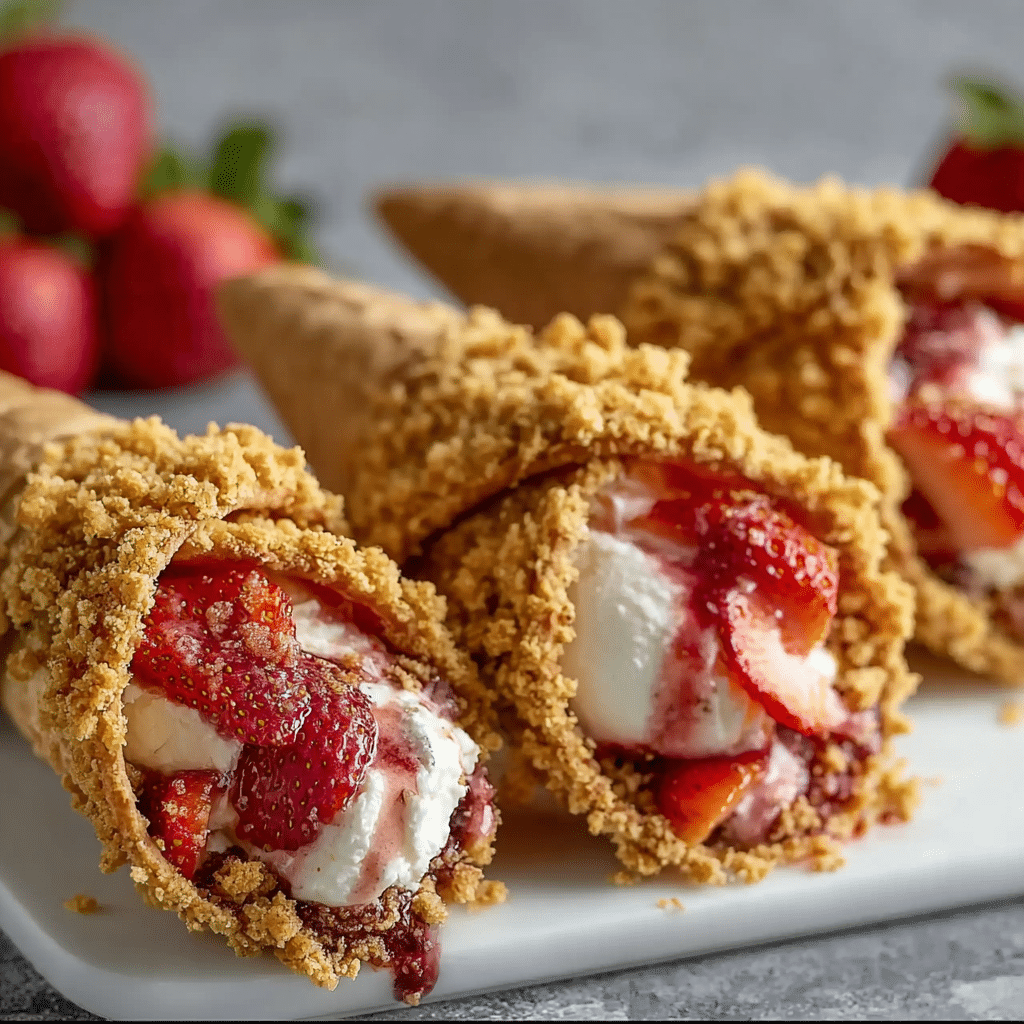
Strawberry Crunch Cheesecake Cones
Close your eyes and imagine a crisp waffle cone dressed in strawberry crunch, packed with fluffy vanilla cheesecake filling, then crowned with juicy strawberries that drip just a little down the side. One bite and you get creamy, crunchy, fruity, and cool all at once. Trust me, you’re going to love this, and let me tell you, it’s worth every bite.
Behind the Recipe
This playful dessert was inspired by summer fairs and ice cream truck memories, only with a bakery twist. I wanted the nostalgia of a cone, the luxury of cheesecake, and that iconic strawberry shortcake bar crunch in every bite. The result is a handheld treat that feels like a celebration, whether you are making them for a party or for a cozy movie night at home.
Recipe Origin or Trivia
Cheesecake cones are a modern mashup that took off on social media, blending the classic no bake cheesecake filling with the grab and go joy of waffle cones. The “strawberry crunch” draws from the beloved strawberry shortcake ice cream bar effect, usually built with a cookie crumb and strawberry component for color and flavor. And now, let’s connect those traditions to your kitchen with a version that is as beautiful as it is delicious.
Why You’ll Love Strawberry Crunch Cheesecake Cones
Versatile: Serve as a make ahead dessert, a showy party centerpiece, or a sweet afternoon pick me up.
Budget-Friendly: Uses pantry cookies, seasonal strawberries, and cream cheese to make a dozen cones without breaking the bank.
Quick and Easy: No oven required, the cones come together fast with simple mixing and brief chilling.
Customizable: Change the fruit, swap the cookies, or tweak the filling sweetness to your taste.
Crowd-Pleasing: Crunchy, creamy, and fruity textures make these disappear from the dessert table first.
Make-Ahead Friendly: Components can be prepped ahead, then assembled right before serving for peak crunch.
Great for Leftovers: Extra filling becomes a no bake parfait, and leftover crunch makes a fantastic yogurt topper.
Strawberry Crunch Cheesecake Cones

Crisp waffle cones coated in strawberry crunch and filled with a fluffy no-bake cheesecake cream, topped with juicy strawberries for the ultimate creamy-crunchy summer dessert.
- Prep Time: 25 minutes
- Cook Time: 10 minutes
- Total Time: 35 minutes
- Yield: 12 cones
- Category: Dessert
- Method: No-bake
- Cuisine: American
- Diet: Vegetarian
Ingredients
- Waffle Cones: 12 standard cones
- White Chocolate or Vanilla Candy Melts: 6 ounces, melted
- Golden Sandwich Cookies: 18 cookies, finely crushed
- Freeze-Dried Strawberries: 1 cup, finely crushed
- Unsalted Butter: 2 tablespoons, melted
- Cream Cheese: 12 ounces, room temperature
- Powdered Sugar: 2/3 cup
- Pure Vanilla Extract: 1 teaspoon
- Fresh Lemon Juice: 1 teaspoon
- Heavy Whipping Cream: 3/4 cup, whipped to soft peaks
- Fresh Strawberries: 1 to 1 1/2 cups, small dice plus slices for garnish
- Granulated Sugar: 1 tablespoon
- Salt: 1 pinch
Instructions
- Set a parchment-lined sheet pan on the counter. Place white chocolate in a microwave-safe bowl and heat in 20-second bursts, stirring until smooth.
- Beat cream cheese with powdered sugar, vanilla, lemon juice, and salt until completely smooth. In a separate bowl whip heavy cream to soft peaks, then fold into the cream cheese mixture until light and fluffy.
- Combine crushed cookies, crushed freeze-dried strawberries, and melted butter in a bowl to form a rosy crumb.
- Dip cone rims into melted white chocolate, let excess drip, then roll rims in strawberry crunch. Stand cones upright in glasses or a cone holder on the prepared pan.
- Transfer cheesecake filling to a piping bag and pipe into each cone, filling to the top with swirls.
- Chill cones for 20 to 30 minutes so the filling sets and the rims firm up.
- Toss diced strawberries with granulated sugar for 5 minutes, then spoon on top of cones and finish with extra crunch. Serve chilled.
Notes
- Use room-temperature cream cheese for the smoothest filling.
- Chill mixing bowl and beaters before whipping cream for better volume.
- Add strawberries just before serving to keep cones crisp.
- For gluten free, use gluten free cones and cookies.
- Leftover filling makes great parfaits with extra crunch and berries.
Nutrition
- Serving Size: 1 cone
- Calories: 410
- Sugar: 31g
- Sodium: 180mg
- Fat: 23g
- Saturated Fat: 12g
- Unsaturated Fat: 9g
- Trans Fat: 0g
- Carbohydrates: 47g
- Fiber: 2g
- Protein: 5g
- Cholesterol: 55mg
Chef’s Pro Tips for Perfect Results
Before we dive into mixing, a few little secrets will set you up for success. These cones love a cold, fluffy filling and a crisp shell, and a little organization turns the process into a breeze.
- Use room temperature cream cheese for ultra smooth, lump free filling.
- Whip the heavy cream to soft peaks before folding, this traps air and keeps the filling light.
- Crush cookies finely so the crunch adheres neatly to the cone and does not shed too much.
- Chill filled cones briefly to help the cheesecake set so every bite holds its shape.
- Add strawberries at the end to keep the cones crisp and prevent sogginess.
Kitchen Tools You’ll Need
Getting your tools lined up keeps the flow easy and fun, so let’s set the stage before we assemble.
- Mixing Bowls: One large for the filling, one medium for the crunch.
- Electric Mixer or Whisk: To whip the cream and smooth the cream cheese.
- Spatula: For gentle folding without deflating the filling.
- Piping Bag or Zip Bag: To pipe the filling neatly into cones.
- Rolling Pin or Food Processor: To crush cookies quickly and evenly.
- Microwave Safe Bowl: For melting the white chocolate coating.
- Sheet Pan with Parchment: To rest cones while the coating and crunch set.
Ingredients in Strawberry Crunch Cheesecake Cones
We are layering creamy cheesecake filling, a strawberry cookie crunch, and fresh fruit inside crisp cones. Each ingredient plays a role in building texture, flavor, and structure, so here is how they work together.
- Waffle Cones: 12 standard cones. Provide a crisp, portable shell for the creamy filling.
- White Chocolate or Vanilla Candy Melts: 6 ounces, melted. Creates a sweet “glue” that seals the cone rim and helps crunch stick.
- Golden Sandwich Cookies: 18 cookies, finely crushed. Form the buttery backbone of the strawberry crunch.
- Freeze Dried Strawberries: 1 cup, finely crushed. Adds vivid color and concentrated strawberry flavor to the crunch.
- Unsalted Butter: 2 tablespoons, melted. Lightly binds the crumb mixture so it clings to the cones.
- Cream Cheese: 12 ounces, room temperature. Builds the rich, tangy cheesecake base.
- Powdered Sugar: 2/3 cup. Sweetens while keeping the filling silky and stable.
- Pure Vanilla Extract: 1 teaspoon. Rounds out the cheesecake flavor with warmth.
- Fresh Lemon Juice: 1 teaspoon. Brightens the filling and balances richness.
- Heavy Whipping Cream: 3/4 cup, whipped to soft peaks. Lightens the texture into a fluffy no bake mousse.
- Fresh Strawberries: 1 to 1 1/2 cups, small dice plus slices for garnish. Brings juicy bursts and a fresh finish.
- Granulated Sugar: 1 tablespoon. Macerates the diced berries for a glossy, flavorful topping.
- Pinch of Salt: 1 small pinch. Enhances sweetness and overall flavor.
Ingredient Substitutions
Baking should feel flexible, so if you need to pivot, here are easy swaps that keep the magic intact.
- Golden Sandwich Cookies: Alternative: Shortbread cookies or vanilla wafer cookies.
- Freeze Dried Strawberries: Alternative: Freeze dried raspberries for a tangier crunch.
- White Chocolate or Candy Melts: Alternative: Yogurt chips or ruby chocolate for a color twist.
- Heavy Whipping Cream: Alternative: Prepared whipped topping for a shortcut.
- Cream Cheese: Alternative: Neufchâtel for a slightly lighter filling.
- Lemon Juice: Alternative: Lime juice for a citrus lift with a gentle zing.
Ingredient Spotlight
Freeze Dried Strawberries: These little gems are pure strawberry, only without the water, so their flavor is bright and concentrated. They color the crunch naturally and keep it crisp.
Cream Cheese: The heart of the filling, it brings tangy richness and a velvety body that turns airy once folded with whipped cream.
Instructions for Making Strawberry Crunch Cheesecake Cones
And now let’s dive into the fun part, building cones that look like they came from a boutique bakery and taste like a summer dream.
- Preheat Your Equipment: Set a parchment lined sheet pan on your counter. Place the white chocolate in a microwave safe bowl and heat in 20 second bursts, stirring between each until smooth.
- Combine Ingredients: In a large bowl beat cream cheese with powdered sugar, vanilla, lemon juice, and the pinch of salt until completely smooth. In a separate bowl whip the heavy cream to soft peaks, then fold it gently into the cream cheese mixture until fluffy.
- Prepare Your Cooking Vessel: In a medium bowl mix the finely crushed cookies, crushed freeze dried strawberries, and melted butter until evenly combined into a sandy, rosy crumb.
- Assemble the Dish: Dip the rims of the waffle cones into the melted white chocolate, let excess drip off, then roll the rims in the strawberry crunch. Stand the cones upright in glasses or a cone holder on the prepared sheet pan. Transfer the cheesecake filling to a piping bag and pipe it into each cone, filling to the top in pretty swirls.
- Cook to Perfection: Chill the filled cones for 20 to 30 minutes so the filling sets and the rims firm up, this ensures clean bites and great structure.
- Finishing Touches: Toss the diced strawberries with the granulated sugar and let sit for 5 minutes until glossy. Spoon a little on top of each cone, then sprinkle with extra crunch.
- Serve and Enjoy: Serve chilled for maximum crunch and creaminess, and watch them disappear in minutes.
Texture & Flavor Secrets
The joy of these cones is the contrast. You get crisp cone and snappy white chocolate at the rim, a buttery cookie strawberry crunch, and a cloud light cheesecake filling that melts on the tongue. Fresh berries add juicy sparkle, while the lemon lifts the sweetness so each bite stays bright instead of heavy.
Cooking Tips & Tricks
A little guidance goes a long way, so keep these helpful notes in mind as you work.
- Chill the bowl and beaters before whipping cream to help it whip fast and hold volume.
- Pipe just before chilling so the swirls stay defined and pretty.
- Keep cones upright in a glass, muffin tin, or cone stand to set neatly and avoid tipping.
What to Avoid
We want every cone to look bakery perfect, so steer clear of these common pitfalls.
- Overmixing the filling, which can deflate the cream and make it runny.
- Adding wet fruit too early, which can soften the cones.
- Skipping the rim coating, since the chocolate helps keep the crunch in place and adds a moisture barrier.
Nutrition Facts
Servings: 12
Calories per serving: 410
Note: These are approximate values.
Preparation Time
Prep Time: 25 minutes
Cook Time: 10 minutes
Total Time: 35 minutes
Make-Ahead and Storage Tips
These cones love a little planning. You can prepare the crunch up to 3 days ahead and keep it airtight at room temperature. The cheesecake filling can be made 1 day in advance and refrigerated. For best texture, assemble cones within 2 hours of serving so the shells stay crisp. If you must store assembled cones, refrigerate uncovered for up to 4 hours, then cover lightly. Leftovers can be chilled, though the cones will soften a bit and take on a cake cone texture that some people adore.
How to Serve Strawberry Crunch Cheesecake Cones
Serve on a tiered stand or in a cone holder for a playful presentation. A scatter of extra crunch on the platter, a few mint sprigs, and bowls of additional diced strawberries invite guests to customize. These pair beautifully with iced coffee, sparkling lemonade, or a cup of hot tea for contrast.
Creative Leftover Transformations
- Parfait Layers: Crumble softened cones with leftover filling and berries into glasses for a quick parfait.
- Breakfast Treat: Spoon filling onto pancakes or toast, then top with remaining crunch.
- Dessert Dip: Stir leftover filling with a splash of milk until dippable and serve with fruit and cookie sticks.
Additional Tips
For ultra neat rims, dip cones in chocolate, let set 1 minute, dip again, then roll in crunch for an even thicker collar. If your kitchen is warm, keep the crunch in the fridge for 10 minutes so the butter firms and sticks extra well.
Make It a Showstopper
Present the cones in a lined vase filled with rice or sugar so they stand tall and secure. Dust the tops with a whisper of powdered sugar, add a strawberry slice on each swirl, and finish with a tiny edible flower or mint leaf for color pop.
Variations to Try
- Chocolate Strawberry Cones: Add 2 tablespoons cocoa to the filling and use chocolate candy melts for the rim.
- Lemon Berry Cheesecake Cones: Increase lemon juice to 1 tablespoon and add lemon zest, then top with mixed berries.
- Raspberry Almond Cones: Swap freeze dried strawberries for raspberries and add 1/4 teaspoon almond extract to the filling.
- Cookies and Cream Cones: Use chocolate sandwich cookies for the crunch and fold mini chocolate chips into the filling.
- Tropical Crunch Cones: Use freeze dried pineapple with vanilla wafers for the crunch and top with mango.
FAQ’s
1. Can I make these gluten free?
Yes, use gluten free cones and swap cookies for a gluten free vanilla wafer or shortbread.
2. Can I skip the white chocolate rim?
You can, but the rim acts as a barrier against moisture and helps the crunch adhere, so cones stay crisp longer.
3. How long can assembled cones sit?
They are best within 2 hours, after that the cones slowly soften though the flavor stays wonderful.
4. Can I use frozen strawberries?
Yes, thaw and drain well, then pat dry before dicing to prevent excess moisture.
5. Can I reduce the sugar in the filling?
Absolutely, start with half, taste, and adjust to your preference.
6. What if I do not have freeze dried strawberries?
Use freeze dried raspberries or simply add extra fresh berries and a touch of strawberry jam to the topping.
7. How do I keep the filling from getting runny?
Whip the cream to soft peaks and fold gently, then chill the cones so the filling sets.
8. Can I make mini cones?
Yes, use mini cones and pipe a small rosette of filling, they are perfect for bite size dessert tables.
9. Can I flavor the filling with jam?
Yes, swirl in 2 to 3 tablespoons of strawberry jam for a ribboned effect without loosening the texture too much.
10. How do I transport them?
Chill until firm, place each cone upright in cupcake liners inside a muffin tin, then keep cool during travel.
Conclusion
These Strawberry Crunch Cheesecake Cones bring together all the best parts of dessert, creamy cheesecake, bright berries, and that nostalgic cookie crunch, all tucked into a crisp cone. From the first crackle of the rim to the last spoonable bite at the bottom, this one’s a total game changer that turns any gathering into a little celebration.