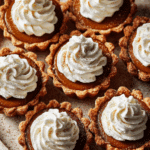
Mini Pumpkin Pies
Creamy, spiced pumpkin filling wrapped in a buttery golden crust, all in a size that fits right in the palm of your hand—these mini pumpkin pies are everything we love about the holidays, only cuter and easier to serve. They’re the perfect little bites of fall flavor, and let me tell you, one is never enough.
Behind the Recipe
The inspiration for these pies came during a holiday get-together when I realized people were slicing traditional pumpkin pie into slivers, trying not to overdo it. That’s when I had the idea—what if we made them mini? It’s the same cozy flavor, just in a more manageable (and adorable) format. These minis make dessert feel less formal and way more fun.
Recipe Origin or Trivia
Pumpkin pie has deep roots in American tradition, often gracing Thanksgiving tables since the early colonial days. Mini versions are a more modern twist, designed with convenience in mind—no slicing, no mess, and perfect for parties or potlucks. Plus, they bake up quicker than a full pie and look just as festive.
Why You’ll Love Mini Pumpkin Pies
These tiny treats pack a punch of flavor in every bite and are just as satisfying as the classic.
Versatile: Great for holiday spreads, dessert trays, or even breakfast the next day.
Budget-Friendly: Uses simple, seasonal ingredients you likely already have.
Quick and Easy: Bakes in half the time of a regular pie.
Customizable: Top with whipped cream, nuts, or even chocolate drizzle.
Crowd-Pleasing: Everyone loves a grab-and-go dessert with no need for a fork.
Make-Ahead Friendly: Bake the night before and store until ready to serve.
Great for Leftovers: Easy to freeze and reheat for pumpkin cravings later.
Chef’s Pro Tips for Perfect Results
These may be mini, but a few smart tips go a long way to making them amazing.
- Use a muffin tin to shape and bake the pies evenly.
- Chill the dough before cutting so it’s easier to work with.
- Pre-bake the crusts for a few minutes to keep them from getting soggy.
- Let the filling cool slightly before spooning into the shells to prevent runny spots.
- Use a cookie scoop to get even filling amounts in each cup.
Kitchen Tools You’ll Need
You probably have most of these tools already, and they make prep a breeze.
Muffin Tin: Standard size works best for uniform minis.
Round Cookie Cutter: To cut pie crust circles that fit into muffin cups.
Mixing Bowls: For both crust and filling prep.
Whisk or Hand Mixer: Helps make the filling smooth and creamy.
Cooling Rack: To help pies set and prevent soggy bottoms.
Ingredients in Mini Pumpkin Pies
These little pies might be small, but each one is packed with fall flavor and cozy spice.
- Pumpkin Puree: 1 cup. Brings earthy sweetness and creamy texture.
- Evaporated Milk: 2/3 cup. Makes the filling silky and smooth.
- Egg: 1 large. Helps the filling set perfectly.
- Brown Sugar: 1/3 cup. Adds warmth and richness.
- Pumpkin Pie Spice: 1 teaspoon. The classic blend of cinnamon, nutmeg, ginger, and cloves.
- Salt: 1/4 teaspoon. Enhances the sweetness and balances flavor.
- Vanilla Extract: 1 teaspoon. Adds a soft, aromatic finish.
- Pie Crust Dough: Enough for 1 full pie (store-bought or homemade). Forms the buttery base.
Ingredient Substitutions
Don’t worry if you’re missing something—there are easy swaps.
Pumpkin Puree: Butternut squash or sweet potato puree work just as well.
Evaporated Milk: Substitute with half-and-half or heavy cream.
Brown Sugar: Use coconut sugar or white sugar in a pinch.
Pumpkin Pie Spice: Mix your own with cinnamon, nutmeg, ginger, and cloves.
Pie Crust Dough: Use puff pastry or even graham cracker crusts for a twist.
Ingredient Spotlight
Pumpkin Puree: The heart of the pie, this rich, naturally sweet ingredient brings in the color, texture, and seasonal flavor.
Pumpkin Pie Spice: This aromatic mix gives the filling its classic warm scent and flavor that screams fall.

Instructions for Making Mini Pumpkin Pies
Here’s where the fun begins—rolling, filling, and watching them bake to golden perfection.
- Preheat Your Equipment:
Heat the oven to 375°F (190°C). Lightly grease a 12-cup muffin tin. - Combine Ingredients:
In a mixing bowl, whisk together pumpkin puree, evaporated milk, egg, brown sugar, pumpkin pie spice, salt, and vanilla until smooth. - Prepare Your Cooking Vessel:
Roll out the pie crust and cut 12 circles using a 3.5-inch cookie cutter. Press each into the muffin tin, gently forming a cup. - Assemble the Dish:
Spoon filling into each crust until about 3/4 full. Use a cookie scoop for even portions. - Cook to Perfection:
Bake for 25–28 minutes until the centers are set and the crust edges are lightly golden. - Finishing Touches:
Cool in the pan for 10 minutes, then transfer to a wire rack to cool completely. Optional: Top with whipped cream or a dash of cinnamon. - Serve and Enjoy:
Serve chilled or at room temperature. These tiny pies are just the right size for savoring slowly—or popping in one bite.
Texture & Flavor Secrets
The smooth pumpkin filling firms up just right thanks to the egg and milk, while the crust stays crisp around the edges. The brown sugar and spices caramelize lightly during baking, creating a deep, cozy flavor with a hint of spice in every bite.
Cooking Tips & Tricks
You’ll love how easy these are—and with a few small tricks, they’re even better.
- Chill the crust for 15 minutes in the pan before filling for better shape.
- Don’t overfill—the pies puff slightly as they bake.
- Use silicone muffin pans for easier release.
What to Avoid
Keep an eye out for these common mini pie mistakes.
- Filling too full can overflow and burn.
- Not letting the pies cool enough makes them tricky to remove.
- Skipping blind bake for crust can lead to soggy bottoms.
Nutrition Facts
Servings: 12 mini pies
Calories per serving: 180
Note: These are approximate values.
Preparation Time
Prep Time: 15 minutes
Cook Time: 28 minutes
Total Time: 43 minutes
Make-Ahead and Storage Tips
You can make these pies a day or two in advance and store them in the fridge. Let them come to room temperature before serving or enjoy chilled. They also freeze beautifully—wrap individually, freeze, and thaw overnight in the fridge.
How to Serve Mini Pumpkin Pies
Top each pie with whipped cream, a sprinkle of cinnamon, or crushed pecans. They’re perfect on a dessert platter with other bite-sized treats like cookies or mini tarts.
Creative Leftover Transformations
- Crumble and layer into parfaits with whipped cream.
- Serve chilled with a scoop of vanilla ice cream.
- Break into pieces and use as topping for yogurt or oatmeal.
Additional Tips
- Add maple syrup to the filling for an extra sweet twist.
- Use decorative pie crust cutouts on top before baking.
- Mix cream cheese into the filling for a pumpkin cheesecake vibe.
Make It a Showstopper
Serve the pies on a tiered tray or wooden board with autumn decor—think cinnamon sticks, mini pumpkins, and fall leaves. A dollop of whipped cream piped on top adds bakery-worthy flair.
Variations to Try
- Maple Pumpkin Pies: Add 1 tablespoon maple syrup to the filling.
- Ginger Snap Crust: Use crushed ginger snap cookies for a spicy base.
- Chocolate Swirl: Add a bit of melted chocolate on top before baking.
- Nutty Topping: Sprinkle chopped walnuts or pecans on each pie.
- Mini Cheesecake Pumpkin Pies: Add a thin layer of cream cheese beneath the filling.
FAQ’s
Q1: Can I use canned pumpkin pie filling?
Yes, but skip the sugar and spices since it’s already seasoned.
Q2: How do I prevent soggy bottoms?
Pre-bake the crusts for 5–6 minutes before adding the filling.
Q3: Can I make these gluten-free?
Use gluten-free pie crust or graham cracker crusts.
Q4: Do I need to refrigerate them?
Yes, store leftovers in the fridge for up to 4 days.
Q5: Can I freeze mini pumpkin pies?
Absolutely! Wrap individually and freeze up to 2 months.
Q6: Can I double the recipe?
Yes, just use a second muffin tin or bake in batches.
Q7: How do I know they’re done?
The center should look set and slightly puffed. A toothpick should come out clean.
Q8: Can kids help with this recipe?
Definitely! Let them cut the dough and fill the cups.
Q9: What’s the best way to top them?
Whipped cream, cinnamon, or even a drizzle of caramel.
Q10: Do they taste good cold?
Yes! They’re just as delicious chilled as they are warm.
Conclusion
Mini pumpkin pies bring big flavor in a little package. Whether you’re serving a crowd or just treating yourself, they’re cozy, cute, and totally irresistible. Trust me, these are going to be your new fall favorite.
PrintMini Pumpkin Pies
Perfectly portioned mini pumpkin pies with a flaky crust and smooth, spiced filling. These bite-sized desserts are cozy, festive, and ideal for any fall gathering.
Ingredients
- 1 cup pumpkin puree
- 2/3 cup evaporated milk
- 1 large egg
- 1/3 cup brown sugar
- 1 teaspoon pumpkin pie spice
- 1/4 teaspoon salt
- 1 teaspoon vanilla extract
- 1 pie crust dough (store-bought or homemade)
Instructions
- Preheat oven to 375°F (190°C) and lightly grease a 12-cup muffin tin.
- In a bowl, whisk together pumpkin puree, evaporated milk, egg, brown sugar, pumpkin pie spice, salt, and vanilla until smooth.
- Roll out pie crust and cut 12 circles using a 3.5-inch cookie cutter.
- Press each crust circle into the muffin tin to form a cup.
- Spoon the filling into each crust, filling about 3/4 full.
- Bake for 25–28 minutes, or until centers are set and crust is golden.
- Cool in the pan for 10 minutes, then transfer to a wire rack to cool completely.
- Top with whipped cream or a sprinkle of cinnamon if desired.
Notes
- Pre-bake crusts for 5 minutes to prevent soggy bottoms.
- Use a cookie scoop for evenly portioned filling.
- Let pies cool completely before removing from the tin.