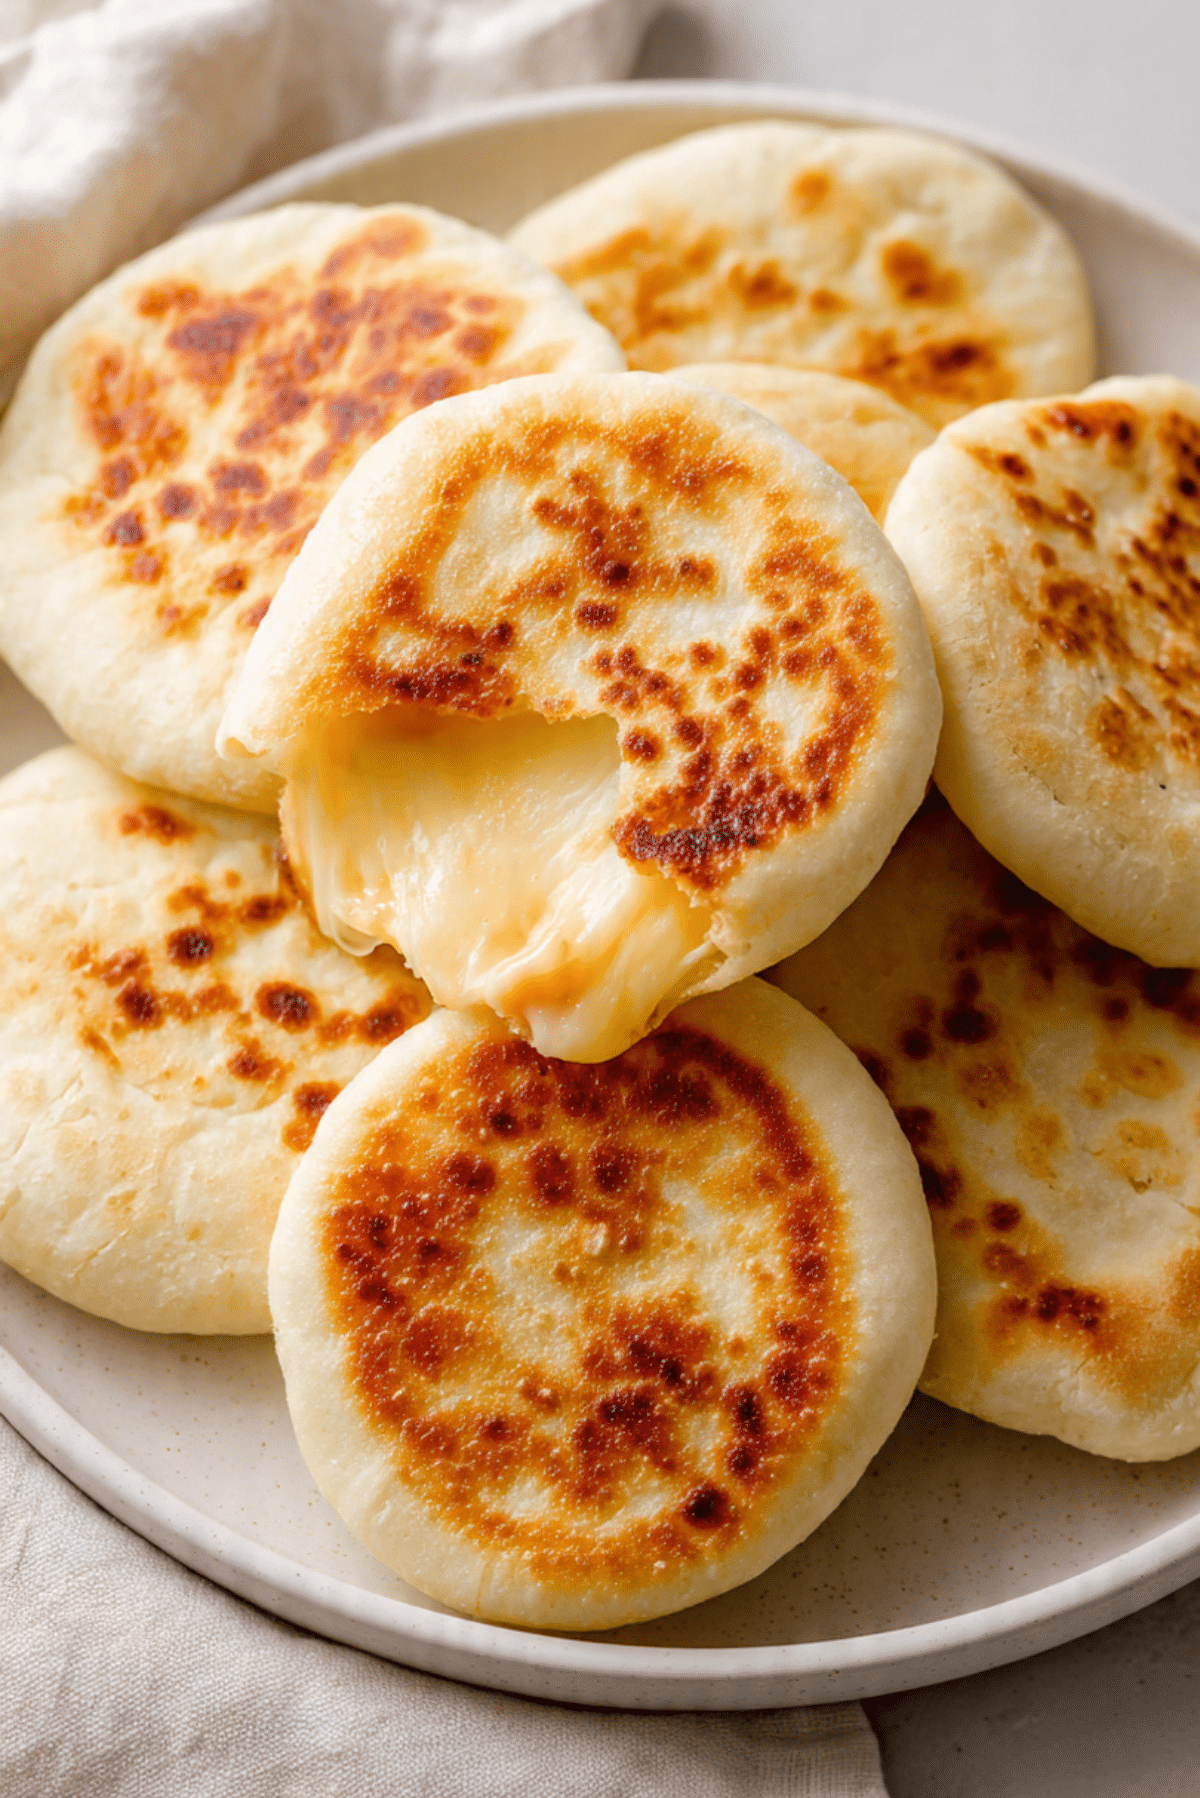
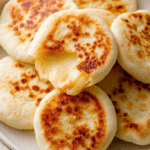
Mini Pita Stuffed Cheese Bread
There is something irresistible about warm bread stuffed with melted cheese. The moment you pull one apart and see that soft, stretchy center, it feels like comfort in its purest form. These Mini Pita Stuffed Cheese Bread rounds are simple, cozy, and completely satisfying. Trust me, you’re going to love this. They are golden on the outside, tender inside, and filled with creamy, gooey cheese that makes every bite worth it.
The Perfect Little Pocket of Comfort
These mini stuffed pitas are the kind of snack that disappears quickly from the table. They are small enough to serve as appetizers, yet filling enough to enjoy as a light meal. The outside becomes lightly crisp with beautiful golden spots, while the inside stays soft and fluffy.
And then comes the cheese. Warm, melted, and perfectly seasoned, it creates that satisfying stretch when you break one open. Let me tell you, it’s worth every bite.
A Classic Idea with a Fun Twist
Stuffed breads have been enjoyed in many cultures for centuries. From Middle Eastern pita pockets to Mediterranean cheese filled flatbreads, the idea of tucking flavorful fillings inside soft dough is timeless. This mini version keeps things simple and playful, turning a traditional concept into something bite sized and shareable.
It feels homemade and rustic, yet impressive enough for guests.
Why This Recipe Works Every Time
Before we start mixing, here is why this one is a keeper.
Versatile: Serve as an appetizer, snack, or alongside soups and salads.
Budget-Friendly: Made with pantry staples and simple cheese.
Quick and Easy: Straightforward dough and minimal ingredients.
Customizable: Add herbs, spices, or different cheese blends.
Crowd-Pleasing: Warm cheesy bread always wins.
Make-Ahead Friendly: Prepare and refrigerate before baking.
Great for Leftovers: Reheat in the oven to bring back that fresh texture.
Insider Tips for Perfect Stuffed Pitas
A few small tricks will elevate your results.
- Seal the edges tightly to prevent cheese from leaking.
- Do not overfill, a little cheese goes a long way.
- Roll evenly so they cook uniformly.
- Bake until lightly golden, not overly browned.
Tools You Will Need
Keep it simple with these basics.
Mixing Bowl: For preparing the dough.
Rolling Pin: Helps create even mini rounds.
Baking Sheet: For even baking.
Pastry Brush: Optional for brushing olive oil on top.
Ingredients That Make It Magical
Here is where the flavor begins.
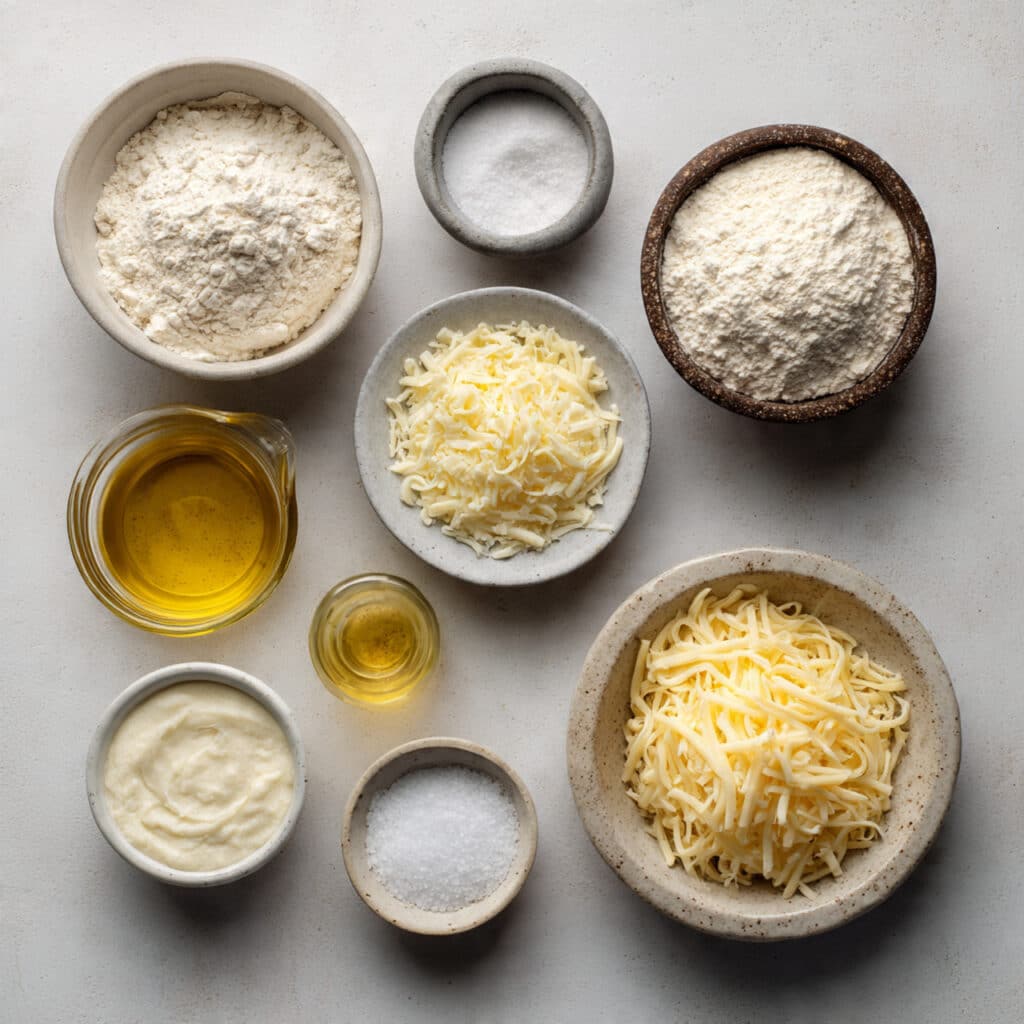
- All Purpose Flour: 2 1/2 cups, forms the structure of the dough.
- Warm Water: 1 cup, activates the yeast and hydrates the flour.
- Active Dry Yeast: 2 teaspoons, creates soft and airy texture.
- Olive Oil: 2 tablespoons, adds richness and softness.
- Salt: 1 teaspoon, enhances flavor.
- Granulated Sugar: 1 teaspoon, helps activate the yeast.
- Shredded Mozzarella Cheese: 1 1/2 cups, provides gooey melt.
Simple Substitutions
You can easily adapt this recipe.
Mozzarella Cheese: Use a mix of mozzarella and cheddar for sharper flavor.
All Purpose Flour: Substitute half with whole wheat for nuttier taste.
Olive Oil: Replace with melted butter if preferred.
Ingredient Spotlight
Mozzarella Cheese: Melts beautifully and gives that irresistible stretch.
Active Dry Yeast: Ensures the dough becomes light and fluffy.
Let’s Make Them Step by Step
Here are the steps you are going to follow.
- Preheat Your Equipment: Preheat oven to 400°F and line a baking sheet with parchment paper.
- Combine Ingredients: In a bowl, mix warm water, sugar, and yeast. Let sit 5 minutes until foamy. Add flour, salt, and olive oil. Mix and knead for 8 minutes until smooth.
- Prepare Your Cooking Vessel: Lightly oil a bowl, place dough inside, cover, and let rise for 1 hour until doubled.
- Assemble the Dish: Divide dough into 10 equal pieces. Roll each into a small circle. Place a spoonful of shredded mozzarella in the center, fold over, and seal edges tightly to form a ball. Gently flatten slightly.
- Cook to Perfection: Place on baking sheet and bake for 12 to 15 minutes until lightly golden.
- Finishing Touches: Brush tops lightly with olive oil while warm.
- Serve and Enjoy: Serve warm for the best cheese melt and texture.
Texture and Flavor Harmony
The outside is lightly crisp with soft golden patches. Inside, the bread is fluffy and airy, wrapping around creamy melted cheese. The flavor is simple yet comforting, warm bread and rich cheese working together perfectly.
Helpful Baking Tips
Keep these in mind.
- Let the dough rise fully for best softness.
- Do not skip sealing the edges carefully.
- Serve warm for maximum cheese pull.
What to Avoid for Best Results
Small mistakes can change texture.
- Overfilling can cause leaks.
- Underbaking may leave doughy centers.
- Rolling too thin can cause tearing.
Nutrition Facts Overview
Servings: 10 mini pitas
Calories per serving: 190
Note: These are approximate values.
Time Breakdown
Prep Time: 20 minutes
Cook Time: 15 minutes
Total Time: 1 hour 35 minutes
Make Ahead and Storage Tips
Prepare the dough ahead and refrigerate overnight after the first rise. Baked pitas store in an airtight container for up to 3 days. Reheat in oven at 350°F for 5 to 7 minutes. Freeze baked pitas for up to 2 months.
Serving Ideas
Serve with marinara sauce for dipping. Pair with soups or salads. Add a sprinkle of dried herbs on top for extra aroma.
Creative Leftover Transformations
Slice and toast for cheesy croutons. Use as mini sandwich buns. Cube and bake into savory bread bites.
Extra Kitchen Wisdom
Use high quality cheese for better melt. Adjust salt depending on cheese type.
Make It a Showstopper
Brush with garlic butter and sprinkle chopped parsley before serving. Arrange on a wooden board for rustic appeal.
Variations to Try
- Add chopped spinach inside for extra flavor.
- Mix in a pinch of chili flakes for gentle heat.
- Add grated parmesan for deeper savory notes.
- Use a blend of cheeses for complex flavor.
FAQ’s
Q1: Can I make them without yeast?
You can try a baking powder dough, but texture will differ.
Q2: Can I air fry them?
Yes, cook at 375°F for about 8 minutes.
Q3: How do I prevent cheese from leaking?
Seal edges tightly and avoid overfilling.
Q4: Can I freeze the dough?
Yes, after first rise, freeze tightly wrapped.
Q5: Can I use whole wheat flour?
Yes, replace up to half for softer texture.
Q6: Why are they dense?
The dough may not have risen enough.
Q7: Can I make them larger?
Yes, adjust baking time accordingly.
Q8: What cheese melts best?
Mozzarella works beautifully.
Q9: How do I reheat?
Use oven for best texture.
Q10: Can I add herbs?
Absolutely, mix into dough or filling.
Conclusion
These Mini Pita Stuffed Cheese Bread rounds are simple, comforting, and packed with gooey goodness. The golden crust, soft interior, and melted cheese center make them impossible to resist. This one’s a total game changer for gatherings or cozy evenings at home. Bake a batch and watch them disappear.
PrintMini Pita Stuffed Cheese Bread
Soft and fluffy mini pita breads stuffed with gooey melted mozzarella cheese and baked until lightly golden. Perfect as a comforting snack, appetizer, or side dish.
Ingredients
- 2 1/2 cups all purpose flour
- 1 cup warm water
- 2 teaspoons active dry yeast
- 2 tablespoons olive oil
- 1 teaspoon salt
- 1 teaspoon granulated sugar
- 1 1/2 cups shredded mozzarella cheese
Instructions
- Preheat oven to 400°F and line a baking sheet with parchment paper.
- In a bowl, combine warm water, sugar, and active dry yeast. Let sit for 5 minutes until foamy.
- Add all purpose flour, salt, and olive oil. Mix and knead for about 8 minutes until smooth and elastic.
- Place the dough in a lightly oiled bowl, cover, and let rise for 1 hour or until doubled in size.
- Divide dough into 10 equal pieces.
- Roll each piece into a small circle.
- Place a spoonful of shredded mozzarella cheese in the center of each circle.
- Fold the edges over the cheese, pinch tightly to seal, and shape into a ball. Gently flatten slightly.
- Arrange on the prepared baking sheet.
- Bake for 12 to 15 minutes until lightly golden.
- Brush lightly with olive oil while warm and serve.
Notes
- Seal the dough tightly to prevent cheese from leaking during baking.
- Do not overfill with cheese.
- Reheat in the oven at 350°F for 5 to 7 minutes for best texture.