Mini Egg Chocolate Bark
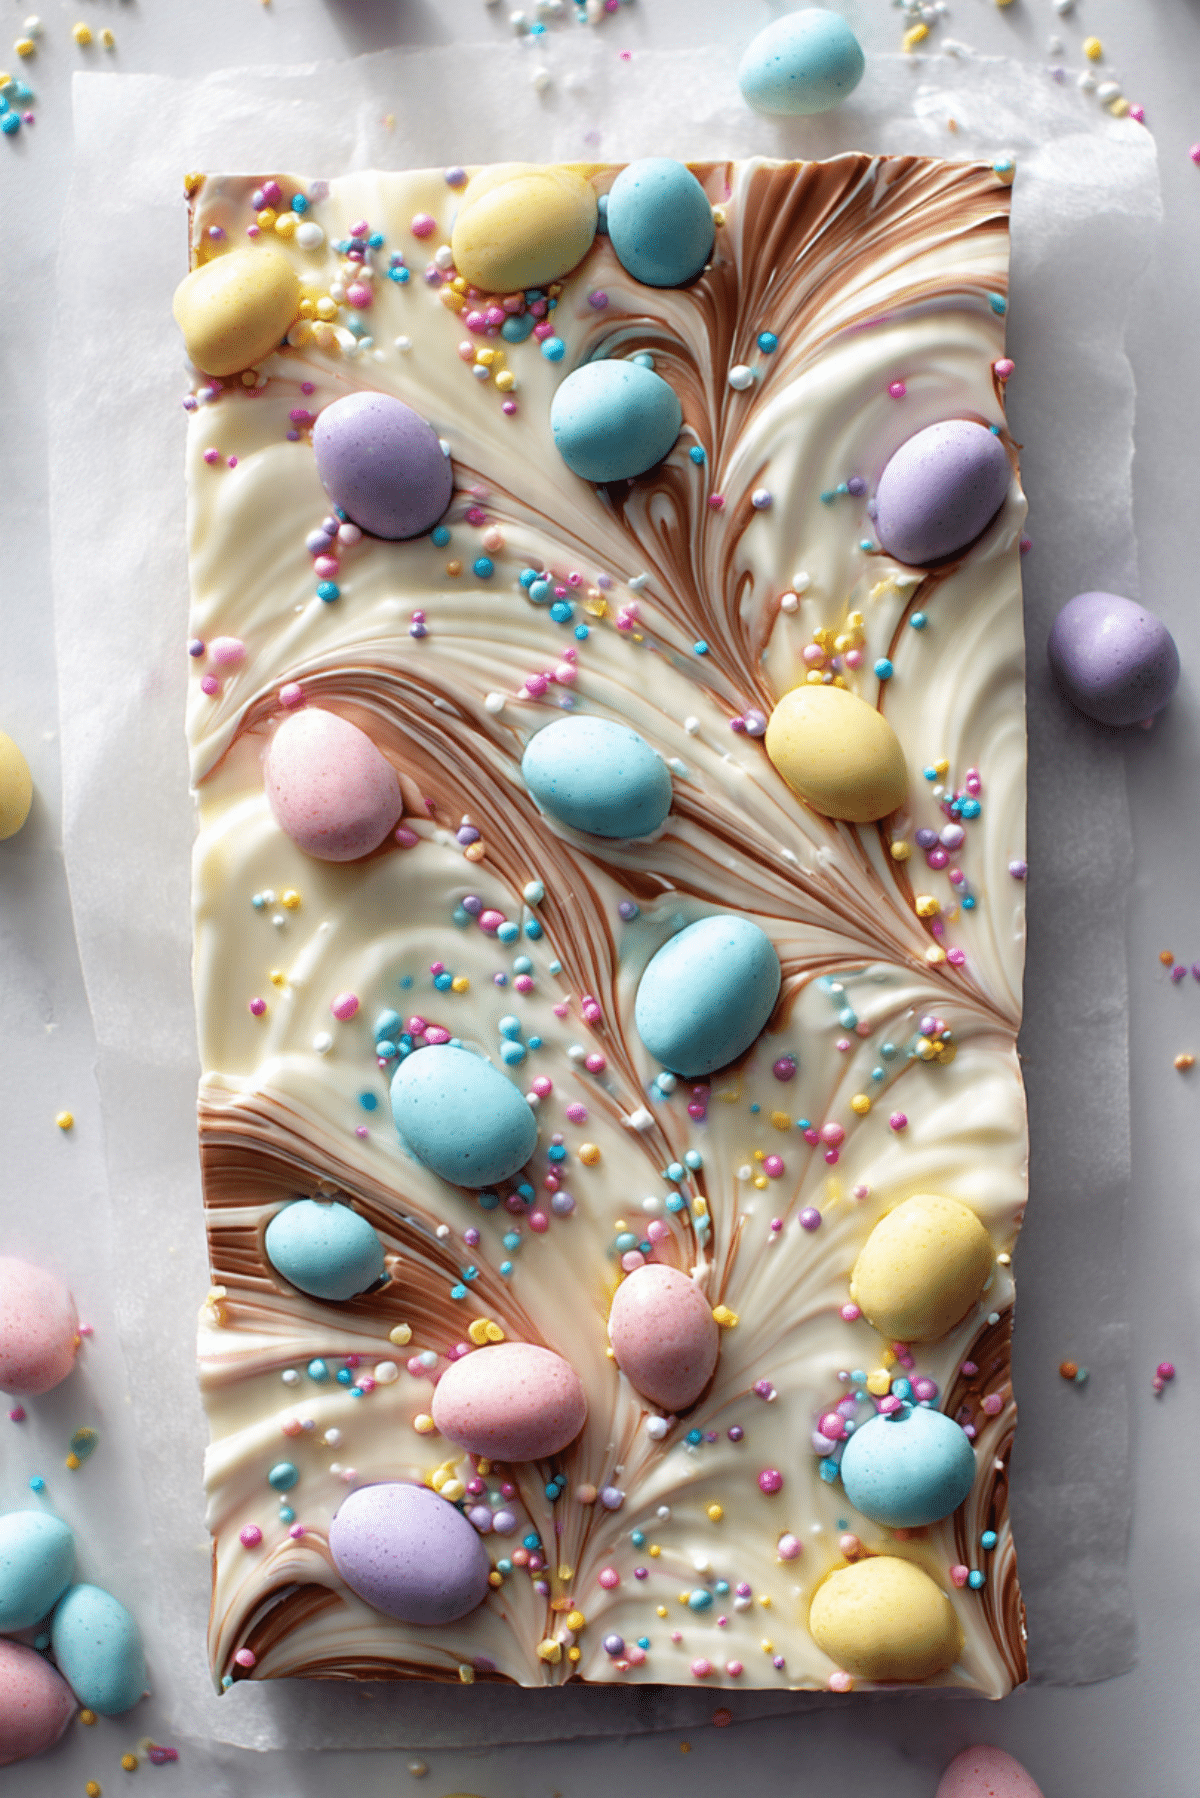
There is something about colorful candy-coated chocolate nestled into silky melted chocolate that instantly makes you feel like a kid again. This Mini Egg Chocolate Bark is playful, crunchy, creamy, and just a little bit nostalgic. The pastel pops of candy against glossy swirls of chocolate feel like spring on a baking tray. Trust me, you’re going to love this. It is the kind of sweet treat you break apart with your hands, sneak a piece from the fridge, and then come back for just one more shard.
Why This Sweet Treat Feels Like Pure Joy on a Tray
What makes this bark so irresistible is the contrast. You get that smooth snap of set chocolate, followed by the crisp candy shell and creamy chocolate center of each mini egg. The sprinkles add a tiny crunch and a burst of color that makes every piece feel festive.
It is simple, no baking required, and it comes together in minutes. This one’s a total game-changer when you need something impressive without turning your kitchen upside down.
A Little Story Behind Chocolate Bark and Candy Eggs
Chocolate bark has been around for generations, often made during holidays as a quick confection that looks beautiful but requires very little effort. It became popular because it is flexible, forgiving, and easy to customize with whatever toppings you have on hand.
Candy mini eggs, on the other hand, are a seasonal favorite in many places, especially around spring celebrations. Their crisp shells and creamy centers make them perfect for decorating desserts. When you combine the two, you get something that feels both traditional and playful at the same time.
Why You Can Always Count on This Recipe
Before we dive into the details, let me tell you why this one earns a permanent spot in your dessert rotation.
Versatile: You can swap toppings, change the chocolate, or adjust the thickness to suit your taste.
Budget-Friendly: With just a few ingredients, you get a generous batch that feeds a crowd.
Quick and Easy: No oven, no complicated steps, just melt, swirl, and chill.
Customizable: Add different candies, nuts, or drizzle patterns to make it your own.
Crowd-Pleasing: Kids love it, adults secretly love it even more.
Make-Ahead Friendly: It stores beautifully in the fridge for days.
Great for Leftovers: Break it up and sprinkle over ice cream or cupcakes for extra flair.
Pro Tips to Make It Look and Taste Amazing
A little attention to detail takes this from good to unforgettable.
- Use good quality chocolate, it melts smoother and sets with a better snap.
- Melt slowly and gently to avoid overheating, which can make chocolate grainy.
- Lightly press the mini eggs into the melted chocolate so they stick once set.
- Chill just until firm, over-chilling can sometimes cause condensation later.
Essential Kitchen Tools for Smooth Success
You do not need much, which is part of the charm.
Baking Sheet: A standard rimmed sheet gives you space to spread the chocolate evenly.
Parchment Paper: Prevents sticking and makes lifting the bark effortless.
Heatproof Bowls: For melting the chocolates separately.
Spatula: Helps spread and create those pretty swirls.
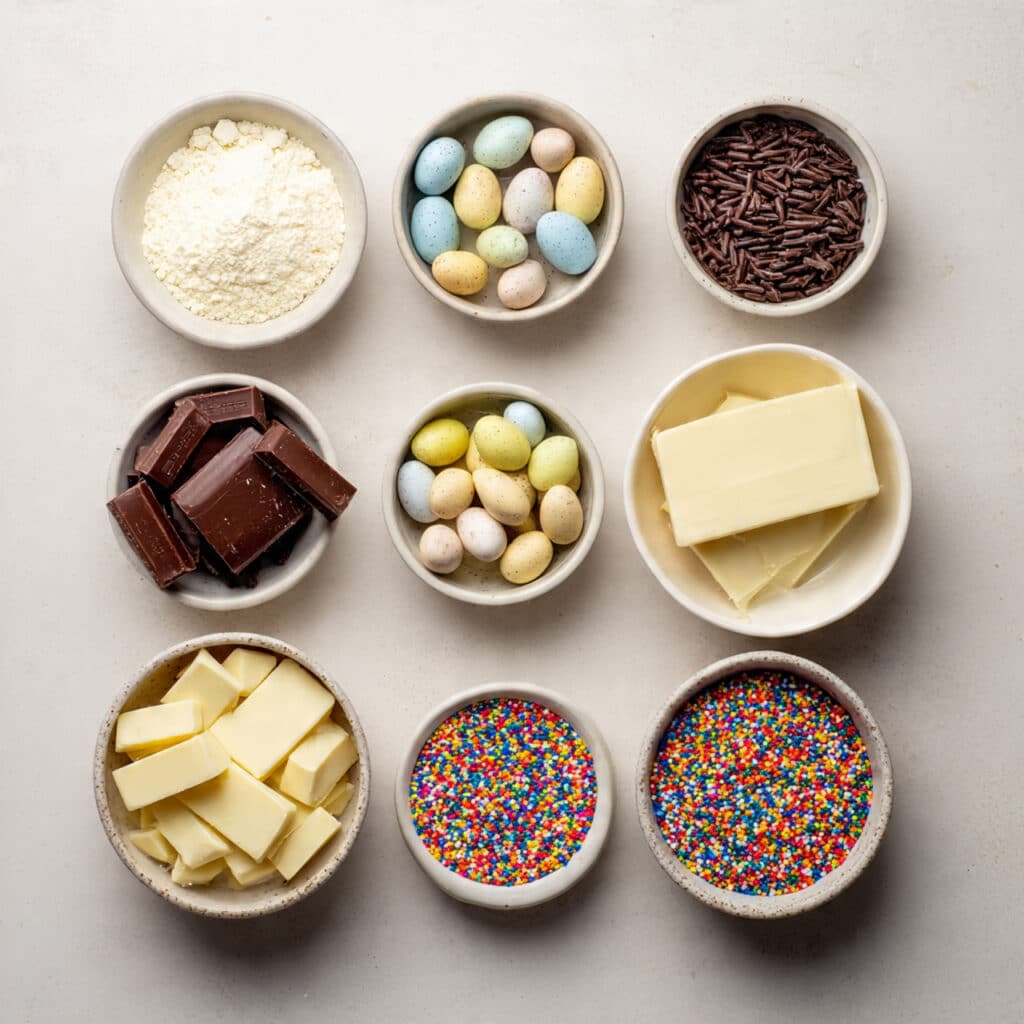
Ingredients You Will Need for Mini Egg Chocolate Bark
The magic here comes from simple ingredients working together in harmony.
- Milk Chocolate: 16 ounces, about 450 grams, chopped. This forms the creamy base with a rich, sweet flavor.
- White Chocolate: 8 ounces, about 225 grams, chopped. Used for swirling and adding visual contrast.
- Candy-Coated Mini Chocolate Eggs: 1 cup, about 170 grams. These bring crunch and color.
- Colorful Sprinkles: 2 tablespoons. They add texture and a festive touch.
Easy Ingredient Swaps If You Want to Experiment
If you feel like getting creative, here are a few ideas.
Milk Chocolate: Use dark chocolate for a deeper, slightly less sweet flavor.
White Chocolate: Swap with caramel-flavored chips for a different swirl effect.
Mini Eggs: Try crushed chocolate candies or even chopped chocolate bars.
Sprinkles: Use crushed nuts or toasted coconut for added texture.
Spotlight on the Stars of the Show
Let’s take a closer look at what makes this bark shine.
Candy-Coated Mini Chocolate Eggs: Their crisp outer shell contrasts beautifully with the smooth chocolate base, giving each bite a satisfying crunch.
White Chocolate: It not only adds sweetness but creates that gorgeous marbled look that makes the bark visually stunning.
Let’s Make It Together
Now let’s dive into the fun part. Here are the steps you are going to follow.
- Preheat Your Equipment: There is no oven needed, but line a rimmed baking sheet with parchment paper and set it aside.
- Combine Ingredients: Place the milk chocolate in a heatproof bowl and melt gently over a pot of simmering water or in short microwave intervals, stirring until smooth. In a separate bowl, melt the white chocolate the same way.
- Prepare Your Cooking Vessel: Pour the melted milk chocolate onto the prepared baking sheet. Use a spatula to spread it into an even layer about one quarter inch thick.
- Assemble the Dish: Spoon the melted white chocolate over the milk chocolate in small dollops. Use a toothpick or knife to gently swirl the two together without fully mixing. Scatter the mini eggs evenly on top and sprinkle with colorful sprinkles. Lightly press them into the surface.
- Cook to Perfection: Transfer the tray to the refrigerator and chill for about 30 minutes, or until fully set and firm to the touch.
- Finishing Touches: Once set, lift the parchment paper and place the bark on a cutting board. Break into irregular pieces using your hands or a knife.
- Serve and Enjoy: Arrange on a platter and serve immediately, or store for later snacking. Let me tell you, it’s worth every bite.
The Texture and Flavor Magic in Every Bite
The first thing you notice is the snap. That gentle crack when you break a piece apart is so satisfying. Then comes the melt, creamy milk chocolate blending with sweet white chocolate. Just when you think it cannot get better, you hit the crisp shell of a mini egg, followed by its smooth center. It is layers of texture that keep each bite interesting.
Smart Tips for Even Better Results
If you want to elevate it even more, keep these in mind.
- Let the chocolate cool slightly before adding toppings so they do not sink.
- Use a toothpick for delicate swirls instead of overmixing with a spoon.
- Store in an airtight container to maintain that perfect snap.
Common Mistakes and How to Avoid Them
Even simple recipes have a few traps.
- Overheating the chocolate, which can cause it to seize. Melt slowly and stir often.
- Spreading the chocolate too thin, which makes the bark fragile.
- Adding toppings too late, they may not stick properly.
Nutrition Highlights You Should Know
Servings: 12 pieces
Calories per serving: 210
Note: These are approximate values.
Time Breakdown at a Glance
Prep Time: 15 minutes
Cook Time: 0 minutes
Total Time: 45 minutes
Make-Ahead and Storage Tips
This bark is perfect for planning ahead. You can prepare it up to five days in advance and store it in an airtight container in the refrigerator. If stacking pieces, place parchment paper between layers.
Freezing works too. Store in a freezer-safe container for up to two months, then thaw in the refrigerator before serving. Avoid microwaving to thaw, as it may affect the texture.
Fun and Festive Ways to Serve It
Pile the pieces high on a cake stand for a party centerpiece. Add small bags tied with ribbon for edible gifts. Or crumble it over vanilla ice cream for an easy dessert upgrade.
Transforming Leftovers into Something New
If you somehow have leftovers, here are a few ideas.
Chop and mix into cookie dough before baking. Sprinkle over frosted cupcakes. Stir chunks into homemade trail mix for a sweet surprise.
Extra Little Tips for Big Flavor
Use a mix of whole and lightly crushed mini eggs for varied texture. Add a tiny pinch of sea salt over the top before chilling for a sweet and salty contrast. Keep your chocolate dry, even a drop of water can change the texture.
Turn It Into a Stunning Dessert Display
For a showstopping look, create dramatic swirls with a skewer and vary the thickness slightly so some areas are marbled more heavily. Arrange broken pieces with the swirled side facing up to showcase the pattern.
Fun Variations to Keep It Interesting
- Add crushed pretzels for a sweet and salty twist.
- Mix in pastel marshmallows for extra chewiness.
- Drizzle melted dark chocolate on top for more contrast.
- Use crushed freeze-dried berries for a fruity note.
FAQ’s
Q1: Can I use chocolate chips instead of chopped chocolate?
Yes, just make sure they melt smoothly and stir well to avoid lumps.
Q2: How do I prevent streaky chocolate?
Melt gently and avoid introducing moisture.
Q3: Can I make this dairy free?
Yes, use dairy free chocolate alternatives.
Q4: How thick should the chocolate layer be?
About one quarter inch works best for a sturdy but easy to break bark.
Q5: Do I need to temper the chocolate?
For casual snacking, melting is fine. Tempering gives a shinier finish.
Q6: How long does it take to set?
About 30 minutes in the refrigerator.
Q7: Can kids help make this?
Absolutely, they can add toppings and swirl the chocolate.
Q8: Why did my toppings sink?
The chocolate may have been too warm when added.
Q9: Can I add nuts?
Yes, chopped nuts add wonderful crunch.
Q10: How should I store it for gifting?
Wrap pieces in parchment and place in decorative boxes.
Conclusion
There is something so satisfying about breaking apart a tray of colorful chocolate bark and sharing it with people you love. It is simple, cheerful, and full of texture and flavor. Whether you make it for a holiday, a party, or just because you are craving something sweet, this Mini Egg Chocolate Bark is sure to bring smiles. Go ahead and give it a try, you might find yourself making it again and again.
PrintMini Egg Chocolate Bark
A festive and colorful chocolate bark made with creamy milk chocolate, swirled white chocolate, and crunchy candy-coated mini eggs. This no-bake treat is quick, easy, and perfect for sharing.
Ingredients
- 16 ounces (450 grams) milk chocolate, chopped
- 8 ounces (225 grams) white chocolate, chopped
- 1 cup (170 grams) candy-coated mini chocolate eggs
- 2 tablespoons colorful sprinkles
Instructions
- Line a rimmed baking sheet with parchment paper and set aside.
- Melt the milk chocolate in a heatproof bowl over simmering water or in short microwave intervals, stirring until smooth.
- In a separate bowl, melt the white chocolate using the same method.
- Pour the melted milk chocolate onto the prepared baking sheet and spread into an even layer about 1/4 inch thick.
- Spoon the melted white chocolate over the milk chocolate and gently swirl with a toothpick or knife.
- Scatter the mini eggs evenly over the surface and sprinkle with colorful sprinkles. Lightly press them into the chocolate.
- Refrigerate for about 30 minutes or until fully set.
- Break into pieces and serve.
Notes
- Melt chocolate slowly to prevent seizing.
- Let the chocolate cool slightly before adding toppings so they do not sink.
- Store in an airtight container in the refrigerator for up to 5 days.