Homemade Chocolate Pudding
There’s just something magical about a silky, rich chocolate pudding. It’s the kind of dessert that brings instant comfort, a little nostalgic joy, and a whole lot of chocolatey satisfaction. The moment that cool, creamy spoonful hits your tongue, it melts with deep cocoa notes and just the right amount of sweetness. Whether you’re serving it up in elegant ramekins or devouring it straight from the bowl with a spoon in one hand and zero regrets in the other, this homemade version is a total game-changer.
Behind the Recipe
Growing up, chocolate pudding usually came from a box. And sure, it got the job done. But once I made it from scratch for the first time, there was no turning back. The homemade version is smoother, more flavorful, and a whole lot more satisfying. I still remember the first time I stirred that bubbling pot of cocoa and milk, the aroma filling the kitchen, my patience running thin as it cooled. But oh, was it worth every second.
Recipe Origin or Trivia
Chocolate pudding has its roots in early American and European custard-style desserts, though it really rose to fame in the 20th century as a quick, go-to treat. Originally more like a stovetop custard, it was often thickened with eggs and flour. Today’s versions vary from eggy and decadent to cornstarch-thickened and ultra-smooth. Homemade pudding holds a proud place in dessert history, especially in family kitchens where comfort food reigns supreme.
Why You’ll Love Homemade Chocolate Pudding
There are plenty of reasons this pudding will become a staple in your dessert rotation.
Versatile: Serve it plain, top it with whipped cream, or layer it into parfaits and pies.
Budget-Friendly: Uses pantry basics and saves money compared to store-bought versions.
Quick and Easy: No baking involved, just a quick stovetop method.
Customizable: Add a pinch of cinnamon, espresso, or sea salt for a twist.
Crowd-Pleasing: A sure hit with both kids and adults alike.
Make-Ahead Friendly: Perfect to prepare ahead and chill until dessert time.
Great for Leftovers: Stays delicious in the fridge for several days.
Chef’s Pro Tips for Perfect Results
Making chocolate pudding from scratch is easier than you think, but here’s how to nail it every time:
- Whisk Constantly: Don’t walk away. Whisking prevents lumps and ensures silky texture.
- Use Good Cocoa Powder: Quality cocoa means deeper chocolate flavor. It’s worth it.
- Don’t Rush the Simmer: Let it bubble just enough to thicken. Too short, and it stays runny.
- Strain for Smoothness: A quick strain through a sieve gives you that velvet finish.
- Cover While Cooling: Place plastic wrap directly on the surface to prevent skin from forming.
Kitchen Tools You’ll Need
To keep things smooth and simple, gather these tools before you begin.
Medium Saucepan: Your go-to for cooking the pudding mixture evenly.
Whisk: Essential for combining ingredients and preventing clumps.
Measuring Cups & Spoons: Accuracy makes a difference in texture.
Fine Mesh Sieve: Optional, but perfect for an ultra-smooth finish.
Serving Bowls or Ramekins: For that final elegant touch.
Ingredients in Homemade Chocolate Pudding
Each ingredient works together to create the creamy, chocolaty dream you’re about to whip up.
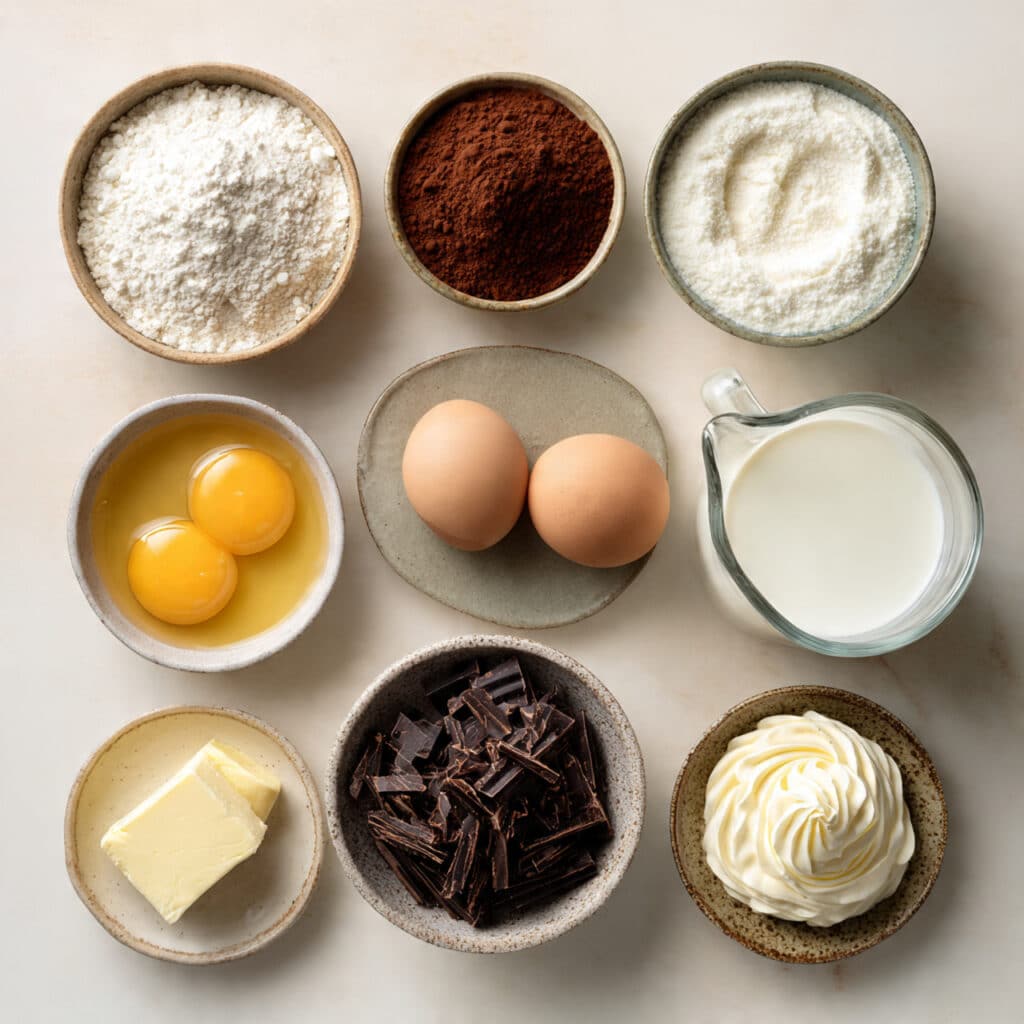
- Granulated Sugar: 2/3 cup Sweetens the pudding just enough without overpowering the chocolate.
- Unsweetened Cocoa Powder: 1/3 cup The heart of the flavor, so choose a high-quality brand.
- Cornstarch: 3 tablespoons Helps thicken the pudding to that perfect spoonable texture.
- Salt: 1/4 teaspoon Enhances the chocolate flavor and balances the sweetness.
- Whole Milk: 2 3/4 cups Adds creaminess and richness.
- Egg Yolks: 3 large Boost the texture and give a custard-like feel.
- Unsalted Butter: 2 tablespoons Melted in at the end for added richness.
- Vanilla Extract: 1 1/2 teaspoons Rounds out the flavor with warm, aromatic depth.
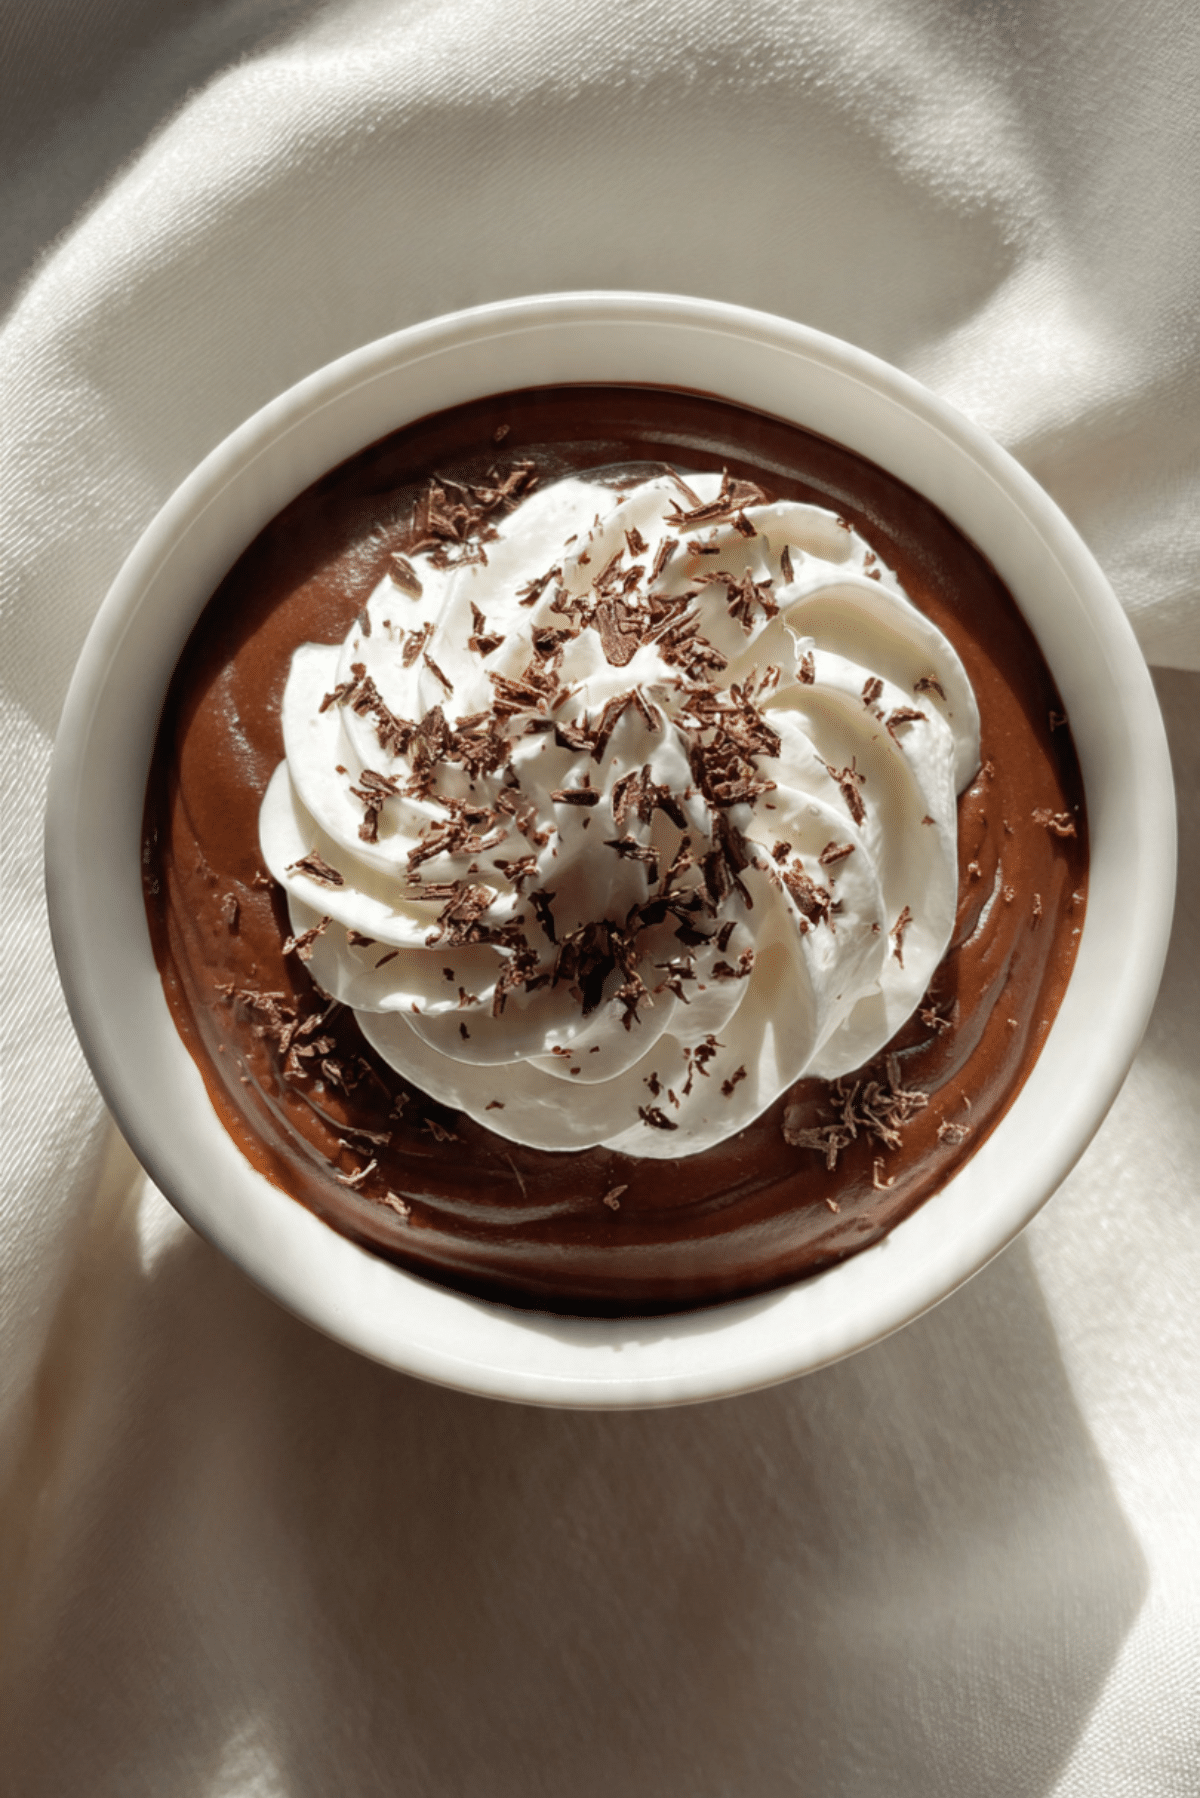
- Whipped Cream and Chocolate Shavings: For topping Totally optional but highly recommended for that final flourish.
Ingredient Substitutions
Sometimes you need to work with what you’ve got. Here’s how to make it work.
Whole Milk: Use 2% milk or a non-dairy alternative like oat milk for a lighter option.
Granulated Sugar: Swap with coconut sugar or maple sugar for a deeper taste.
Cornstarch: Arrowroot powder or tapioca starch will also do the trick.
Butter: Dairy-free butter or coconut oil can step in if needed.
Egg Yolks: Omit for an eggless version, just increase cornstarch by 1 tablespoon.
Ingredient Spotlight
Cocoa Powder: The star of the show, cocoa powder adds intensity and depth. A dark Dutch-processed cocoa gives the richest color and flavor.
Cornstarch: This pantry hero helps thicken the pudding to the perfect consistency without needing to bake or chill forever.
Instructions for Making Homemade Chocolate Pudding
This recipe is as fun to make as it is to eat. Just follow these steps, and you’ll have a dreamy dessert in no time.
1. Preheat Your Equipment:
No preheating needed, but have your saucepan ready on the stovetop and bowls prepped for chilling.
2. Combine Ingredients:
In a medium saucepan, whisk together sugar, cocoa powder, cornstarch, and salt. Slowly whisk in the milk until fully blended, then whisk in the egg yolks until smooth.
3. Prepare Your Cooking Vessel:
Place the saucepan over medium heat and begin stirring continuously with your whisk.
4. Assemble the Dish:
As the mixture heats, it will slowly start to thicken. Keep whisking gently to avoid lumps.
5. Cook to Perfection:
Let it reach a gentle boil, then continue cooking for 1-2 minutes until thick. Remove from heat, stir in butter and vanilla extract until smooth.
6. Finishing Touches:
Strain through a fine mesh sieve into a large bowl to ensure smoothness. Pour into individual serving dishes.
7. Serve and Enjoy:
Cover with plastic wrap directly on the surface to prevent a skin from forming. Chill for at least 2 hours. Serve cold with whipped cream and chocolate shavings.
Texture & Flavor Secrets
The magic of this pudding is in its velvety texture and balanced flavor. The cornstarch gives it that thick but smooth consistency, while the cocoa powder brings bold richness. Egg yolks add a custard-like body, and the butter at the end seals in a glossy, luscious finish. A dash of salt makes the chocolate pop, and the vanilla adds that bakery-fresh aroma.
Cooking Tips & Tricks
Making homemade pudding is surprisingly easy, but here’s how to make it even better:
- Stir constantly to avoid burning or clumps.
- Use a silicone whisk for a non-stick pan.
- Taste before chilling and adjust sugar or salt if needed.
- Strain the pudding for a luxe, restaurant-style smoothness.
What to Avoid
Here are a few common pitfalls and how to steer clear of them:
- Lumpy Texture: Always whisk ingredients before heating. Stir constantly.
- Too Runny: Make sure it boils slightly and thickens fully before removing from heat.
- Skin Formation: Press plastic wrap directly on pudding surface.
- Overcooked Eggs: Add milk gradually to avoid scrambling the yolks.
Nutrition Facts
Servings: 4
Calories per serving: 280
Note: These are approximate values.
Preparation Time
Prep Time: 10 minutes
Cook Time: 10 minutes
Total Time: 20 minutes
Make-Ahead and Storage Tips
This pudding is a dream to make ahead. Chill it in the fridge for up to 4 days, covered tightly. If you’re prepping for a dinner party, make it the night before and top with whipped cream just before serving. It doesn’t freeze well due to texture changes, but reheats gently on the stovetop if needed.
How to Serve Homemade Chocolate Pudding
Serve it in clear glass cups for a layered look or in small ramekins for a cozy dessert feel. Top with whipped cream, chocolate curls, crushed cookies, or even fresh berries for contrast. It also works beautifully as a pie filling or layered in trifles.
Creative Leftover Transformations
Have extra pudding? Get playful with it.
- Use it as a dip for strawberries or graham crackers.
- Layer into a chocolate trifle with cake and cream.
- Swirl into vanilla yogurt or oatmeal for a decadent breakfast.
- Freeze into pudding popsicles for a cool treat.
Additional Tips
- Let your pudding cool slightly before pouring into serving bowls to avoid condensation.
- Add a pinch of espresso powder for mocha vibes.
- For a silky finish, don’t skip the butter at the end.
Make It a Showstopper
Sprinkle chocolate shavings or cocoa powder over the whipped cream topping. Serve in vintage teacups or glass jars for that Pinterest-worthy finish. A drizzle of melted chocolate or salted caramel never hurts either.
Variations to Try
- Mexican Chocolate Pudding: Add cinnamon and a dash of chili powder.
- Mocha Version: Stir in 1 teaspoon of espresso powder.
- Peanut Butter Swirl: Add a spoonful of peanut butter before chilling.
- Mint Chocolate: Use peppermint extract instead of vanilla.
- Double Dark: Use dark cocoa powder and top with dark chocolate chunks.
FAQ’s
Q1: Can I make this without eggs?
A1: Yes, just increase the cornstarch to 4 tablespoons to thicken without yolks.
Q2: What milk alternative works best?
A2: Oat milk or almond milk are great dairy-free choices.
Q3: How long does it last in the fridge?
A3: Up to 4 days when stored in a sealed container.
Q4: Can I serve this warm?
A4: Definitely, it’s delicious warm, just skip the chilling.
Q5: Why did my pudding turn grainy?
A5: Overcooking or not stirring enough can cause that. Try straining it.
Q6: Can I use dark chocolate instead of cocoa powder?
A6: You can, just reduce the sugar slightly and melt the chocolate into the milk.
Q7: Is this gluten-free?
A7: Yes, as long as your cornstarch is certified gluten-free.
Q8: Can I double the recipe?
A8: Absolutely, just use a larger saucepan and stir a bit longer.
Q9: What’s the best topping?
A9: Whipped cream and chocolate shavings are classic, but berries are great too.
Q10: Does it freeze well?
A10: Not really. It changes texture when thawed, so best to enjoy it fresh.
Conclusion
This homemade chocolate pudding is more than just a dessert, it’s a moment of pure joy in every spoonful. With its luscious texture, bold cocoa flavor, and endless ways to serve it up, it’s one of those recipes you’ll come back to again and again. Trust me, you’re going to love this.
Homemade Chocolate Pudding
Silky, rich, and incredibly satisfying, this homemade chocolate pudding is a comforting treat made from scratch with pantry staples. It’s creamy, deeply chocolatey, and perfect for any day you need a little indulgence.
Ingredients
- 2/3 cup granulated sugar
- 1/3 cup unsweetened cocoa powder
- 3 tablespoons cornstarch
- 1/4 teaspoon salt
- 2 3/4 cups whole milk
- 3 large egg yolks
- 2 tablespoons unsalted butter
- 1 1/2 teaspoons vanilla extract
- Whipped cream and chocolate shavings, for topping (optional)
Instructions
- In a medium saucepan, whisk together sugar, cocoa powder, cornstarch, and salt until well combined.
- Gradually whisk in the milk until smooth, then whisk in the egg yolks.
- Place the saucepan over medium heat and cook, whisking constantly, until the mixture begins to thicken and comes to a gentle boil.
- Continue to cook for 1-2 minutes while whisking, then remove from heat.
- Stir in the butter and vanilla extract until fully incorporated and smooth.
- Optional: Strain the pudding through a fine mesh sieve into a clean bowl for an ultra-smooth texture.
- Pour into individual bowls or ramekins and cover with plastic wrap, pressing it directly onto the surface to prevent a skin from forming.
- Chill for at least 2 hours before serving. Top with whipped cream and chocolate shavings if desired.
Notes
- Use high-quality cocoa powder for a richer chocolate flavor.
- To make it egg-free, increase the cornstarch to 4 tablespoons and omit the yolks.
- For a mocha twist, stir in 1 teaspoon of espresso powder with the cocoa.