Herb Cheese Bites
There is something instantly comforting about small, creamy bites that melt in your mouth, especially when they are rolled in herbs, nuts, and cheese. These herb cheese bites feel like the kind of snack you set out for guests and suddenly everyone gathers around the table. They are rich but fresh, simple but special, and trust me, you’re going to love this from the very first bite.
Why Everyone Falls in Love With These Little Bites
What makes these bites so irresistible is how effortlessly they fit into any moment. They feel elegant enough for a party, yet relaxed enough for a quiet afternoon snack. The contrast between the creamy center and the textured coating makes every bite interesting and satisfying.
A Little Backstory and Inspiration
Cheese rolled in herbs has long been a classic way to stretch simple ingredients into something memorable. From European cheese boards to home kitchens, rolling soft cheese in herbs and nuts has always been about balance and presentation. Over time, these bite-sized versions became a favorite for gatherings because they are easy to serve and even easier to enjoy.
Why This Recipe Always Works
These herb cheese bites are reliable, flexible, and friendly for cooks of all levels. Let me tell you why they deserve a spot in your go-to recipes.
Versatile: They work as an appetizer, snack, or even part of a light lunch platter.
Budget-Friendly: Simple ingredients come together without anything fancy or expensive.
Quick and Easy: No cooking required, just mixing, rolling, and chilling.
Customizable: You can switch up herbs, nuts, or cheese coatings to suit your taste.
Crowd-Pleasing: Creamy, savory, and bite-sized, they disappear fast at gatherings.
Make-Ahead Friendly: They actually taste better after chilling.
Great for Leftovers: Any extras hold well and stay delicious.
Chef-Level Tips Before You Start
A few small details can take these bites from good to unforgettable. Soft cheese is easier to shape, fresh herbs bring brighter flavor, and chilling at the right time helps everything hold together beautifully.
Kitchen Tools You Will Need
Before we dive in, let’s make sure your kitchen is ready for the job.
Mixing Bowl: For blending the cheese until smooth and creamy.
Spatula or Spoon: To combine everything evenly.
Small Plates or Bowls: For holding the different coatings.
Parchment Paper: To prevent sticking while chilling.
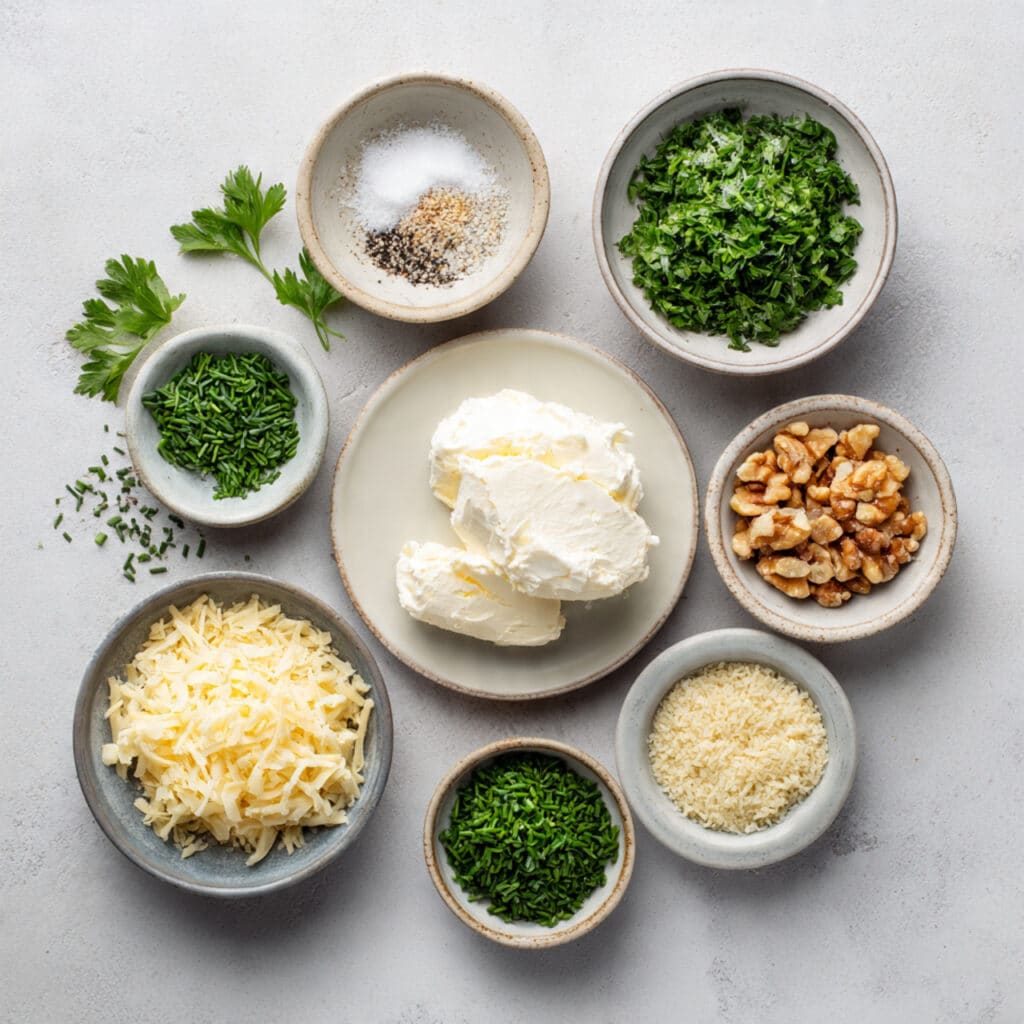
Ingredients You Will Need
The magic here comes from simple ingredients working together in harmony.
- Cream Cheese: 8 ounces, softened, this creates the rich and creamy base.
- Fresh Parsley: 2 tablespoons, finely chopped, adds freshness and color.
- Fresh Chives: 1 tablespoon, finely chopped, brings a mild onion note.
- Garlic Powder: 0.5 teaspoon, for gentle savory depth.
- Salt: 0.25 teaspoon, to balance the flavors.
- Black Pepper: 0.25 teaspoon, freshly ground for subtle warmth.
- Chopped Nuts: 0.5 cup, such as almonds or walnuts, for crunch.
- Grated Hard Cheese: 0.5 cup, for a salty and savory coating.
Smart Ingredient Swaps
If you like to experiment, these swaps work beautifully.
Cream Cheese: Use a lactose-free version if needed.
Parsley: Try dill or basil for a different herbal note.
Chives: Green onions work well in a pinch.
Chopped Nuts: Sunflower seeds are a great nut-free option.
Spotlight on Key Ingredients
Cream Cheese: This is the heart of the recipe, smooth, mild, and perfect for carrying flavor.
Fresh Herbs: They brighten the richness and make the bites taste fresh instead of heavy.
Let’s Make These Together
Now let’s dive into the fun part and bring everything together step by step.
- Preheat Your Equipment: No heat needed here, just clear some space in the fridge for chilling later.
- Combine Ingredients: In a bowl, mix the softened cream cheese, parsley, chives, garlic powder, salt, and black pepper until smooth.
- Prepare Your Cooking Vessel: Line a plate with parchment paper to hold the shaped bites.
- Assemble the Dish: Scoop small portions of the cheese mixture and roll into bite-sized balls.
- Cook to Perfection: Roll each ball in chopped nuts or grated cheese until fully coated.
- Finishing Touches: Place the coated bites on parchment and chill for 30 minutes.
- Serve and Enjoy: Let them sit at room temperature for a few minutes before serving.
Texture and Flavor in Every Bite
The first thing you notice is the creamy center, smooth and rich, followed by the crunch of nuts or the salty edge of grated cheese. As you keep chewing, the herbs bloom and the flavors settle into something balanced and comforting. It’s worth every bite.
Helpful Cooking Tips and Tricks
A few extra pointers to keep things stress-free.
- Chill the mixture briefly if it feels too soft to roll.
- Use slightly damp hands to prevent sticking.
- Mix coatings for variety and visual appeal.
What to Avoid
Even simple recipes have a few pitfalls.
- Skipping the chill time, which helps the bites hold their shape.
- Overmixing, which can make the texture too loose.
- Using dried herbs only, which can taste flat.
Nutrition Facts at a Glance
Servings: 12 bites
Calories per serving: 95
Note: These are approximate values.
Preparation Time Breakdown
Prep Time: 15 minutes
Cook Time: 0 minutes
Total Time: 15 minutes plus chilling
Make-Ahead and Storage Tips
These bites are perfect for planning ahead. You can prepare them a day in advance and store them in an airtight container in the fridge. They keep well for up to three days and do not require reheating.
How to Serve Them
Serve these bites on a wooden board with crackers, sliced vegetables, or fresh bread. They also pair nicely with fruit for a sweet and savory contrast.
Creative Leftover Transformations
Leftovers can be crumbled over salads, spread on toast, or tucked into wraps for a quick lunch upgrade.
Additional Tips for Best Results
For extra flavor, toast the nuts lightly before chopping. Always let the bites soften slightly before serving for the best texture.
Make It a Showstopper
Arrange the bites in clusters with different coatings for color contrast. A simple garnish of fresh herbs nearby makes the platter feel intentional and inviting.
Variations to Try
- Roll some bites in smoked paprika and grated cheese.
- Add lemon zest to the cheese mixture for brightness.
- Use finely chopped olives for a savory twist.
- Coat a batch in sesame seeds for extra crunch.
FAQ’s
Q1: Can I make these ahead of time?
Yes, they actually taste better after chilling.
Q2: How long do they last in the fridge?
Up to three days when stored properly.
Q3: Can I freeze them?
Freezing is not recommended as the texture may change.
Q4: What nuts work best?
Almonds and walnuts are both great choices.
Q5: Are these vegetarian?
Yes, they are fully vegetarian.
Q6: Can I make them spicy?
Add a pinch of chili flakes to the cheese mixture.
Q7: Do I need a mixer?
No, a spoon or spatula works just fine.
Q8: Can I use low fat cheese?
You can, but the texture may be less creamy.
Q9: How big should the bites be?
About one tablespoon each works perfectly.
Q10: Should they be served cold?
Slightly chilled or just below room temperature is ideal.
Conclusion
These herb cheese bites prove that simple ingredients can still feel special. They are creamy, fresh, and endlessly adaptable, making them a total game-changer for entertaining or everyday snacking. Give them a try, and let me tell you, they will quickly become a favorite in your kitchen.
PrintHerb Cheese Bites

Creamy, bite-sized cheese snacks rolled in fresh herbs, crunchy nuts, and grated cheese, perfect for entertaining or quick snacking.
- Prep Time: 15 minutes
- Cook Time: 0 minutes
- Total Time: 15 minutes plus chilling
- Yield: 12 bites
- Category: Appetizer
- Method: No-Cook
- Cuisine: International
- Diet: Vegetarian
Ingredients
- 8 ounces cream cheese, softened
- 2 tablespoons fresh parsley, finely chopped
- 1 tablespoon fresh chives, finely chopped
- 0.5 teaspoon garlic powder
- 0.25 teaspoon salt
- 0.25 teaspoon black pepper
- 0.5 cup chopped nuts (almonds or walnuts)
- 0.5 cup grated hard cheese
Instructions
- In a mixing bowl, combine the softened cream cheese, parsley, chives, garlic powder, salt, and black pepper until smooth.
- Line a plate with parchment paper.
- Scoop small portions of the cheese mixture and roll into bite-sized balls.
- Roll each ball in chopped nuts or grated hard cheese until fully coated.
- Place the coated bites on the parchment-lined plate.
- Chill in the refrigerator for 30 minutes before serving.
Notes
- Use slightly damp hands to prevent sticking while rolling.
- For extra flavor, lightly toast the nuts before chopping.
- Let the bites sit at room temperature for a few minutes before serving for best texture.
Nutrition
- Serving Size: 1 bite
- Calories: 95
- Sugar: 1 g
- Sodium: 120 mg
- Fat: 8 g
- Saturated Fat: 4 g
- Unsaturated Fat: 3 g
- Trans Fat: 0 g
- Carbohydrates: 2 g
- Fiber: 0.5 g
- Protein: 2 g
- Cholesterol: 20 mg