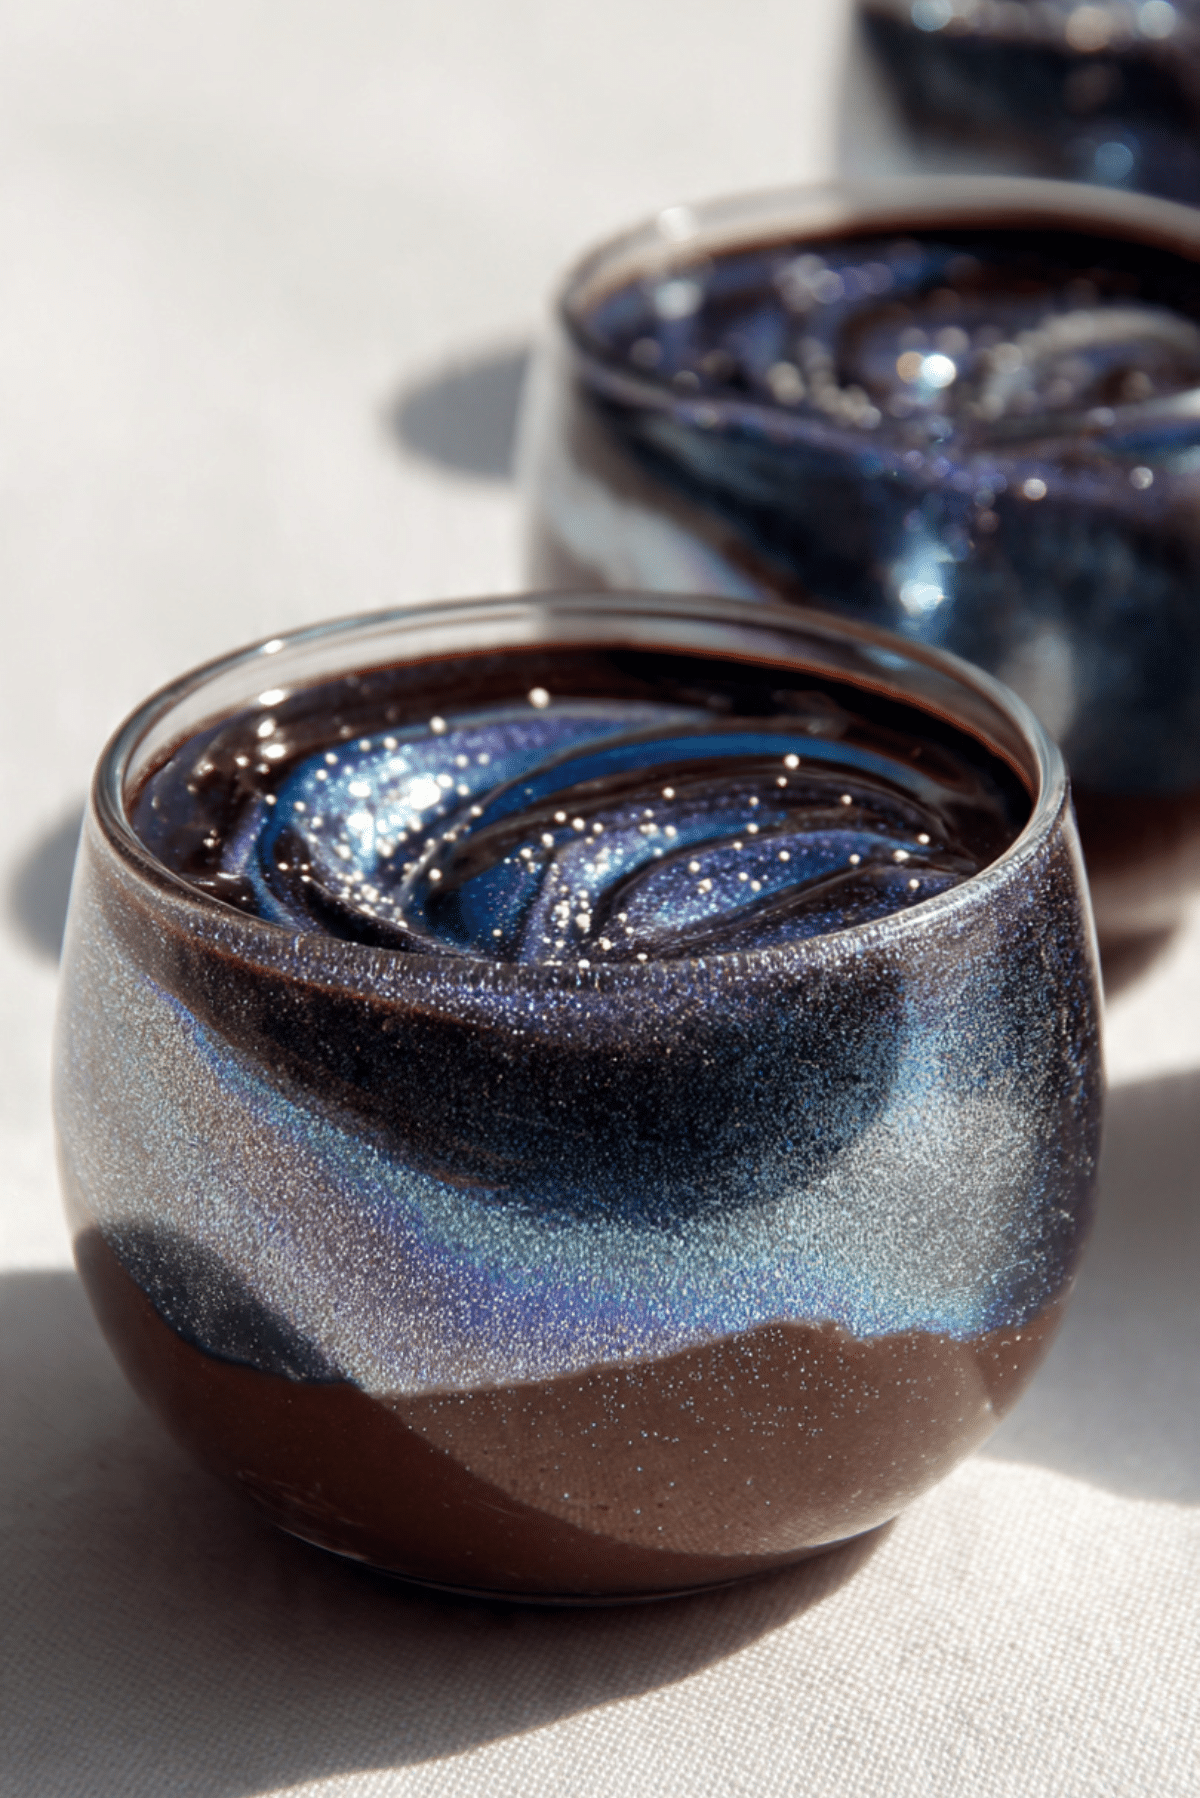
Galaxy Mirror Glaze Dessert Cups
The first time I made these Galaxy Mirror Glaze Dessert Cups, I actually paused for a second just to admire them. That glossy, cosmic swirl sitting on top of silky chocolate mousse almost felt too pretty to eat. But let me tell you, once you dip your spoon in and break through that shiny glaze into the creamy layers underneath, it is absolutely worth every bite.
A Dessert That Looks Like the Night Sky in a Cup
There is something magical about a mirror glaze. It reflects light, it shimmers, and when you swirl deep blues and purples together, it suddenly looks like a tiny galaxy resting in your palm. These dessert cups combine visual drama with rich chocolate flavor, creating a treat that feels bakery level but is surprisingly doable at home.
And now let’s talk about where this mesmerizing glaze trend began.
The Story Behind Mirror Glaze Magic
Mirror glaze became famous in high end pastry kitchens, especially in French patisserie. Chefs perfected glossy finishes by carefully balancing chocolate, sugar, and gelatin to create that reflective surface. Over time, home bakers adapted the technique, adding vibrant colors and creative designs.
The galaxy style became especially popular for celebrations, birthdays, and themed parties. It transforms a simple mousse into something that feels like edible art.
Why This Dessert Is a Total Showstopper
Before we dive into the steps, here is why you will want to make these again and again.
Versatile: You can change the base flavor to vanilla, coffee, or even white chocolate.
Budget-Friendly: Uses simple pantry staples like cream, chocolate, sugar, and gelatin.
Quick and Easy: While it looks advanced, the process is straightforward when broken into steps.
Customizable: Play with different color combinations for the glaze.
Crowd-Pleasing: Guests will be impressed before they even taste it.
Make-Ahead Friendly: Prepare the mousse and glaze ahead of time.
Great for Leftovers: Store chilled and enjoy for several days without losing texture.
Pro Secrets for a Perfect Mirror Finish
A glossy glaze depends on a few key techniques.
- Strain the glaze to remove bubbles before pouring.
- Let the glaze cool to about 90°F so it pours smoothly without melting the mousse.
- Freeze the mousse cups before glazing to ensure a clean finish.
- Pour in one steady motion for that flawless surface.
Tools That Make the Process Smooth
You do not need a professional kitchen, just a few reliable tools.
Heatproof Bowls: For melting chocolate and mixing glaze.
Saucepan: To heat cream and sugar evenly.
Whisk: Ensures smooth, lump free mixtures.
Fine Mesh Strainer: Removes bubbles from the glaze.
Clear Dessert Cups: Show off those beautiful layers.
Ingredients You Will Need for This Cosmic Creation
Each ingredient works together to create rich texture and glossy beauty.
- Dark Chocolate: 200 grams, finely chopped. Forms the base of the mousse and adds deep flavor.
- Heavy Cream: 2 cups, divided. Provides richness for both mousse and glaze.
- Granulated Sugar: 1/2 cup. Sweetens the glaze and balances the chocolate.
- Unsweetened Cocoa Powder: 1/4 cup. Enhances the chocolate depth in the glaze.
- Unflavored Gelatin: 2 teaspoons, bloomed in 2 tablespoons cold water. Helps the glaze set with shine.
- White Chocolate: 100 grams, melted. Adds smoothness and shine to the glaze.
- Blue and Purple Gel Food Coloring: A few drops each for galaxy effect.
- Vanilla Extract: 1 teaspoon for flavor balance.
Easy Substitutions If Needed
Dark Chocolate: Substitute with semi sweet chocolate for milder flavor.
Heavy Cream: Use full fat coconut cream for a dairy free option.
Granulated Sugar: Coconut sugar works, though color may darken slightly.

Star Ingredients That Make It Shine
Gelatin: Essential for that glossy, sliceable mirror effect.
White Chocolate: Adds structure and that smooth reflective surface.
Let’s Create These Stunning Cups
This is where the magic happens, step by step.
- Preheat Your Equipment: No oven needed, but chill your dessert cups in the freezer for 10 minutes.
- Combine Ingredients: Melt 200 grams dark chocolate. Warm 1 cup heavy cream and pour over chocolate, whisking until smooth. Stir in vanilla extract.
- Prepare Your Cooking Vessel: In a separate bowl, whip the remaining 1 cup heavy cream to soft peaks.
- Assemble the Dish: Fold whipped cream into chocolate mixture gently. Spoon mousse into cups and freeze for 1 hour until firm.
- Cook to Perfection: In a saucepan, combine sugar, cocoa powder, and 1/2 cup water. Bring to a gentle simmer. Remove from heat and whisk in bloomed gelatin and melted white chocolate until smooth.
- Finishing Touches: Divide glaze into bowls, tint with blue and purple coloring, swirl lightly, cool to about 90°F, then pour over frozen mousse cups.
- Serve and Enjoy: Refrigerate 30 minutes to set. Serve chilled and watch the shine catch the light.
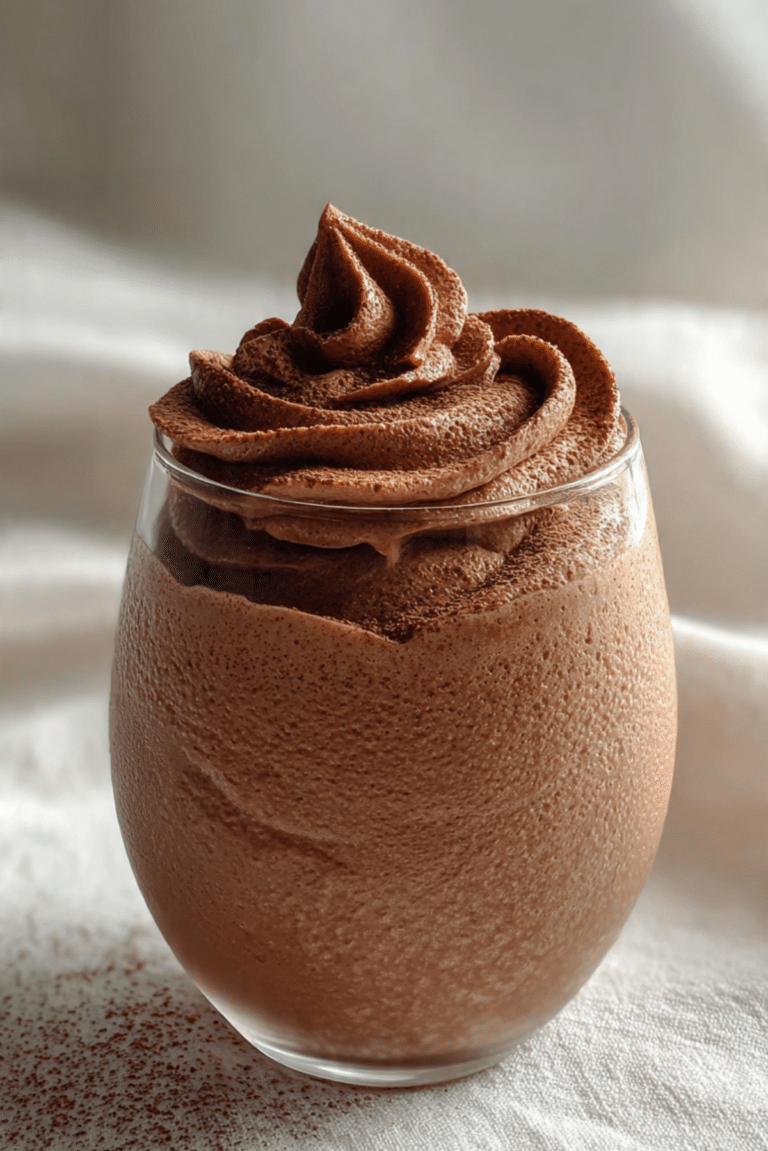
Texture and Flavor That Feels Luxurious
The mousse is airy and smooth, almost cloud like, while the mirror glaze adds a silky, slightly firm layer on top. When your spoon breaks through, you get creamy richness balanced by a glossy finish that melts gently on your tongue.
Extra Tips for Success
- Always bloom gelatin fully before adding.
- Avoid stirring too aggressively to prevent bubbles.
- Use gel coloring for vibrant galaxy tones.
What to Avoid for a Flawless Finish
- Pouring glaze too hot, which melts the mousse.
- Skipping the strainer step, which can leave bubbles.
- Not chilling long enough before glazing.
Nutrition Facts at a Glance
Servings: 6
Calories per serving: 420
Note: These are approximate values.
Preparation Time Breakdown
Prep Time: 40 minutes
Cook Time: 10 minutes
Total Time: 1 hour 50 minutes
Make-Ahead and Storage Tips
You can prepare these dessert cups up to two days in advance. Store covered in the refrigerator. They should not be frozen after glazing, as condensation can dull the shine. Serve chilled for best texture.
How to Serve for Maximum Impact
Place the cups on a white platter under soft lighting to highlight the reflective glaze. Add a few edible silver sprinkles on top for extra sparkle.
Creative Leftover Transformations
Spoon leftover mousse into layered parfaits with fruit. Use extra glaze to top cupcakes. Blend remaining mousse into a thick milkshake.
Additional Tips for Best Results
Work patiently and do not rush the cooling stages. Keep surfaces clean so the shine stands out beautifully.
Make It a Showstopper at Any Event
Arrange the cups at different heights on a dessert table. The reflective tops will catch every bit of light in the room.
Variations to Try
Use pink and gold colors for a sunset effect.
Add espresso powder to the mousse for mocha flavor.
Top with edible glitter for extra sparkle.
Layer with crushed cookies at the bottom for texture.
FAQ’s
Q1: Can I make this without gelatin?
The glaze will not set properly without it, so a substitute like agar may be needed.
Q2: Why is my glaze dull?
It may have cooled too much before pouring.
Q3: Can I freeze after glazing?
It is best to refrigerate only.
Q4: How do I avoid bubbles?
Strain the glaze and pour slowly.
Q5: Can I use milk chocolate?
Yes, but it will be sweeter.
Q6: How long do they last?
Up to two days refrigerated.
Q7: Can I skip white chocolate?
It helps with shine and texture, so it is recommended.
Q8: Are these gluten free?
Yes, naturally gluten free.
Q9: Do I need special molds?
No, simple clear cups work perfectly.
Q10: Can I make mini versions?
Absolutely, just adjust portion size.
Conclusion
Galaxy Mirror Glaze Dessert Cups are proof that dessert can be both delicious and breathtaking. Once you master that glossy finish, you will feel like a pastry chef in your own kitchen. Trust me, this one is unforgettable.
PrintGalaxy Mirror Glaze Dessert Cups
Elegant chocolate mousse dessert cups topped with a glossy galaxy mirror glaze that looks stunning and tastes rich and creamy.
Ingredients
- 200 grams dark chocolate, finely chopped
- 2 cups heavy cream, divided
- 1/2 cup granulated sugar
- 1/4 cup unsweetened cocoa powder
- 2 teaspoons unflavored gelatin, bloomed in 2 tablespoons cold water
- 100 grams white chocolate, melted
- Blue and purple gel food coloring, a few drops each
- 1 teaspoon vanilla extract
Instructions
- Chill dessert cups in the freezer for 10 minutes.
- Melt dark chocolate. Warm 1 cup heavy cream and pour over chocolate, whisk until smooth, then stir in vanilla extract.
- Whip remaining 1 cup heavy cream to soft peaks and fold into chocolate mixture.
- Spoon mousse into cups and freeze for 1 hour.
- In a saucepan combine sugar, cocoa powder, and 1/2 cup water. Simmer gently, remove from heat, and whisk in bloomed gelatin and melted white chocolate.
- Divide glaze, tint with blue and purple coloring, swirl gently, cool to 90°F, then pour over frozen mousse.
- Refrigerate 30 minutes before serving.
Notes
- Strain glaze before pouring to remove bubbles.
- Pour glaze at about 90°F for best shine.
- Store covered in refrigerator up to 2 days.