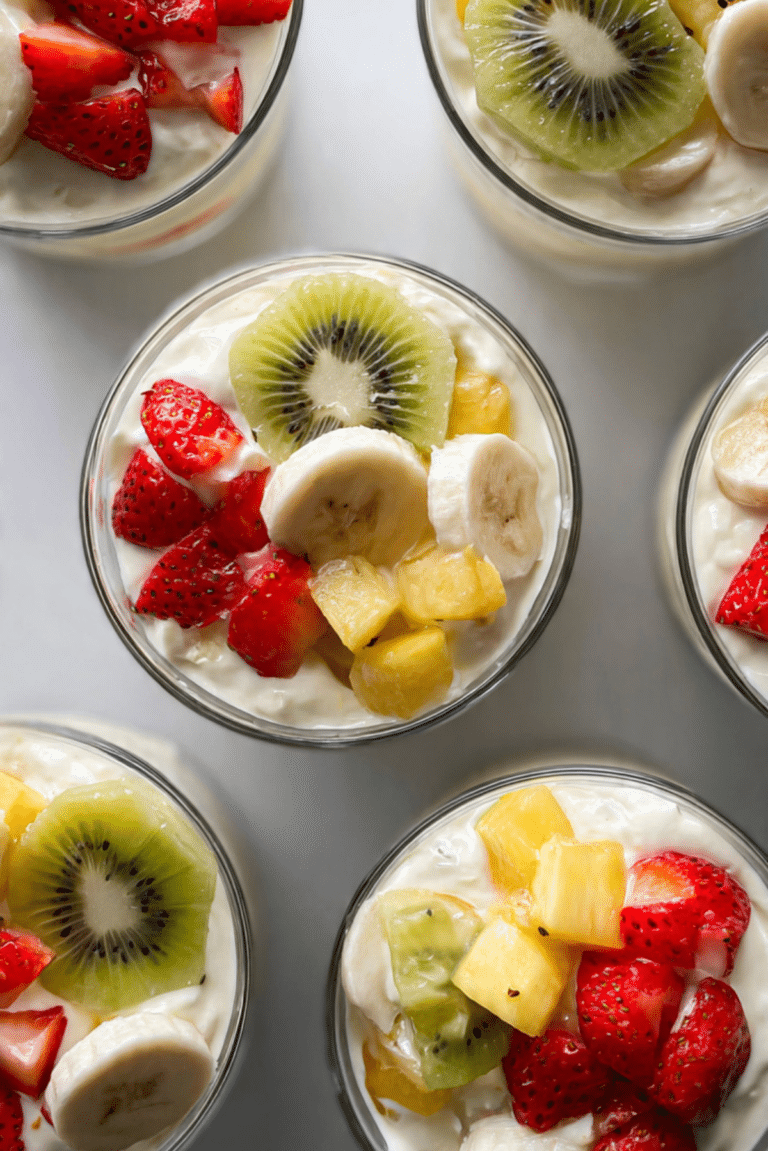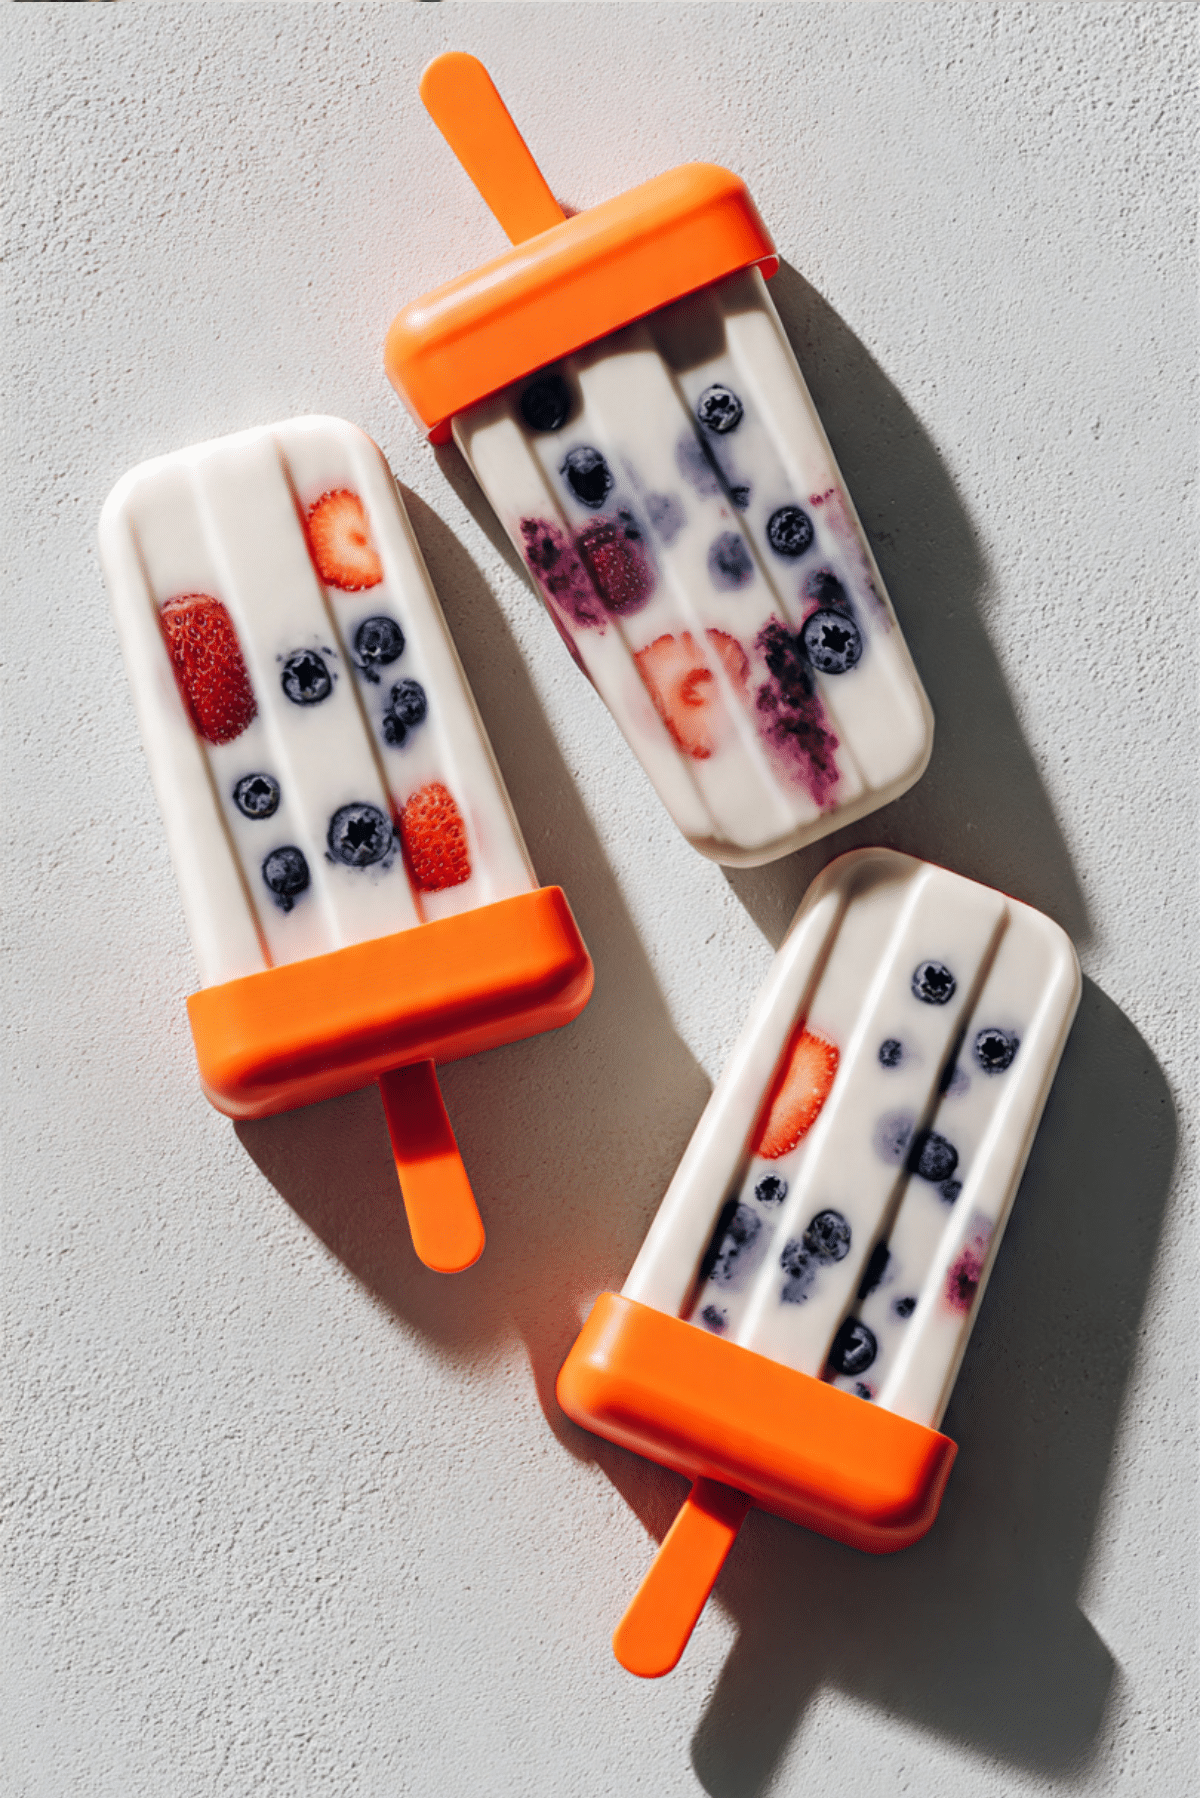
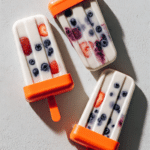
Frozen Fruit Yogurt Pops
There is something about pulling a homemade frozen treat out of the freezer on a warm afternoon that just feels right. These Frozen Fruit Yogurt Pops are creamy, fruity, and perfectly refreshing, with little bursts of berries in every bite. The first time I made them, I honestly did not expect them to disappear so fast. Trust me, you’re going to love this. They are cool, lightly sweet, and have that dreamy yogurt texture that melts slowly on your tongue.
And now let’s dive into why these little pops are such a favorite in so many kitchens.
Why These Pops Are Pure Summer Happiness
There is a reason these frozen treats keep showing up every summer. They are simple, wholesome, and packed with bright fruit flavor. The creamy yogurt balances the natural sweetness of strawberries and blueberries, creating a contrast that feels both indulgent and fresh.
Each bite gives you that silky smooth base followed by juicy berry pockets. It is the kind of snack that feels like dessert but still makes you feel good about eating it. This one’s a total game changer for hot days, after school treats, or even a light evening sweet.
A Little Background on Yogurt Pops
Frozen yogurt treats have been around for decades, especially in homes where families wanted a lighter alternative to ice cream. In many Mediterranean and Middle Eastern cultures, yogurt has long been used in both savory and sweet dishes. Freezing it with fruit became a natural extension of that tradition.
Over time, homemade yogurt pops gained popularity as parents looked for simple ingredients and less processed options. Today, they remain a nostalgic treat for many of us, reminding us of childhood summers and sticky fingers.
And now that we know their story, let’s talk about what makes this version so reliable.
Why You Can Always Count on These
These Frozen Fruit Yogurt Pops are not just delicious, they are dependable. Let me break it down for you.
Versatile: You can swap fruits depending on the season. Strawberries and blueberries are classic, but raspberries or mango work beautifully too.
Budget-Friendly: Yogurt and fresh fruit are affordable and easy to find year round.
Quick and Easy: The mixture comes together in minutes. The freezer does the rest.
Customizable: Adjust the sweetness to your taste. Add a touch more honey if you like it sweeter.
Crowd-Pleasing: Kids and adults both reach for these without hesitation.
Make-Ahead Friendly: Prepare them days in advance and keep them frozen until needed.
Great for Leftovers: Extra pops can stay in the freezer for weeks without losing texture.
And now that you are convinced, let’s talk like pros for a minute.
Pro Tips for Perfect Texture Every Time
A few small details make a big difference here.
- Use full fat plain yogurt for the creamiest result.
- Gently mash some of the berries while leaving others whole for texture contrast.
- Tap the molds lightly on the counter to remove air bubbles before freezing.
- Freeze for at least 4 hours, but overnight gives the best firmness.
Now let’s look at what you will need in your kitchen.
Kitchen Tools That Make It Easy
You do not need anything fancy, just a few basics.
Mixing Bowl: For combining yogurt, honey, and vanilla smoothly.
Spoon or Spatula: To gently fold in the fruit without crushing it completely.
Popsicle Molds: Essential for shaping and freezing the pops.
Freezer Space: Make sure the molds sit flat while freezing.
And now we get to the heart of it, the ingredients.
Ingredients You Will Need For Frozen Fruit Yogurt Pops
The beauty of this recipe is how a handful of simple ingredients come together in perfect harmony.
- Plain Greek Yogurt: 2 cups, full fat preferred for a rich and creamy base.
- Fresh Strawberries: 1 cup, hulled and chopped, for natural sweetness and color.
- Fresh Blueberries: 1 cup, whole, for juicy bursts of flavor.
- Honey: 3 tablespoons, to gently sweeten the yogurt.
- Vanilla Extract: 1 teaspoon, for warmth and depth.
Each ingredient plays its part, creating that balanced flavor we love.
Easy Ingredient Swaps If You Need Them
Sometimes you work with what you have, and that is perfectly fine.
Plain Greek Yogurt: Use regular plain yogurt, though the texture will be slightly softer.
Honey: Maple syrup works beautifully as a substitute.
Strawberries: Try raspberries or diced peaches instead.
Blueberries: Blackberries or chopped cherries are lovely options.
And now let’s spotlight the stars.

The Ingredients That Make the Magic
Greek Yogurt: This is the creamy backbone of the pops. It freezes beautifully while staying smooth rather than icy.
Fresh Berries: They bring color, brightness, and natural sweetness. When frozen, they become slightly chewy and intensely flavorful.
Now let’s move into the fun part, making them.
Let’s Make These Together
This is where the kitchen starts to smell sweet and inviting.
- Preheat Your Equipment: No heat needed, but place your popsicle molds on a flat tray so they can move easily to the freezer.
- Combine Ingredients: In a mixing bowl, stir the Greek yogurt, honey, and vanilla extract until smooth and creamy.
- Prepare Your Cooking Vessel: Ensure your molds are clean and completely dry before filling.
- Assemble the Dish: Gently fold in the chopped strawberries and whole blueberries. Spoon the mixture evenly into the molds, leaving a small space at the top.
- Cook to Perfection: Place the molds in the freezer and freeze for at least 4 hours, or until fully solid.
- Finishing Touches: To release, run the outside of the molds under warm water for a few seconds.
- Serve and Enjoy: Pull them out and enjoy immediately while they are perfectly frozen and refreshing.
Let me tell you, it’s worth every bite.
Texture and Flavor That Just Work
The first thing you notice is the creamy base, smooth and slightly tangy. Then you hit a pocket of berry, sweet and juicy. The contrast between the frozen yogurt and the fruit creates a balanced texture that keeps each bite interesting. The vanilla lingers gently in the background, tying everything together.
Helpful Tips for Best Results
A few small adjustments can elevate your pops even more.
- Stir the yogurt mixture well to avoid uneven sweetness.
- Do not overfill the molds, as the mixture expands slightly when freezing.
- If you prefer smoother pops, blend the fruit lightly before mixing.
Common Mistakes and How to Avoid Them
It is easy to get this right, but here are a few things to watch.
- Using low fat yogurt can make the pops slightly icy. Choose full fat for creaminess.
- Not freezing long enough may result in soft centers. Give them enough time.
- Overmixing the fruit can make the color muddy. Fold gently.
Nutrition at a Glance
Servings: 6 pops
Calories per serving: Approximately 110
Note: These are approximate values.
Time Breakdown
Prep Time: 10 minutes
Cook Time: 0 minutes
Total Time: 4 hours 10 minutes
Make Ahead and Storage Tips
These pops are perfect for planning ahead. Once frozen solid, you can remove them from the molds and store them in an airtight container or freezer bag. They keep well for up to 3 weeks. To serve, let them sit at room temperature for a minute or two if they are very firm.
Fun Ways to Serve
Serve them straight from the freezer on a hot afternoon, or pair them with fresh fruit salad for a light dessert platter. They also look beautiful arranged on a chilled tray for summer gatherings.
Creative Leftover Transformations
If you happen to have leftovers, you can blend a pop into a smoothie for extra creaminess. You can also chop them and stir into extra yogurt for a frozen parfait style treat.
Extra Tips for Even More Flavor
Add a squeeze of fresh lemon juice to brighten the fruit. You can also swirl in a spoonful of fruit puree before freezing for a marbled effect.
Make Them Look Irresistible
To make these pops look stunning, use clear molds so the berry pieces show through. When serving, place them on a chilled plate to prevent quick melting and highlight their vibrant colors.
Variations to Try
- Add a tablespoon of chia seeds for a slight crunch and added texture.
- Mix in finely chopped mint for a fresh herbal twist.
- Use layered fruit puree for a striped visual effect.
- Add a handful of finely chopped mango for tropical sweetness.
FAQ’s
Q1: Can I use frozen fruit instead of fresh?
Yes, just thaw and drain it first to avoid excess moisture.
Q2: How long do they need to freeze?
At least 4 hours, but overnight is best.
Q3: Can I make them dairy free?
Yes, use a dairy free yogurt alternative.
Q4: Why are my pops icy?
Low fat yogurt or too much added liquid can cause iciness.
Q5: Can I reduce the honey?
Absolutely, adjust to your taste preference.
Q6: How do I remove them easily from molds?
Run warm water over the outside for a few seconds.
Q7: Can I blend the mixture completely smooth?
Yes, for a uniform texture.
Q8: How long do they last in the freezer?
Up to 3 weeks if stored properly.
Q9: Are they suitable for kids?
Yes, they are naturally sweetened and fruity.
Q10: Can I double the recipe?
Of course, just ensure you have enough molds.
Conclusion
There is something so satisfying about making your own frozen treats at home. These Frozen Fruit Yogurt Pops are simple, wholesome, and bursting with berry goodness. They feel nostalgic and fresh at the same time. Give them a try, share them with someone you love, and enjoy every cool, creamy bite.
PrintFrozen Fruit Yogurt Pops
Creamy frozen yogurt pops packed with fresh strawberries and blueberries, naturally sweetened with honey and finished with a hint of vanilla. A refreshing and wholesome summer treat.
Ingredients
- 2 cups plain Greek yogurt
- 1 cup fresh strawberries, hulled and chopped
- 1 cup fresh blueberries
- 3 tablespoons honey
- 1 teaspoon vanilla extract
Instructions
- Place popsicle molds on a flat tray so they are ready for filling.
- In a mixing bowl, stir the Greek yogurt, honey, and vanilla extract until smooth and creamy.
- Ensure the popsicle molds are clean and completely dry.
- Gently fold in the chopped strawberries and whole blueberries, then spoon the mixture evenly into the molds, leaving a small space at the top.
- Freeze for at least 4 hours, or until fully solid.
- Run the outside of the molds under warm water for a few seconds to release the pops.
- Serve immediately and enjoy.
Notes
- Use full fat Greek yogurt for the creamiest texture.
- Do not overfill the molds as the mixture expands slightly when freezing.
- For a smoother texture, lightly blend the fruit before mixing.
- Pops can be stored in an airtight container in the freezer for up to 3 weeks.