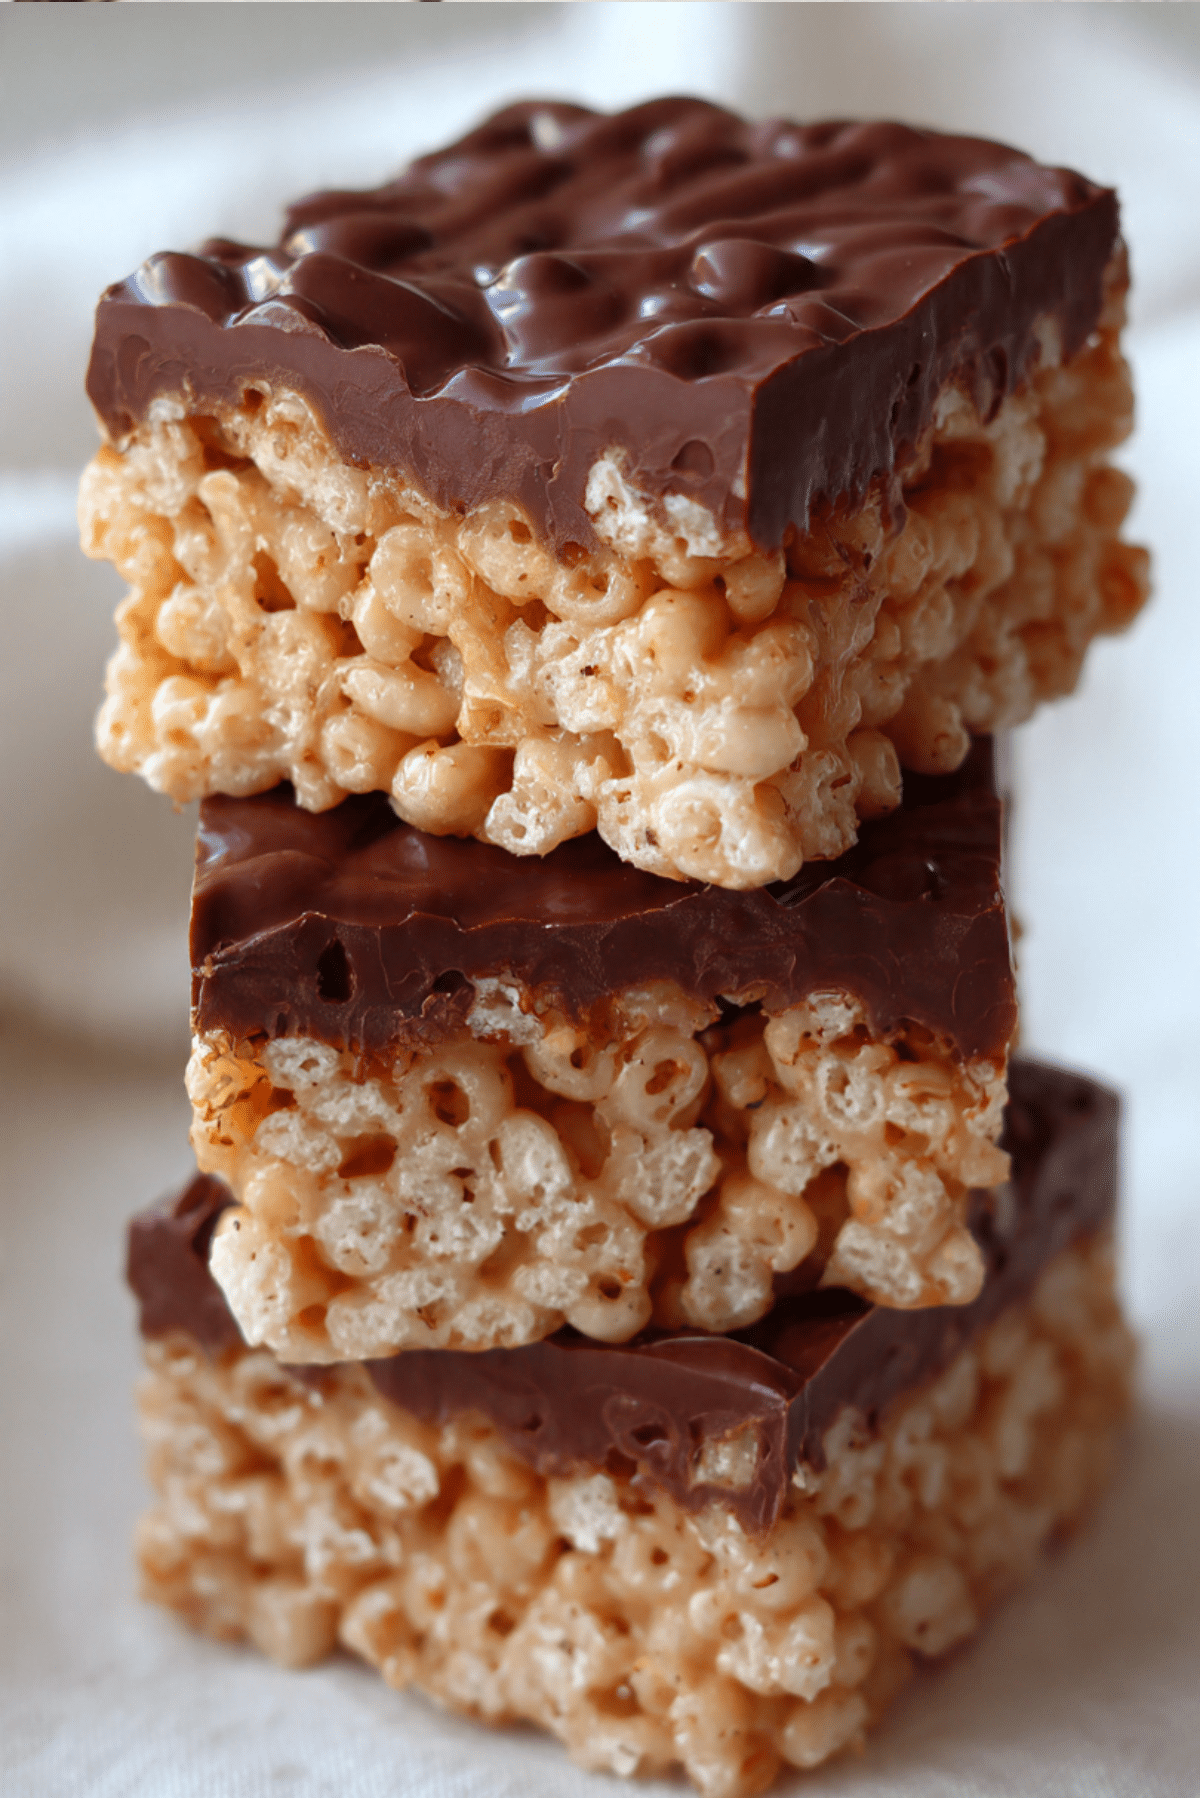
Chocolate Rice Bars
There is something quietly nostalgic about biting into a chewy, chocolate topped square that crackles just a little before giving way to that sweet, sticky crunch. These Chocolate Rice Bars take me right back to after school afternoons, when all you needed was something sweet, simple, and just messy enough to feel like a treat. Trust me, you’re going to love this. It is crunchy, glossy on top, and just the right balance of rich chocolate and light puffed rice.
A Sweet Little Treat That Feels Like Childhood
Some desserts are fancy, layered, and meant for special occasions. Others are humble, quick, and somehow even more comforting. This one falls beautifully into the second category.
The magic is in the contrast. You get that crisp bite from the puffed rice, then the smooth snap of chocolate on top. It is simple, but let me tell you, it is worth every bite. This one’s a total game changer when you need something fast that still feels homemade and thoughtful.
A Bit of Background Behind These Crunchy Squares
Bars made with puffed grains have been around for decades, especially in home kitchens where creativity met convenience. During the mid twentieth century, puffed rice became a pantry staple, and home cooks quickly realized it could be transformed into sweet treats with just a bit of syrup or melted sugar.
Over time, chocolate found its way into the mix, because honestly, what does not get better with chocolate? These no bake style bars became popular for bake sales, lunchboxes, and quick desserts. They are proof that you do not need complicated techniques to create something everyone will reach for first.
Why You Can Always Count on This Recipe
Before we dive deeper, let me share why this one deserves a permanent spot in your rotation.
Versatile: You can dress it up with nuts, drizzle, or even a sprinkle of sea salt. Or keep it classic and simple.
Budget-Friendly: The ingredients are pantry basics, which makes this treat affordable and accessible.
Quick and Easy: No complicated steps, no fancy equipment. Just mix, press, chill, and slice.
Customizable: Swap the chocolate type, add nut butter, or mix in seeds for a personal twist.
Crowd-Pleasing: Kids love it, adults feel nostalgic about it. It disappears fast at gatherings.
Make-Ahead Friendly: You can prepare it a day in advance and store it in the fridge until ready to serve.
Great for Leftovers: If there are any leftovers, they hold up beautifully for days.
A Few Insider Secrets for the Best Texture
Making these bars is straightforward, but a few small details make a big difference.
- Use fresh puffed rice so the bars stay light and crisp.
- Melt the chocolate gently, either over a water bath or in short bursts in the microwave, so it stays smooth and glossy.
- Press the mixture firmly into the pan so the bars hold together without crumbling.
- Let the chocolate fully set before slicing for clean, sharp edges.
Tools That Make It Even Easier
You do not need much, which is part of the charm, but having the right tools keeps everything smooth.
Mixing Bowl: For combining the puffed rice and syrup mixture evenly.
Small Saucepan: To gently warm the syrup and butter together.
Spatula: Helps fold everything together without crushing the puffed rice.
Square Baking Pan, 8 x 8 inches: Creates evenly thick bars.
Parchment Paper: Makes lifting and slicing effortless.
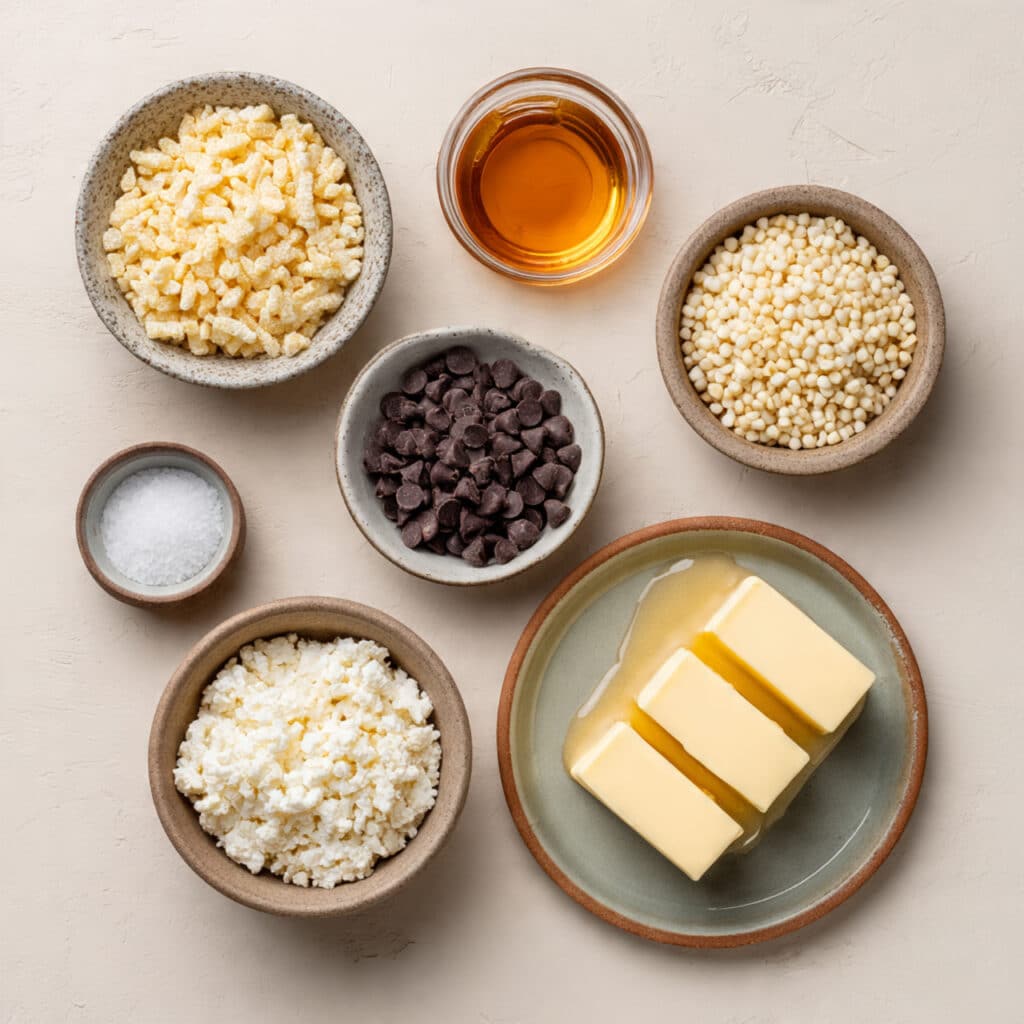
Ingredients That Come Together Like Magic
The beauty of this dessert is how a few simple ingredients create something so satisfying.
- Puffed Rice Cereal: 4 cups, about 120 grams. This is the crunchy base that gives the bars their signature texture.
- Unsalted Butter: 1/4 cup, about 60 grams. Adds richness and helps bind everything together.
- Honey or Light Corn Syrup: 1/2 cup, about 170 grams. This creates the sticky sweetness that holds the cereal in place.
- Semi Sweet Chocolate Chips: 1 cup, about 170 grams. Melted and spread on top for that smooth chocolate layer.
- Vanilla Extract: 1 teaspoon. Brings warmth and depth to the sweetness.
- Salt: 1/4 teaspoon. Enhances the chocolate and balances the sweetness.
Easy Swaps If You Want to Experiment
If you like to play around in the kitchen, here are a few ideas.
Semi Sweet Chocolate Chips: Use dark chocolate or milk chocolate instead.
Honey: Swap with maple syrup for a slightly deeper flavor.
Unsalted Butter: Coconut oil works if you want a dairy free option.
Puffed Rice Cereal: Try puffed quinoa for a fun twist.
Spotlight on the Star Ingredients
Puffed Rice Cereal: Light, airy, and crisp, it creates that satisfying crunch without feeling heavy.
Semi Sweet Chocolate Chips: They melt into a smooth, glossy topping that firms up into a delicate snap when chilled.
Let’s Make These Crunchy Bars Together
Now that you know what makes them special, let’s dive into the fun part. Here are the steps you are going to follow.
- Preheat Your Equipment: There is no oven needed, but line your 8 x 8 inch pan with parchment paper so it is ready to go.
- Combine Ingredients: In a small saucepan over low heat, melt the butter with the honey or corn syrup. Stir until smooth, then remove from heat and mix in the vanilla extract and salt.
- Prepare Your Cooking Vessel: Place the puffed rice cereal in a large mixing bowl, making sure it is evenly distributed and not clumped.
- Assemble the Dish: Pour the warm syrup mixture over the cereal. Gently fold with a spatula until all the cereal is coated. Transfer to the lined pan and press firmly into an even layer.
- Cook to Perfection: Melt the chocolate chips in a heatproof bowl, stirring until smooth. Spread the melted chocolate evenly over the pressed cereal layer.
- Finishing Touches: Let the pan sit at room temperature for about 10 minutes, then refrigerate for 30 minutes until the chocolate is fully set.
- Serve and Enjoy: Lift the bars out using the parchment paper, slice into squares, and enjoy that perfect crunchy, chocolatey bite.
The Texture and Flavor Story
What I love most is the contrast. The base is crisp and slightly chewy, thanks to the syrup binding everything together. On top, the chocolate sets into a smooth layer that snaps gently when you bite into it.
The sweetness is balanced by a hint of salt and the subtle warmth of vanilla. Every bite has that light crunch followed by a rich cocoa finish. It is simple, but deeply satisfying.
Helpful Tips for Perfect Bars Every Time
A little attention goes a long way here.
- Press the mixture firmly but gently, so it holds together without crushing the cereal too much.
- Use a sharp knife to slice once the chocolate is fully set.
- Store in the fridge if your kitchen is warm, so the chocolate stays firm.
What to Avoid for the Best Results
Even simple recipes have a few pitfalls, and here is how to dodge them.
- Do not overheat the syrup mixture, as it can become too thick and hard.
- Avoid adding the chocolate before pressing the base evenly.
- Do not skip lining the pan, or removing the bars will be tricky.
Nutrition Facts at a Glance
Servings: 9 squares
Calories per serving: Approximately 210
Note: These are approximate values.
Time You Will Need
Prep Time: 15 minutes
Cook Time: 5 minutes
Total Time: 20 minutes plus 30 minutes chilling
Make-Ahead and Storage Tips
These bars are perfect for preparing ahead. You can make them the night before and keep them in an airtight container in the refrigerator for up to 5 days.
If you want to freeze them, wrap each square individually and store in a freezer safe container for up to 2 months. Let them thaw at room temperature before serving.
Serving Ideas to Make It Extra Special
Serve them slightly chilled for a firmer bite, or at room temperature for a softer texture. Pair with a glass of cold milk or a cup of coffee for that sweet and bitter contrast.
You can even cut them into smaller bite sized pieces for party platters.
Creative Leftover Transformations
If you somehow have extras, crumble a square over vanilla ice cream for a crunchy topping. Or chop them up and mix into yogurt for a quick dessert parfait.
A Few Extra Tips Before You Go
Add a light sprinkle of flaky salt over the chocolate before it sets for a sweet and salty twist. You can also drizzle a little white chocolate on top for a bakery style finish.
Make It a Showstopper
For cleaner slices, dip your knife in hot water and wipe it dry between cuts. Arrange the squares on a simple white plate so the glossy chocolate top really stands out.
Fun Variations to Try
- Add 1/4 cup chopped toasted almonds for extra crunch.
- Mix 2 tablespoons peanut butter into the melted chocolate for a nutty layer.
- Stir 2 tablespoons shredded coconut into the cereal mixture.
- Use dark chocolate and a pinch of espresso powder for a deeper flavor.
- Add colorful sprinkles on top before the chocolate sets for a festive look.
FAQ’s
Q1: Can I use marshmallows instead of honey?
Yes, you can melt about 3 cups mini marshmallows with the butter as an alternative binding option.
Q2: Do these bars need to stay refrigerated?
They hold at room temperature if it is cool, but refrigeration keeps the chocolate firm.
Q3: Can I make them gluten free?
Yes, just ensure your puffed rice cereal is certified gluten free.
Q4: Why are my bars falling apart?
They may not have been pressed firmly enough or the syrup mixture was not evenly distributed.
Q5: Can I double the recipe?
Absolutely, just use a 9 x 13 inch pan and adjust the thickness as desired.
Q6: Can I use white chocolate?
Yes, white chocolate works beautifully for a sweeter finish.
Q7: How long do they last?
Stored properly in an airtight container, they last up to 5 days in the fridge.
Q8: Can I reduce the sweetness?
You can use dark chocolate and slightly reduce the syrup amount, though it may affect binding.
Q9: What is the best way to cut clean squares?
Chill fully and use a sharp knife wiped clean between slices.
Q10: Can kids help make this?
Definitely, it is a fun and safe recipe for little helpers, especially the mixing and pressing part.
Conclusion
Sometimes the simplest treats are the ones that stay with us the longest. These Chocolate Rice Bars are crunchy, chocolatey, and incredibly easy to make. This one’s a total game changer when you need something quick that still feels homemade. Give it a try, and let that first crisp, sweet bite take you right back to those carefree moments in the kitchen.
PrintChocolate Rice Bars
Crunchy puffed rice bars coated with a smooth layer of melted chocolate, made with simple pantry ingredients and no baking required. These sweet, chewy squares are quick to prepare and perfect for snacks or dessert.
Ingredients
- 4 cups puffed rice cereal (about 120 grams)
- 1/4 cup unsalted butter (about 60 grams)
- 1/2 cup honey or light corn syrup (about 170 grams)
- 1 cup semi sweet chocolate chips (about 170 grams)
- 1 teaspoon vanilla extract
- 1/4 teaspoon salt
Instructions
- Line an 8 x 8 inch square baking pan with parchment paper.
- In a small saucepan over low heat, melt the unsalted butter with the honey or light corn syrup. Stir until smooth, then remove from heat and mix in the vanilla extract and salt.
- Place the puffed rice cereal in a large mixing bowl.
- Pour the warm syrup mixture over the cereal and gently fold until evenly coated.
- Transfer the mixture into the prepared pan and press firmly into an even layer.
- Melt the semi sweet chocolate chips in a heatproof bowl, stirring until smooth.
- Spread the melted chocolate evenly over the pressed cereal layer.
- Let sit at room temperature for 10 minutes, then refrigerate for 30 minutes until the chocolate is fully set.
- Lift from the pan, slice into 9 squares, and serve.
Notes
- Press the cereal mixture firmly to help the bars hold their shape.
- Allow the chocolate to fully set before slicing for clean edges.
- Store in an airtight container in the refrigerator for up to 5 days.