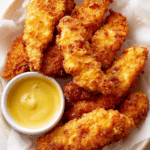
Chicken Tenders
Crispy, golden, and wildly addictive chicken tenders are the kind of comfort food that instantly brings a smile. Each bite is the perfect balance of juicy, tender chicken and a crackly, seasoned coating that shatters in the best way. Whether you’re dipping them in a creamy honey mustard or spicy buffalo sauce, these homemade chicken tenders are pure joy on a plate.
Behind the Recipe
This recipe brings back memories of weeknight dinners as a kid, where a plate of hot chicken tenders would hit the table and disappear just as fast. My version leans into that nostalgic crunch but adds a homemade touch with a flavorful buttermilk soak and perfectly seasoned coating. They’re simple to make and taste like something out of a cozy family diner.
Recipe Origin or Trivia
Chicken tenders became a fast food and diner staple in the 1980s, especially across the southern United States. Though similar to chicken nuggets, tenders are made from the whole tenderloin and were originally seen as a more premium option. Their crispy exterior and juicy interior made them an instant favorite for kids and adults alike.
Why You’ll Love Chicken Tenders
Whether you’re cooking for a crowd or craving comfort, these chicken tenders deliver on every level.
Versatile: Serve them solo, in wraps, on salads, or with waffles for a fun twist.
Budget-Friendly: Uses simple pantry staples and chicken tenderloins.
Quick and Easy: From soak to skillet, they’re ready in about 30 minutes.
Customizable: Spice them up, bake them instead, or go gluten-free with ease.
Crowd-Pleasing: Perfect finger food for parties, game days, or family dinners.
Make-Ahead Friendly: Marinate the chicken the night before to save time.
Great for Leftovers: Reheat in the oven or turn them into chicken sandwiches.
Chef’s Pro Tips for Perfect Results
For extra crunchy and juicy tenders, here’s what I swear by:
- Use buttermilk for marinating it tenderizes and adds tangy flavor.
- Double dredge in seasoned flour for that thick, crispy crust.
- Let the coated chicken rest before frying to help the breading stick.
- Fry in batches to keep the oil temperature consistent.
- Drain on a wire rack, not paper towels, to preserve crunch.
Kitchen Tools You’ll Need
You don’t need fancy equipment to make amazing tenders, but a few key tools help:
Mixing Bowls: For marinating and breading the chicken.
Wire Rack: Essential for keeping tenders crispy after frying.
Heavy Skillet or Dutch Oven: Keeps heat even during frying.
Tongs: For safe and easy flipping.
Thermometer: Helps monitor oil temp so the crust doesn’t burn.
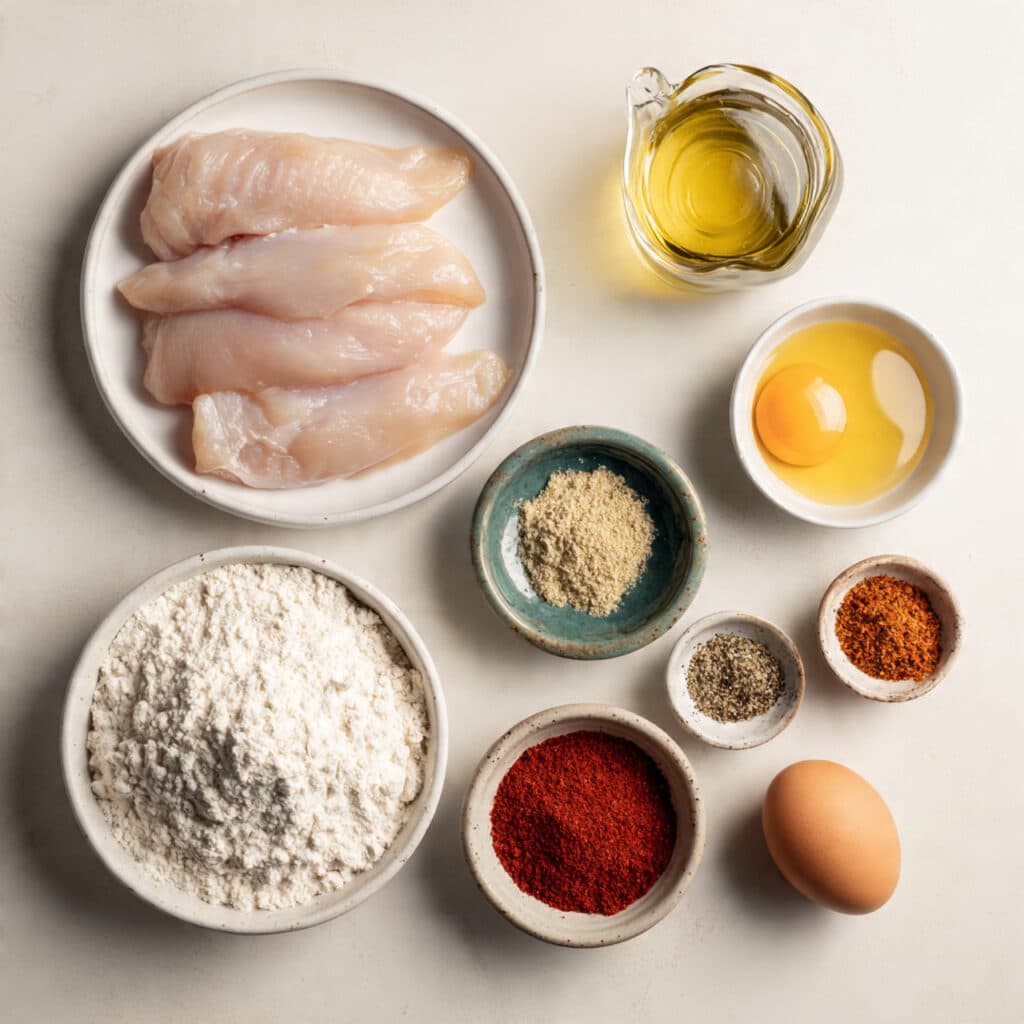
Ingredients in Chicken Tenders
These ingredients work together like magic, creating crispy, juicy tenders with every bite.
- Chicken Tenderloins: 1 ½ pounds – The star of the show, naturally tender and quick-cooking.
- Buttermilk: 1 cup – Tenderizes the chicken and adds flavor.
- Egg: 1 large – Helps the flour coating stick better.
- All-Purpose Flour: 1 ½ cups – Forms the base of the crispy coating.
- Paprika: 1 teaspoon – Adds warmth and a hint of smoky flavor.
- Garlic Powder: 1 teaspoon – Boosts the savory notes in the crust.
- Onion Powder: 1 teaspoon – Adds depth and balances the seasoning.
- Salt: 1 teaspoon – Essential for flavoring the chicken and coating.
- Black Pepper: ½ teaspoon – For a subtle kick.
- Vegetable Oil: for frying – Neutral and great for high-heat cooking.
Ingredient Substitutions
Need to swap something? No problem.
Buttermilk: Use milk mixed with a tablespoon of vinegar or lemon juice.
All-Purpose Flour: Substitute with gluten-free flour blend.
Vegetable Oil: Canola or peanut oil work just as well.
Paprika: Smoked paprika or cayenne for more heat.
Ingredient Spotlight
Buttermilk: This tangy dairy hero breaks down proteins in the chicken and ensures ultra-juicy tenders. It also helps the flour cling on for better crunch.
Paprika: Don’t underestimate it. This simple spice adds just enough color and flavor to elevate the coating.
Instructions for Making Chicken Tenders
Here’s the fun part it’s frying time. Get ready for your kitchen to smell absolutely amazing.
- Preheat Your Equipment:
Heat about 2 inches of oil in a heavy-bottomed skillet to 350°F. Set a wire rack over a baking sheet. - Combine Ingredients:
In a bowl, whisk together buttermilk and egg. Add chicken tenderloins and marinate for at least 15 minutes. - Prepare Your Cooking Vessel:
While oil heats, mix flour, paprika, garlic powder, onion powder, salt, and pepper in a separate bowl. - Assemble the Dish:
Remove chicken from buttermilk and dredge each piece in the flour mixture. Press well to adhere. Let rest 10 minutes. - Cook to Perfection:
Fry chicken in batches for about 4 to 5 minutes per side until golden brown and cooked through. - Finishing Touches:
Transfer fried tenders to the wire rack. Sprinkle with a pinch of salt while hot for extra flavor. - Serve and Enjoy:
Serve warm with your favorite dipping sauces like ranch, honey mustard, or buffalo.
Texture & Flavor Secrets
The crust is crispy and craggy, while the inside stays juicy and tender thanks to the buttermilk soak. A touch of seasoning in every layer means the flavor doesn’t stop at the surface — it carries all the way through.
Cooking Tips & Tricks
Even if it’s your first time frying, these tips have got you covered:
- Let the coated chicken sit for 5–10 minutes before frying.
- Use a thermometer to keep oil between 350–365°F.
- Don’t overcrowd the pan, or the tenders will steam instead of fry.
- Use tongs for flipping to keep the crust intact.
What to Avoid
Here’s how to sidestep common issues:
- Skipping the marinade: Your chicken won’t be as juicy or flavorful.
- Using wet flour: Always shake off excess buttermilk before dredging.
- Frying in cold oil: Leads to greasy, soggy tenders.
- Draining on paper towels: Makes the bottom soggy use a wire rack.
Nutrition Facts
Servings: 4
Calories per serving: 425
Note: These are approximate values.
Preparation Time
Prep Time: 15 minutes
Cook Time: 15 minutes
Total Time: 30 minutes
Make-Ahead and Storage Tips
Marinate the chicken a day ahead for deeper flavor. Once cooked, let tenders cool completely before storing in an airtight container. Reheat in the oven at 375°F to bring back the crisp. You can also freeze them after frying and reheat straight from frozen.
How to Serve Chicken Tenders
Pair them with waffle fries, coleslaw, or tuck them into a sandwich with lettuce and sauce. They’re also great sliced over a salad or tucked into wraps for lunchboxes.
Creative Leftover Transformations
Don’t let any go to waste. Here’s how to give leftovers a new life:
- Chop and toss into a Caesar or ranch salad.
- Layer into a tortilla with cheese for crispy chicken quesadillas.
- Reheat and serve with pancakes for a chicken-and-waffles breakfast.
Additional Tips
For even coating, use one hand for wet ingredients and the other for dry when dredging. Letting the chicken rest before frying is key to preventing the coating from falling off. And always taste your first batch so you can adjust seasoning if needed.
Make It a Showstopper
Serve your tenders stacked on a parchment-lined plate with a drizzle of sauce over the top and a sprinkle of fresh herbs. Add a ramekin of sauce on the side and a few pickle chips for a pop of color and texture.
Variations to Try
- Spicy Tenders: Add cayenne to the flour and serve with hot sauce.
- Baked Version: Bake at 425°F for 20 minutes on a wire rack.
- Parmesan-Crusted: Mix grated Parmesan into the flour.
- Gluten-Free: Use a gluten-free flour blend and double check all labels.
- Herb Crusted: Add dried Italian herbs to the dredge for a garden-fresh twist.
FAQ’s
Q1: Can I bake these instead of frying?
Yes, bake at 425°F on a rack for crispy results.
Q2: What can I use instead of buttermilk?
Try regular milk with lemon juice or vinegar.
Q3: How do I keep them crispy after frying?
Drain on a wire rack and avoid covering them immediately.
Q4: Can I use chicken thighs?
Yes, but slice them thin to mimic tender shape and texture.
Q5: Can I freeze them?
Absolutely. Freeze after frying and reheat in the oven.
Q6: How long can they stay in the fridge?
Up to 3 days in an airtight container.
Q7: What dipping sauces go best?
Ranch, honey mustard, barbecue, or buffalo sauce.
Q8: Do I need a thermometer for frying?
It helps a lot to maintain the right temperature.
Q9: Can I prep these in advance?
Yes, marinate and coat in advance, then fry when ready.
Q10: What oil is best for frying?
Vegetable, canola, or peanut oil are all great options.
Conclusion
There’s just something irresistible about a hot, crunchy chicken tender that’s perfectly seasoned and made with love. Once you try this homemade version, you might never go back to store-bought. Trust me, they’re worth every bite and then some.
PrintChicken Tenders
Crispy on the outside, juicy on the inside — these homemade chicken tenders are easy, flavorful, and totally addictive. Perfect for dipping, snacking, or turning into a meal.
Ingredients
- 1 ½ pounds chicken tenderloins
- 1 cup buttermilk
- 1 large egg
- 1 ½ cups all-purpose flour
- 1 teaspoon paprika
- 1 teaspoon garlic powder
- 1 teaspoon onion powder
- 1 teaspoon salt
- ½ teaspoon black pepper
- Vegetable oil for frying
Instructions
- Heat about 2 inches of vegetable oil in a deep skillet to 350°F. Place a wire rack over a baking sheet for draining.
- In a mixing bowl, whisk together the buttermilk and egg. Add chicken tenderloins and marinate for at least 15 minutes.
- In another bowl, combine flour, paprika, garlic powder, onion powder, salt, and pepper.
- Remove chicken from the marinade, letting excess drip off. Dredge each piece in the flour mixture, pressing firmly to coat. Let rest for 10 minutes.
- Fry chicken in batches for 4–5 minutes per side or until golden brown and cooked through. Do not overcrowd the pan.
- Transfer to the wire rack and sprinkle with a little extra salt while hot.
- Serve immediately with your favorite dipping sauce.
Notes
- Letting the coated chicken rest helps the breading stick better during frying.
- Use a thermometer to maintain oil between 350–365°F for best results.
- Drain on a rack instead of paper towels to keep the crust crispy.